⬅️ Previous - Intro to LangGraph
➡️ Next - LangGraph Writer-Critic Loop
In this lesson, you’ll build your first LangGraph project — a simple joke bot — to learn how to define state, create nodes, add conditional edges, and run a stateful workflow. No LLMs yet — just clean, inspectable graph logic to help you master the fundamentals.
Week GitHub Repository
Full Program GitHub Repository
📹 Lesson Video: Embedded Below
Before we dive into tools, agents, and LLMs, let’s master the fundamentals of LangGraph — how to build and run a graph-based workflow.
To keep things simple (and fun), we’ll build a joke bot that tells you jokes from different categories. There’s no LLM here — and that’s intentional. This example is not about building a useful chatbot. It’s about helping you:
LangGraph is typically used with agents and language models. But here, we’re skipping all that to focus on the core mechanics — so when we add complexity later, you’ll know exactly what’s happening under the hood.
You’ll learn how to:
By the end, you’ll have a running LangGraph app — and a clear mental model for how LangGraph systems work.
Before you dive into the project, take a quick look at the joke bot you’re about to build. This video demo walks through the full user experience — from choosing jokes to switching categories — so you can see how LangGraph drives the logic behind the scenes.
It’s short, fun, and gives you a clear picture of the project outcome.
Your project is a simple and playful joke-telling bot, built with LangGraph. We will be using the pyjokes library to fetch jokes - there are no LLM calls involved in this example.
Here’s how it works:
The bot keeps track of two key things:
You’ll build reusable functions as graph nodes, route dynamically based on your choices, and see how LangGraph evolves state across steps. By the end, you’ll understand how a graph-based workflow actually runs — not just in theory, but in code.
And yes, it might make you laugh too 😄
Let’s get started.
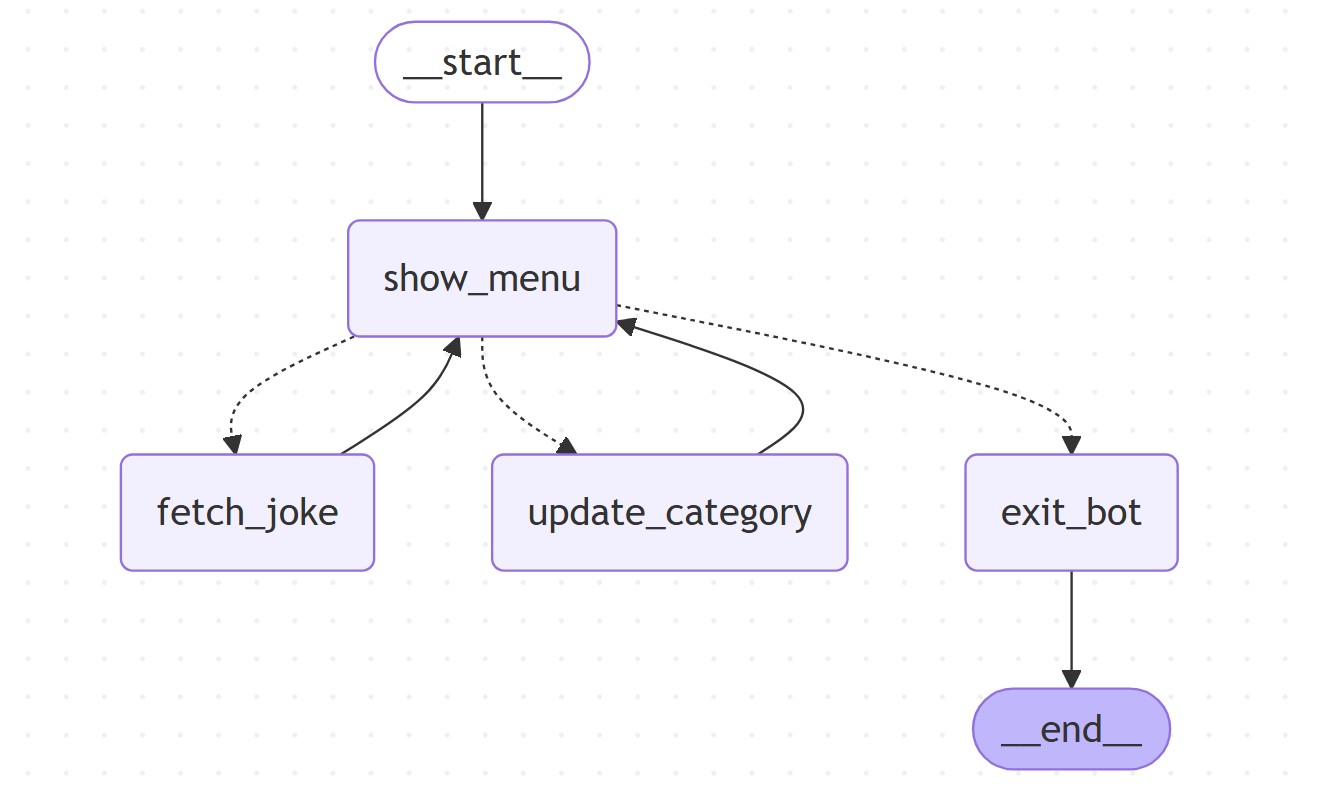
Before we write any code, let’s take a look at the structure of the graph you’ll be building.
Here’s the Mermaid diagram that shows how the nodes connect:

This flow might look simple — and that’s the point. It’s meant to teach you the LangGraph mechanics with just enough logic to be interesting.
Let’s walk through the key parts:
🟪 show_menu
This is the main control node. Every time it runs, it shows the user three options:
Based on the user’s input, the graph routes to one of the next nodes.
🟩 fetch_joke
This node fetches a joke from the selected category and displays it. After showing the joke, it routes back to show_menu so the user can make another choice.
🟦 update_category
This lets the user select a new category of jokes (like “chuck” or “neutral”). After the update, it also routes back to the menu.
⛔ exit_bot
When the user chooses to quit, this node says goodbye and ends the graph by routing to the special __end__ node.
The entire system loops until the user explicitly chooses to quit.
This setup gives us a great little sandbox to practice:
Now that you’ve seen the structure, let’s start building it step by step.
In the last lesson, you learned the five steps to building any LangGraph system:
We’ll follow the same structure here — but this time, we’re doing it hands-on.
We start by declaring what the bot should remember — the current joke category, what the user just selected, and a list of jokes already told. We also add a quit flag for graceful exit.
class Joke(BaseModel):
    text: str
    category: str

class JokeState(BaseModel):
    jokes: Annotated[List[Joke], add] = []
    jokes_choice: Literal["n", "c", "q"] = "n" # next joke, change category, or quit
    category: str = "neutral"
    language: str = "en"
    quit: bool = False
We use Annotated with add to automatically append new jokes to the list.
Note that the reducer for jokes will append new jokes to the existing list, allowing us to keep track of what’s been told so far. For the other fields, we are using default reducer which simply overwrites the current value. This will be handled by LangGraph automatically.
Each node is just a function that takes in the state and returns updates. We have four simple nodes:
Here's the show_menu function that displays the menu and gets user input:
def show_menu(state: JokeState) -> dict:
    user_input = input("[n] Next  [c] Category  [q] Quit\n> ").strip().lower()
    return {"jokes_choice": user_input}
Now, let's implement fetch_joke, which pulls a joke from the pyjokes library and returns it:
def fetch_joke(state: JokeState) -> dict:
    joke_text = get_joke(language=state.language, category=state.category)
    new_joke = Joke(text=joke_text, category=state.category)
    return {"jokes": [new_joke]}
Next, we implement the update_category function, which allows the user to change the joke category:
def update_category(state: JokeState) -> dict:
    categories = ["neutral", "chuck", "all"]
    selection = int(input("Select category [0=neutral, 1=chuck, 2=all]: ").strip())
    return {"category": categories[selection]}
For our last node, we implement the exit_bot function, which will be called when the user chooses to quit:
def exit_bot(state: JokeState) -> dict:
    return {"quit": True}
We also define a router function to decide which node to go to next. This will serve as a conditional edge based on the user's choice:
def route_choice(state: JokeState) -> str:
    if state.jokes_choice == "n":
        return "fetch_joke"
    elif state.jokes_choice == "c":
        return "update_category"
    elif state.jokes_choice == "q":
        return "exit_bot"
    return "exit_bot"
You might have noticed that none of our node functions mutate the state directly. Instead, each node simply returns a dictionary of field updates.
This is by design.
LangGraph handles state management for you — it takes the updates you return and produces a new state object behind the scenes. This means:
{field_name: new_value}.This declarative approach keeps your logic clean, predictable, and easy to debug — especially as your graphs grow in complexity.
So: just return what changed, and let LangGraph handle the rest.
We will use a builder function to create our graph. This is where we define the structure of our workflow and register all the nodes we created earlier.
def build_joke_graph() -> CompiledStateGraph:
    workflow = StateGraph(JokeState)

    workflow.add_node("show_menu", show_menu)
    workflow.add_node("fetch_joke", fetch_joke)
    workflow.add_node("update_category", update_category)
    workflow.add_node("exit_bot", exit_bot)

    workflow.set_entry_point("show_menu")

    workflow.add_conditional_edges(
        "show_menu",
        route_choice,
        {
            "fetch_joke": "fetch_joke",
            "update_category": "update_category",
            "exit_bot": "exit_bot",
        }
    )

    workflow.add_edge("fetch_joke", "show_menu")
    workflow.add_edge("update_category", "show_menu")
    workflow.add_edge("exit_bot", END)

    return workflow.compile()
This function instantiates the StateGraph, registers our nodes, sets the entry point, and defines the routing logic. We are also compiling the graph at this point, which prepares it for execution.
Once everything is wired up, we can have the main function to run the graph. This is where we invoke the graph with an initial state and start the interaction loop.
def main():
    graph = build_joke_graph()
    final_state = graph.invoke(JokeState(), config={"recursion_limit": 100})
That’s it — your first full LangGraph in action.
In the next section, we’ll run it and show what it looks like in action.
Now that everything’s wired up, let’s see your LangGraph joke bot in action.
We’ve kept the lesson code clean and minimal, but the actual project includes a few extra print statements for a better user experience — you’ll find those in the repo if you want to add some flair.
When you run the script, you’ll get a simple but functional interactive menu. You can:
⚠️ Yes, the UI is extremely... minimalist. We’re here to learn LangGraph, not win design awards 😅
Here’s what a sample session might look like:
🎉==========================================================🎉
    WELCOME TO THE LANGGRAPH JOKE BOT!
    This example demonstrates agentic state flow without LLMs
============================================================


🚀==========================================================🚀
    STARTING JOKE BOT SESSION...
============================================================
🎭 Menu | Category: NEUTRAL | Jokes: 0
--------------------------------------------------
Pick an option:
[n] 🎭 Next Joke  [c] 📂 Change Category  [q] 🚪 Quit
User Input: n

😂 3 Database Admins walked into a NoSQL bar. A little while later they walked out because they couldn't find a table.

============================================================
🎭 Menu | Category: NEUTRAL | Jokes: 1
--------------------------------------------------
Pick an option:
[n] 🎭 Next Joke  [c] 📂 Change Category  [q] 🚪 Quit
User Input: n

😂 Hardware: The part of a computer that you can kick.

============================================================
🎭 Menu | Category: NEUTRAL | Jokes: 2
--------------------------------------------------
Pick an option:
[n] 🎭 Next Joke  [c] 📂 Change Category  [q] 🚪 Quit
User Input: q

🚪==========================================================🚪
    GOODBYE!
============================================================

🎊==========================================================🎊
    SESSION COMPLETE!
============================================================
    📈 You enjoyed 2 jokes during this session!
    📂 Final category: NEUTRAL
    🙏 Thanks for using the LangGraph Joke Bot!
============================================================
You can see the full loop in action: input → state update → reroute → repeat.
Notice how:
It’s simple, predictable, and easy to extend — which is exactly what you want in the early stages of building agentic workflows.
Let’s take it further.
Now that you've built your first LangGraph system, it's time to flex those new muscles. Try extending the joke bot with a few extra features. These will push you to think about state design, routing, and node logic — just like you’ll need to do in real agentic systems.
Here are a couple of fun upgrades — and a bonus challenge for those ready to bring in an LLM:
pyjokes supports multiple languages (like en, de, es, etc.). Let’s make our bot multilingual!
What to do:
JokeState called languageupdate_language) that lets the user pick a language[l] 🌐 Change Language) and update the routing logicLet’s give the user a way to reset the joke history.
What to do:
[r] 🔁 Reset Joke Historyreset_jokes) that clears the list of past jokespyjokesIn the next lesson, we’ll replace pyjokes with an actual LLM call — but if you want to try it yourself now, here’s the challenge:
What to try:
Swap the fetch_joke node logic with an LLM call (OpenAI, Anthropic, Mistral, etc.)
Design a prompt that returns a single joke for the selected category
Use category to control the theme:
"programmer" → general dev jokes"chuck" → Chuck Norris jokes"dad" → classic dad jokes (or whatever your LLM supports)We’ll walk through one possible implementation in the next lesson — but if you're ready to explore early, go for it.
You just built and ran your first LangGraph project — no LLMs, no agents, just clean graph logic.
Along the way, you:
And thanks to LangGraph, you didn’t have to worry about:
It’s not the prettiest UI — but that wasn’t the point.
You now know how LangGraph workflows really run — and how to build them from the ground up.
Next up: LangSmith — a tool that helps you debug, trace, and improve your graph-based systems.
Onward.
⬅️ Previous - Intro to LangGraph
➡️ Next - LangGraph Writer-Critic Loop