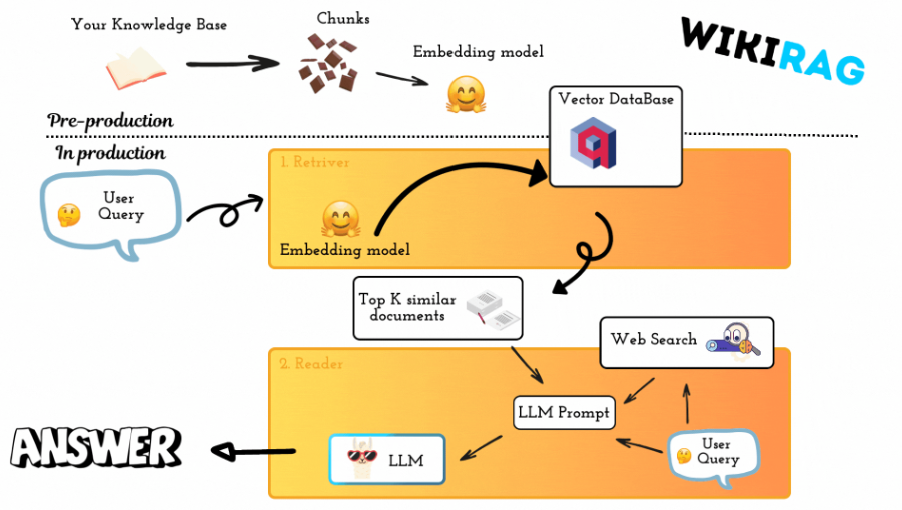
WikiRag is a Retrieval-Augmented Generation (RAG) system designed for question answering, it reduces hallucination thanks to the RAG architecture. It leverages Wikipedia content as a knowledge base.
ollama
└──WikiRag
   ├─── `app`: the streamlit app
   ├─── `conda`: all the conda environments
   ├─── `data`:  all the data
   ├─── `images`: all the images if Any
   ├─── `notebooks`: all the notebooks if Any
   ├─── `vectorization_pipeline`: all the vectorization pipeline scripts
   ├─── `wiki_rag`: the WikiRag class
   ├─── `.gitignore`
   ├─── `README.md`
   ├─── `wikipedia_urls.txt`: the txt file with all the urls
   └─── `requirements.txt`
The WikiRag class provides a framework for building a conversational AI system that leverages Wikipedia articles as its knowledge base. It integrates various components like Ollama, HuggingFaceEmbeddings, and Qdrant to create a powerful system capable of answering user queries using context retrieved from Wikipedia.
HuggingFaceEmbeddings is used to convert queries into embeddings, which are then matched against the vectors in the Qdrant collection.Ollama model.DuckDuckGo search engine to find additional relevant information on the web.To test this library it is possible to use the notebook notebooks/wiki_rag.ipynb.
from wiki_rag import WikiRag

# Initialize the WikiRag class
wiki_rag = WikiRag(
    qdrant_url="http://localhost:6333",
    qdrant_collection_name="olympics"
)
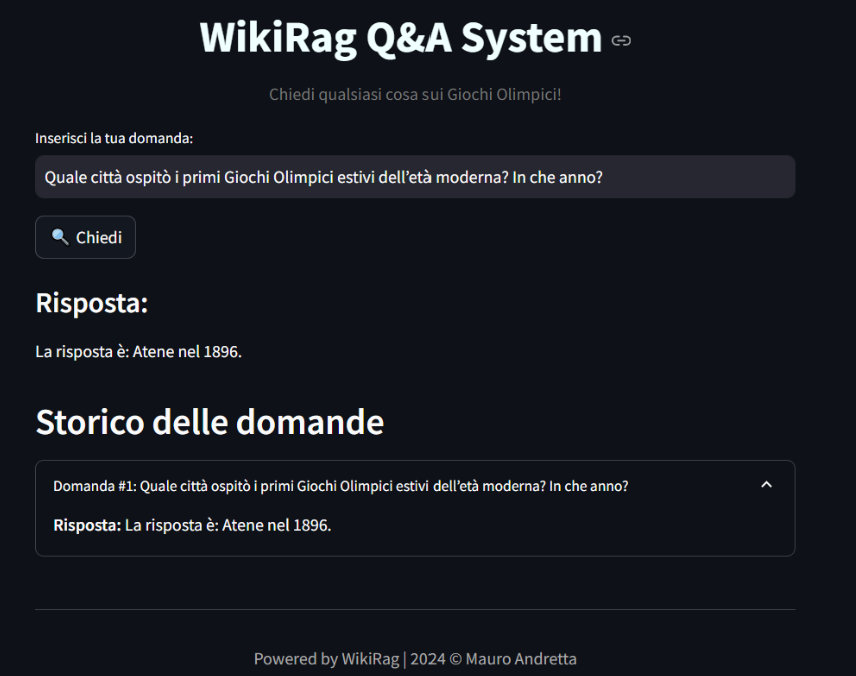
response = wiki_rag.invoke("Quale città ospitò i primi Giochi Olimpici estivi dell’età moderna? In che anno?")
print(response)
# La città che ospitò i primi Giochi Olimpici estivi dell'età moderna fu Atene, in Grecia, nel 1896.
To ensure the effectiveness of the WikiRag system, we provide a comprehensive evaluation process, which can be found in the notebook evaluate_wiki_rag.ipynb. This notebook guides you through the evaluation of the main components of the RAG (Retrieval-Augmented Generation) application, focusing on generation aspects.
The main elements to evaluate in a RAG application like WikiRag are:
Retrieval: This involves experimenting with different data processing strategies, embedding models, and other factors to see how they impact the retrieval performance. The goal is to identify the settings that retrieve the most relevant documents from the knowledge base.
Generation: Once the best retrieval settings are determined, the next step is to experiment with different large language models (LLMs) to find the best model for generating accurate and contextually relevant answers.
In the evaluate_wiki_rag.ipynb notebook, the evaluation is centered on the overall generative performance of the WikiRag class, with particular focus on the following aspects:
Answer Semantic Similarity: This metric measures how semantically similar the generated answer is to the ground truth. A higher score indicates that the model's answer closely aligns with the intended meaning of the correct answer.
Answer Correctness: This metric evaluates the factual accuracy of the generated answer in comparison to the ground truth. It assesses whether the information provided by the model is correct.
To facilitate this evaluation, we use the Ragas library, which provides a robust framework for assessing the quality of RAG systems.
By following the evaluation steps outlined in the notebook, you can systematically assess the performance of the WikiRag system, identify areas for improvement, and fine-tune the model to better meet your application's needs.
The WikiRag system demonstrates improved performance when web search is used to expand the context for answering queries:
Without Web Search:
With Web Search:
These metrics indicate that incorporating web search significantly enhances both the semantic similarity and factual accuracy of the generated answers, making the system more effective in providing relevant and correct responses.
Without Web Search:
With Web Search:
As it is possible to denote creating a tailored prompt is an essential step in all the GenAI tasks, indeed, techniques of prompt engineering are fundamentals to improve the performances and capabilities of AI systems.
To enhance the context available for generating responses, the WikiRag class includes a method to search the web when the knowledge base does not provide sufficient information. This method uses DuckDuckGo to perform the search and integrates the additional context into the response generation process. The web search is the default behavior, to disable the web search initilaise the WikiRag object as:
from wiki_rag import WikiRag

# Initialize the WikiRag class
wiki_rag = WikiRag(
    qdrant_url="http://localhost:6333",
    qdrant_collection_name="olympics",
    expand_context=False
)
The WikiRag Q&A System is an interactive web application built using Streamlit that allows users to ask questions based on the underlying KB, accurate answers generated by the WikiRag class.
To run the WikiRag Q&A System Streamlit application, follow these steps:
Install Dependencies:
Ensure that Streamlit and all other required packages are installed in your environment. You can leverage both:
conda/wiki_rag.yaml file to create a conda env with all the packages to run the apprequirements.txt file as: pip install -r requrement.txtRun the application:
Move in the app folder and run:
cd app
streamlit run app.py
The Vectorization Pipeline is a series of automated steps to process Wikipedia pages, split the content into manageable chunks, generate embeddings for each chunk, and load them into a Qdran vector database. This pipeline is essential for transforming raw Wikipedia data into a structured format that can be used for advanced search and retrieval tasks.
Before running the pipeline, ensure you have the following:
The pipeline consists of three main steps:
SentenceTransformer.document_acquisition.pywikipedia_chunker.pyqdrant_loader.pyremember to activate Qdrant to be able to successfully load the qdrant points in the vector database.
vectorization_pipeline/tasks.py.For a more flexible and cross-platform solution, you can use a Python script with the Invoke library:
Install Invoke or use directly the wiki_rag.yaml to create the wiki_rag environment which already contains all the necessary packages to execute the documents vectorization pipeline:
pip install invoke
Run the pipeline with the following command (it is suggested to run it from the root directory of this project to avoid problems with the paths):
python -m invoke --search-root vectorization_pipeline full-vectorization-pipeline
It is also possible to personalize the params of the vectorization pipeline, see vectorization_pipeline/tasks.py for how to do that.
To load the chunks into Qdrant, you need an instance of Qdrant up and running. Qdrant is a vector database optimized for handling embeddings and can be used for similarity search, nearest neighbor search, and other tasks.
To set up Qdrant locally or in the cloud, follow the instructions in the Qdrant section.
This Vectorization Pipeline simplifies the process of extracting, processing, chunking, and storing Wikipedia data into a Qdrant vector database. By following the steps outlined in this section, you can quickly deploy the pipeline and begin using Qdrant for advanced search and retrieval tasks.
Qdrant is an open-source, high-performance vector database designed for handling large-scale search and similarity queries with ease. This section explains how to set up Qdrant locally using Docker.
1.1 Once Installed is it possible to test it running the command below:
docker version
Pulling Qdrant image hosted in the Docker Hub:
docker pull qdrant/qdrant
Run the qdrant instance locally, run the command below in your terminal. It
is suggested to run the below command in the root directory of this repository.
docker run -p 6333:6333 -v $(pwd):/qdrant/storage qdrant/qdrant
Might happen to receive this error message:
docker: invalid reference format: repository name
The error you're encountering is due to the incorrect syntax for specifying the volume when running Docker in a Windows environment. The . symbol, which represents the current directory in Unix-based systems, is not directly compatible in this context when passed to Docker on Windows.
pwd
The output might look something like this:
/c/your_path/WikiRag
Replace /c/ with C:/, and ensure that the slashes (\) are backslashes (/)
C:/your_path/WikiRag
Now you can use the correct absolute path instead of the variable $(pwd) to launch the Qdrant vectorstore.
docker run -p 6333:6333 -v C:/your_path/WikiRag:/qdrant/storage qdrant/qdrant
 2024-08-23 10:02:09            _                 _
 2024-08-23 10:02:09   __ _  __| |_ __ __ _ _ __ | |_
 2024-08-23 10:02:09  / _` |/ _` | '__/ _` | '_ \| __|
 2024-08-23 10:02:09 | (_| | (_| | | | (_| | | | | |_
 2024-08-23 10:02:09  \__, |\__,_|_|  \__,_|_| |_|\__|
 2024-08-23 10:02:09     |_|
 2024-08-23 10:02:09
 2024-08-23 10:02:09 Version: 1.11.0, build: 63363956
 2024-08-23 10:02:09 Access web UI at http://localhost:6333/dashboard
 2024-08-23 10:02:09
 2024-08-23 10:02:09 2024-08-23T08:02:09.168280Z  INFO storage::content_manager::consensus::persistent: Initializing new raft state at ./storage/raft_state.json
 2024-08-23 10:02:09 2024-08-23T08:02:09.292041Z  INFO qdrant: Distributed mode disabled
 2024-08-23 10:02:09 2024-08-23T08:02:09.293079Z  INFO qdrant: Telemetry reporting enabled, id: 77988a47-9fcc-4dc7-8ea3-f63a6ee99d05
 2024-08-23 10:02:09 2024-08-23T08:02:09.304312Z  INFO qdrant::actix: TLS disabled for REST API
 2024-08-23 10:02:09 2024-08-23T08:02:09.305016Z  INFO qdrant::actix: Qdrant HTTP listening on 6333
 2024-08-23 10:02:09 2024-08-23T08:02:09.305072Z  INFO actix_server::builder: Starting 19 workers
 2024-08-23 10:02:09 2024-08-23T08:02:09.305083Z  INFO actix_server::server: Actix runtime found; starting in Actix runtime
 2024-08-23 10:02:09 2024-08-23T08:02:09.305291Z  INFO qdrant::tonic: Qdrant gRPC listening on 6334
 2024-08-23 10:02:09 2024-08-23T08:02:09.305344Z  INFO qdrant::tonic: TLS disabled for gRPC API
Do note that the TLS is disabled and so you can access the dashboard on the http://localhost:6333/dashboard. If you were to visit this url then you can view the qdrant dashboard.
notebooks\test_qdrant_client.ipynbollamaThis section guides you through the process of downloading a LLaMA (Large Language Model) model locally using the ollama CLI. The ollama CLI provides an easy way to manage, download, and run large language models on your local machine.
Before you begin, ensure that you have the following:
ollama CLI installed on your system. You can download and install it from the official Ollama website.ollamaTo install ollama, follow these steps:
Download and Install ollama:
Verify Installation:
After installation, open your terminal (Command Prompt, PowerShell, or Bash) and verify that ollama is installed correctly by running:
ollama --version
Once ollama is installed, you can use it to download a LLaMA model locally.
List Available Models:
To see the available models for download, you can use the following command:
ollama list
You can also refer to the github page, which lists all the avaialable models.
Download a Specific LLaMA Model:
To download a specific LLaMA model, use the ollama pull command followed by the model's name. For example, to download the LLaMA3.1-8B model:
ollama pull llama3.1
This command will download the model to your local machine, making it available for use in your projects.
Verify the Download:
After the download is complete, you can verify that the model has been downloaded by listing the installed models:
ollama list installed