1. Abstract
Today, as businesses and organizations continue to digitize their operations and assets, there is an ever increasing need to fortify security measures against criminal activities, and here comes the importance of anomaly detection, which is a vital subset of artificial intelligence and machine learning that focuses on identifying rare, unusual, or abnormal patterns in data. In the context of theft detection, it involves scrutinizing surveillance imagery to detect any unauthorized or suspicious activities, thus safeguarding against potential intrusions and security breaches.
2. Introduction
The system incorporates facial recognition to grant user access. When a user stands in front of the camera, it captures their image, and an algorithm identifies the person. If authorized, access is granted. Additionally, the system detects intrusions by continuously recording the field of view and comparing images to spot anomalies, such as thefts. If a detection occurs, alerts are sent to the users. Finally, a user friendly interface enables user registration and management, along with a clear display of event logs.
In this report, we delve into the realm of anomaly detection using computer vision, with a primary focus on its application in intruder detection and theft prevention. By harnessing the power of machine learning algorithms and image processing techniques, this project aims to deliver a robust and intelligent solution that identifies anomalies in real-time video streams, enabling proactive responses to potential security threats.
3. Project Architecture:
– User Interface: It represents the interface through which authorized users can interact with the system. The user interface allows the registration of the authorized users informations and faces, the management of access permissions, and the viewing of event logs.
– Facial Recognition Module: This part of the system implements the facial recognition algorithm based on OpenCV and Python. It is responsible for capturing the user's face image, analyzing the image, and identifying the authorized person.
– Anomaly Detection Module: The anomaly detection module also uses OpenCV and Python libraries to monitor the camera's field of vision in real-time. It compares recorded images with learned models to detect anomalies, such as thefts or unauthorized intrusions.
– Database: A database is used to store information related to registered users, their faces, and event logs. This allows for access permission management, storing data required for facial recognition, and keeping track of anomaly detection activities.
– Authorization Management: This part of the system handles access permissions for each user. It verifies if the user is authorized based on their face registered in the database.
– Notification System: When an anomaly is detected, the system automatically sends email alerts to concerned users, informing them of the incident in real-time.
4. Employee Data Management Interface:

The interface design is intuitively structured allowing the input of employee details, it is characterized by a number of functions dedicated for data creation, registration and validation

4.1 createData() Function:
The function createData is triggered upon pressing the "Photo" button. When the "Photo" button is clicked, the createData function is invoked, facilitating the process of capturing employee data and facial images, and subsequently storing the data in the SQLite database.
Face detection:
The face detection process will be implemented using Haar cascade classifier, which is an algorithm within OpenCV, that distinguishes images containing a specific object (such as a face) from images lacking that object (non-faces).
Initially, a considerable number of face and non-face images were provided to this classifier. Using machine learning techniques, the classifier underwent training to identify human faces. It subsequently extracted Haar Features from these images and saved them in an xml file.
— Haar features:
Basically, in the context of face detection, the classifier seeks out key facial attributes like eyes, nose, lips, forehead, and eyebrows, because, as we all know, these features occupy similar positions on the face no matter how different looks people could have.
Haar features are patterns of white and black pixels found on the face. Also, we know that the grayscale image of a face usually doesn't consist solely of pure white and black pixels. However, here we're considering an ideal scenario where white pixels represent lighter shades and black pixels represent darker shades.
In the next provided image, the eyebrows contain darker pixels while the forehead comprises lighter ones. This concept applies similarly to the eyes, nose, and lips.
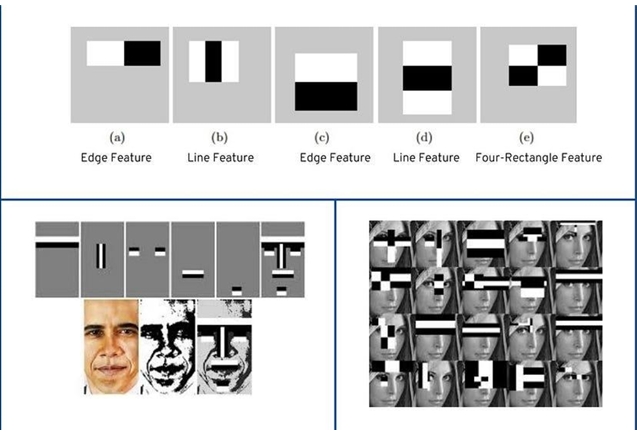
Now, if a new input image is provided to the classifier, it compares the Haar Features from the xml file with the input image. If the image successfully matches all the stages of Haar feature comparison, it's identified as a face; otherwise, it's not recognized as a face.
— Image pyramid:
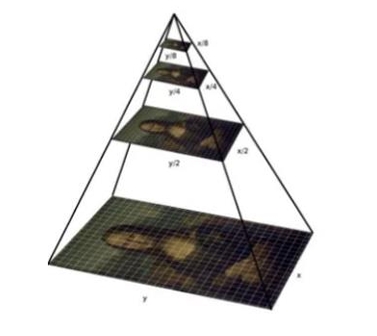
The image pyramid technique is a common approach used in object detection to handle objects of varying sizes within an image. Given that the classifier model was trained using images of a specific face size, its proficiency lies in recognizing faces of identical dimensions to those used during training. The concern arises when faced with images featuring faces smaller or larger than the ones used in training. To address this issue, we resort to employing various scales of our input image using the image pyramid technique, which creates scaled-down versions of the original image by resizing it. Each resized version represents a different scale level in the pyramid.
— Sliding window:
To detect objects at different scales and positions in the image, a sliding window approach is used. The window is moved across the image in different scales and positions, and at each step, the cascade of classifiers makes a decision about whether an object is present within the window.

Considering that the majority of an image typically doesn't contain faces, applying all Haar features to every individual window (regions without faces) can be time-consuming. To address this, a cascade of classifiers is employed.
This cascade involves several stages of filters, with the Haar features organized into these distinct classifier stages.
With each shift of the sliding window, the comparison is conducted through the cascade of classifiers in a step-by-step manner. If a window doesn't pass the initial stage of Haar feature comparison, the classifier will swiftly reject it as a potential face. Consequently, there's no need to carry out comparisons with the remaining stages of Haar feature analysis, and the process moves on to the next window.
4.2 validate() Function:
The function Validate is triggered upon pressing the "Validate" button. When the "Validate" button is clicked, the validate function commences its operation, undertaking the responsibility of training the facial recognition model. This model is trained based on the facial images garnered earlier.
LBPH recognizer:
LBP is a texture descriptor that captures local patterns in an image. For each pixel in a grayscale image, compare its intensity with the intensities of its neighboring pixels. Represent the pattern formed by these comparisons as a binary number. This binary pattern is the Local Binary Pattern for that pixel. Then, this binary pattern is converted into a decimal value.

After Computing LBPs for each pixel, we have a new image which represents better the characteristics of the original image.
Since the facial image is divided into local regions and texture descriptions are extracted from each region independently, the possible LBP values are divided into a set of bins with the count of how many times each LBP value occurs in each face image. This generates a histogram for each image, representing the distribution of different texture patterns within the image.
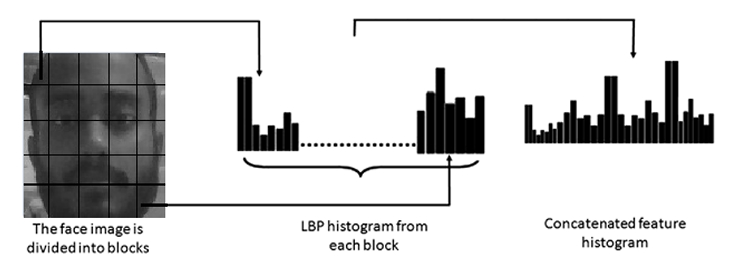
Now, all we have left to do is to train the recognizer, the training process involves creating histograms for each face image using the LBPs calculated earlier. Associate each histogram with the corresponding label of the person in the image. The recognizer uses these histograms to learn the unique texture patterns associated with each person's face.
4.3 on_closing() Function:
The function on_closing() is triggered upon pressing the "x" button nestled within the window's upper right corner. When the "x" button is clicked, the on_closing function manages the closure of the application window while employing a conditional logic that the window can’t be closed unless the "Validate" button has been already clicked to make sure that the validation process is completed every time new facial images are captured.
5. Intruder Detection:
5.1 Haar Cascade Classifier:
A Haar Cascade classifier is a machine learning-based object detection method used to identify objects or features within images or video streams. It was introduced by Viola and Jones in their 2001 paper "Rapid Object Detection using a Boosted Cascade of Simple Features." This technique is particularly well-suited for detecting objects with distinct visual patterns, such as faces. The CascadeClassifier('haarcascade_frontalface_default.xml') is a component of the OpenCV library, it is part of the Haar Cascade Classification used specifically for detecting frontal faces in images or video streams.
In this context, CascadeClassifier('haarcascade_frontalface_default.xml') is used to load a pretrained cascade classifier specifically designed to detect frontal faces. The XML file 'haarcascade_frontalface_default.xml' contains the information needed to define the Haar-like features and the classifier stages for detecting frontal faces in images or video frames.
When the code processes video frames, it utilizes this cascade classifier to scan the frames for regions that resemble frontal faces. Detected face regions are then marked and used for facial recognition using the LBPH Face Recognizer.

5.2 LBPH Face Recognizer:
The LBPH Face Recognizer is a component of the OpenCV library used for face recognition. It stands for Local Binary Pattern Histogram (LBPH) Face Recognizer.
This algorithm is employed to recognize and classify faces in images or video frames based on their unique features and patterns.
5.3 Face Recognition:
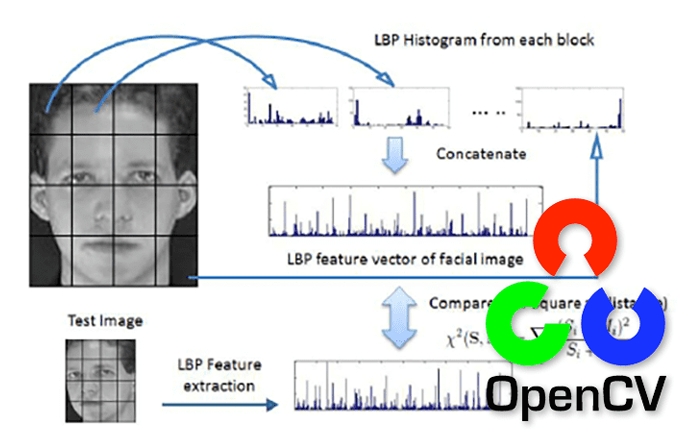
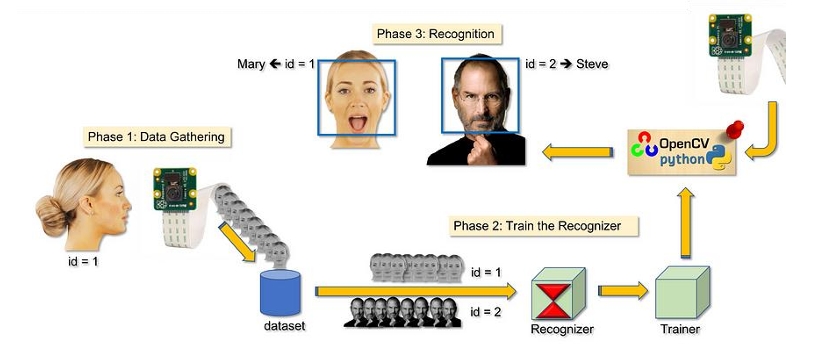
In this step, the recognizer algorithm has been already trained on the gathered dataset where each image is represented by its equivalent created histogram. So, given an input image, it goes through all the steps that we have gone through earlier to create a histogram which represents this image.
To locate the most matching image for the input image, the algorithm computes the Local Binary Pattern (LBP) histogram for the detected face. Then, it proceeds to compare this histogram with the histograms of known individuals from the training dataset using the well known Euclidean distance method, using the following formula:
Following this comparison, the algorithm's output is the ID of the image with the most analogous histogram. Additionally, the algorithm provides the computed distance, serving as a 'confidence' metric. This metric is then subject to a threshold which, in our case, has the value of 70. When the computed distance surpasses the threshold, the detected face is categorized as unknown. Conversely, if it falls below this threshold, it's assigned to the known individual with the closest match.
The recognition result is represented by the label assigned to the detected face, disclosing the identity of the recognized individual, while any similarity score over the threshold results in the face being labeled as unknown.
5.4 Employee Daily Records:
The cornerstone of employee daily records management lies in the interaction with SQLite databases to obtain a comprehensive list of employee IDs, crucial for seamless recognition and record updates. Simultaneously, another database serves as a dedicated repository for entrance and exit records, accommodating the intricate web of employee attendance tracking.

6. Stolen Object Detection:
6.1 Structural Similarity:
Skimage.metrics is a module from the scikit-image library, which is a collection of algorithms for image processing in Python. The module contains various metrics and functions for measuring the similarity or dissimilarity between images.
Structural similarity, often referred to as SSIM (Structural Similarity Index), is a function within the skimage.metrics module that computes the structural similarity index between two images. Structural similarity is a widely used metric in image processing that measures the similarity between two images, it’s a measure that quantifies how much the structural patterns in one image resemble those in another image.
The index considers both global and local structural information in the images. The higher the structural similarity index between two images, the more similar their structural patterns are.
The structural similarity index takes into account various aspects of an image's structure, to provide a quantitative value indicating how similar the images are to each other, the key considered components are:
– Luminance: SSIM compares the luminance of corresponding pixels in the images. Luminance is a measure of brightness. This aspect helps capture changes in lighting conditions.
– Contrast: Contrast refers to the difference between the light and dark areas of an image. SSIM evaluates the contrast similarity between the images.
– Structure: The structure component assesses the spatial arrangement of pixels. It takes into account the patterns and textures present in the images.
The Structural Similarity Index (SSIM) is computed by comparing three main components of two images: luminance, contrast, and structure, it returns a value between -1 and +1, the value of -1 indicating that both images are very similar, and the value of +1 indicating that both images are very different, these values are often adjusted to be in the range [0,1], where the extremes hold the same meaning.
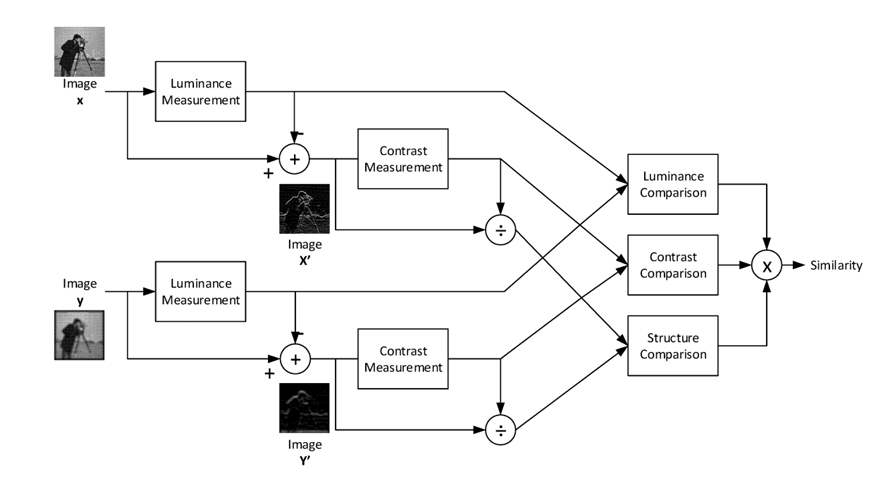
— Luminance comparison: Calculate the mean (average) luminance (brightness) of both images. This is usually done using a Gaussian filter to reduce noise using this formula:
Which leads to calculate luminance comparison:
— Contrast comparison: Calculate the contrast for both images. The contrast measures the difference in luminance between a pixel and its neighboring pixels using this formula:
Which leads to calculate contrast comparison:
— Structure comparison: Calculate the structure similarity. This involves comparing the local patterns and structures within the image. It's often done using a method called the "structural gradient," which measures the changes in image structure using this formula:
Which leads to calculate structure comparison:
And finally, the SSIM score is given by :
where α > 0, β > 0, γ > 0, and to simplify this expression, we assume that α = β = γ = 1 and C3 = C2/2, and we get:
The structural_similarity function is used to compare two grayscale frames and compute a structural similarity score. This score is then used as a measure of how similar the frames are. A low similarity score suggests a significant change between the frames, which in this case is used to detect a potential theft or unauthorized change in the scene captured by the camera.
6.2 Email Notification Alert:
Should a stolen object be detected, a proactive email notification will promptly be dispatched to the user, accompanied by an attached image. This image will be augmented with a highlighted rectangle encapsulating the identified stolen object, facilitating immediate recognition.
This process is orchestrated through a systematic algorithm:

1- Captures frames from a camera feed.
2- Compares consecutive frames using structural similarity to identify differences.
3- If a significant difference is detected, contours are found to identify the stolen object's location.
4- A bounding rectangle is drawn around the detected object.
5- An email is sent with a notification and an image of the scene showing the stolen item.
7. Theft Detection:
7.1 Motion Detection:
The motion detection process involves comparing consecutive video frames to identify regions with significant changes, which can indicate motion. This process is crucial for recognizing potential theft or intrusion scenarios.

The motion detection process serves as the gateway to identifying potential theft or intrusion scenarios. The process is well planned and organized, commencing with the capture and preprocessing of video frames from the webcam. Leveraging the OpenCV library, this stage involves the utilization of the cv2.cvtColor() function to seamlessly convert the captured frames into grayscale images, a critical step that standardizes the subsequent analysis.
The next step involves carefully comparing images to find differences, a fundamental technique that underpins the motion detection mechanism. The grayscale frames, having undergone the preprocessing phase, are carefully put together to unveil differences between consecutive frames. This comparative process relies on the cv2.absdiff() function, an integral tool for calculating the absolute difference in pixel values between corresponding pixels within the frames. This calculated difference becomes a window into the evolving scene, facilitating the potential identification of motion.
However, it's the subsequent thresholding operation that enhances the code's efficacy in capturing substantial deviations within the frames. The resultant difference image, originating from the prior step, is a pattern of varying intensity values. To extract substantial differences and eliminate unimportant variances, a binary thresholding technique is employed. This process is realized through cv2.threshold(), as it skillfully converts the difference image into a binary manifestation. This transformation means that pixels above a certain brightness level become white (255), while those below become dark (0), generating a striking contrast.
The heart of the motion detection process beats within the contour detection phase, a complex task facilitated by the cv2.findContours() function. These contours serve as a critical metric to assess whether motion has occurred between consecutive frames or not. Contours essentially represent closed curves that delineate objects or regions of interest within an image. In the context of motion detection, each contour corresponds to an area in the thresholded binary difference image where there is a significant change between consecutive frames.
When the algorithm captures frames, processes them, and extracts the contours, it quantifies the number of contours detected in a given frame. This count becomes an indirect measure of the number of distinct changes or disturbances that have taken place in the scene between those frames. Here's how this process allows the code to identify motion:
-
Normal Scenario (No Motion):
. In the absence of any substantial movement, the captured frames would have minimal differences between them.
. Consequently, the thresholding and contour detection process would likely yield very few, if any, contours.
. The contour count would remain low, implying that the scene is relatively stable and no significant motion has occurred. -
Motion Scenario (Motion Detected):
. In the presence of motion, the thresholded binary difference image would exhibit regions of elevated intensity, representing areas where significant changes have occurred.
. These regions of change correspond to objects, individuals, or other elements that have moved within the scene.
. The contour detection process would identify and trace the boundaries of these regions, resulting in a higher count of detected contours.
. The increase in contour count reflects the number of distinct areas where motion has been detected.
By analyzing the contour count, the code can infer whether motion has transpired between the consecutive frames. If the count exceeds a predetermined threshold, it's indicative of a scenario where substantial changes have occurred in the scene, suggesting the presence of motion. Conversely, a lower contour count suggests relative stability and the absence of noteworthy motion.
7.2 Alert Generation and Record Trigger:
Alert Generation and Record Trigger mechanisms respond comprehensively to potential theft scenarios. This process is initiated upon the detection of motion, a foundational element of security vigilance. However, it is the subsequent confirmation of theft that serves as the main trigger for this process, ensuring heightened vigilance and minimizing false positives.
The confirmation of theft following motion detection initiates a symphony of actions

Once motion is detected, the code undertakes additional analysis to ascertain the occurrence of theft. Upon confirmation, alerts are generated, and recordings are initiated to document the theft event comprehensively.
8. Conclusion
In the scope of this project, we have developed an anomaly detection system dedicated to individuals seeking to protect their private or work spaces, aiming to facilitate continuous surveillance of these areas. Our computer vision-based system has been designed for precision and user-friendliness.
By employing machine learning and computer vision techniques, we've been able to analyze the faces of people appearing in front of surveillance cameras, providing reliable information and aiding decision-making to identify intruders and detect their movements to prevent potential theft operations.
This report has comprehensively presented the project's overall context, project initiation, and the various system components. Each part has added new functionalities, ranging from the data management interface, followed by the development of the intrusion detection part, to the anomaly detection segment.
In conclusion, our project offers an intelligent solution to ensure the protection of valuable items, prevent theft possibilities, and effectively monitor various spaces securely, and it can be useful in different fields, such as commercial field, industrial field, or even for private use to ensure the security of homes, for example.
However, we wish to emphasize the potential for project expansion. With its extensible and modular structure, this solution presents the opportunity for a second version that could be functional for larger spaces with more objects, providing users with a greater chance of anomaly detection.
9. References:
[1] Bastien L. (Aout 28, 2023). Python : tout savoir sur le principal langage Big Data et Machine Learning. Dossiers, Intelligence artificielle. lebigdata.fr.
https://www.lebigdata.fr/python-langage
[2] Jitumani Bhagabati. (Jul 3,2019). Crowd based face detection using LBP. Medium.
https://medium.com/@jitumanicit/crowd-based-face-detection-using-lbp3e974b033e2c
[3] Kelvin Salton do Prado. (Nov 10, 2017). Face Recognition: Understanding LBPH Algorithm. Towards Data Science.
https://towardsdatascience.com/face-recognition-how-lbph-works-90ec258c3d6b
[4] Pranjal Datta. (Sep 3, 2020). All about Structural Similarity Index (SSIM). Medium.
https://medium.com/srm-mic/all-about-structural-similarity-index-ssim%20theory-code-in-pytorch-6551b455541
[5] Rashmi Ranu. (Sept 21,2020). Terminologies used in Face Detection with Haar Cascade Classifier: Open CV. Artificial Intelligence in Plain English.
https://ai.plainenglish.io/terminologies-used-in-face-detection-with-haar-cascade-classifier-open-cv-6346c5c926c
[6] Ravikiran A S. (Feb 16, 2023). What is SQLite? Everything You Need to Know. Simplilearn.
https://www.simplilearn.com/tutorials/sql-tutorial/what-is-sqlite
[7] Thomas CHABOUD. (Sep 9, 2019). OpenCV, c’est quoi ?. AXOPEN.
https://www.axopen.com/blog/2019/09/open-cv-cest-quoi/
[8] Vicky Mudeng, Minseok Kim & Se-woon Choe. (Apr 8, 2022). Applied sciences. MDPI.
https://www.mdpi.com/2076-3417/12/8/3754