
In today’s fast-paced world, mental health support is more essential than ever. Our breakthrough project harnesses cutting-edge agentic AI to deliver a 24/7 wellness assistant that bridges critical care gaps. With over 1 in 5 adults facing mental health challenges, our solution employs advanced emotion detection, proactive voice call interventions via Twilio, and dynamic, context-aware responses to transform traditional mental health support.
This project showcases how structured LLM workflows and chain-of-thought reasoning empower autonomous decision-making. Explore our modular design, scalable serverless architecture, and proactive engagement protocols—tools that enable a chatbot to deliver empathetic, real-time care while setting new standards in AI-driven mental health support.
In this tutorial, you'll learn how to build a wellness check-in application using OpenAI and Twilio Programmable Voice for Personalized Support. The application receives user input and analyzes it. If the analysis indicates the need for further support, the application automatically triggers a call to the user using Twilio Programmable Voice. It then delivers a pre-recorded and dynamic message tailored to their situation. This solution leverages modern technologies to provide mental health support by offering AI-powered responses and phone call functionality.
Twilio provides the Programmable Voice API for making voice calls, while OpenAI will generate responses based on the emotional state detected from user input.
By the end of this tutorial, you’ll be able to develop a functional mental health hotline application.
Prerequisites
-
Before you start building, you will need the following:
-
A Twilio account. If you don’t have an account, you can sign up for a free account.
-
An OpenAI account and API key creation. You can sign up for a new account here.
-
A basic understanding of Python.
With the above in place, you are ready to kick off.
Set up your developer Working Environment
Create a new directory for your project:
mkdir mental_health_resource_app
cd mental_health_resource_app
Create a virtual environment and activate it:
python -m venv venv
venv\Scripts\activate
Install the required packages:
pip install flask python-dotenv openai transformers torch
Create a .env file in your project directory to store sensitive information like API keys.
OPENAI_API_KEY=your_openai_api_key
TWILIO_ACCOUNT_SID=your_twilio_account_sid
TWILIO_AUTH_TOKEN=your_twilio_auth_token
TWILIO_PHONE_NUMBER=+1234567890
USER_PHONE_NUMBER=+1987654321
APP_URL=localhost:5000
This file stores sensitive credentials and configuration settings:
OPENAI_API_KEY: Your OpenAI API key used for generating responses.
TWILIO_ACCOUNT_SID and TWILIO_AUTH_TOKEN: Credentials required by the Twilio API.
TWILIO_PHONE_NUMBER: The number from which the calls will be made.
USER_PHONE_NUMBER: A sample user phone number for testing Twilio calls.
APP_URL: The base URL for your application (used when building the webhook URL for Twilio).
Usage:
The file is loaded by python-dotenv in app.py so that these values can be accessed via os.getenv() in your code.
Configure your Twilio Account
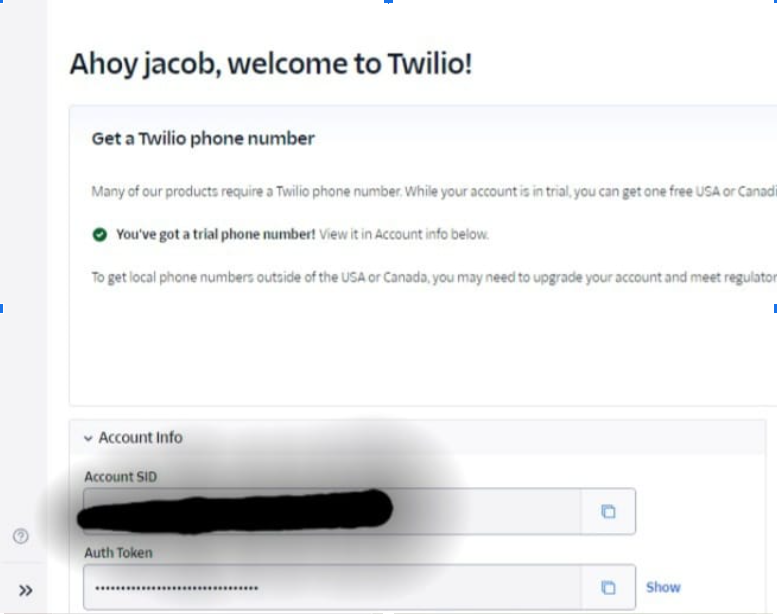
Navigate to find your Account SID and Auth Token within the Twilio Console. Copy and add them to the .env file. These credentials play a critical role in authenticating requests to Twilio's API endpoints. They establish the connection between your Flask application and Twilio's services, facilitating calls.
Set up a Twilio Phone Number
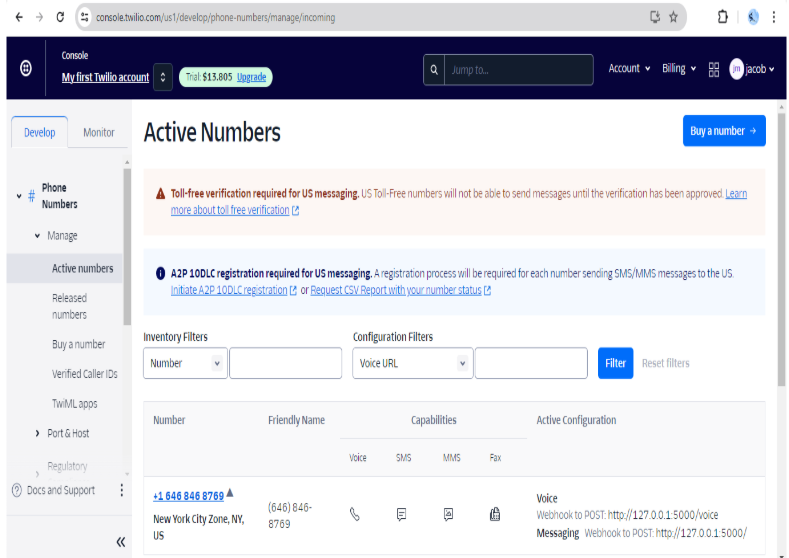
To set up a Twilio phone number, navigate to the left panel and select the Phone Numbers section on the Twilio console. Click on manage menu, then click on Active numbers.
Configure the Phone Number settings
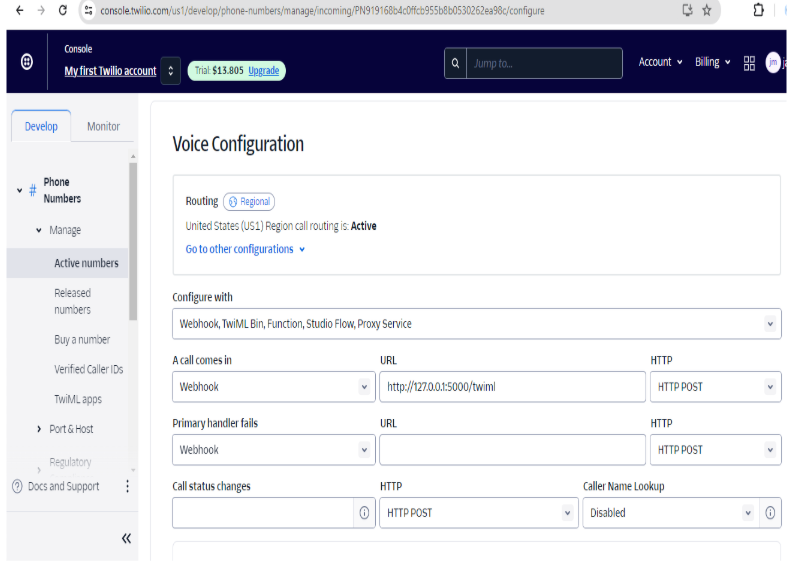
To configure your phone number, click on the phone number to allow you to access and modify its settings. Select the option Webhook and replace the default URL with http://localhost:5000/twiml where Twilio will send incoming call requests. This URL will be the endpoint in your Flask application that handles incoming calls. Select HTTP POST as the HTTP method for sending the webhook request to your Flask application. Make sure to accept the Emergency calling terms and conditions. After configuring the voice settings, save your changes.
Configure your OpenAI Account
To set up your OpenAI account and obtain an API key, visit the OpenAI website and log in to your OpenAI dashboard. Follow the provided instructions to generate an API key tailored to your account. Securely copy and add it to the .env file. It will be used for authentication of requests to the OpenAI API from your Flask application. It enables it to leverage OpenAI's natural language processing capabilities effectively.
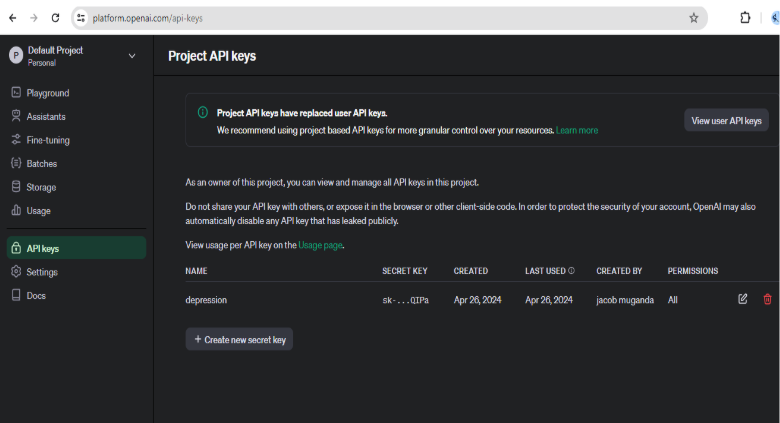
Click on Create new secret key. You are prompted to enter the name of the API key and then click again on Create new secret key to generate the API key. Copy the API key as shown in the image below and add it to your .env file under the OPENAI_API_KEY.
Build the Flask Application
Now let's actualize our lucrative idea by diving into the technical bit.
Create the Agent
Create a file and name it agent.py. Update it with the code below.
import os
import openai
from transformers import pipeline
from twilio.rest import Client

class MentalHealthSupportAgent:
    """
    Autonomous Mental Health Support Agent

    Components:
    - Sensor: Emotion classifier (BERT-based) that detects user emotional states
    - Processor: OpenAI LLM for response generation and intervention decision-making
    - Actuator: Twilio Programmable Voice for autonomous outreach
    - Memory: User interaction history and emotional state tracking
    """

    def __init__(self, user_id=None):
        self.user_id = user_id
        # Initialize the emotion classifier using Hugging Face's transformers library.
        self.classifier = pipeline("text-classification", model="bhadresh-savani/bert-base-uncased-emotion")
        # Initialize the OpenAI client with the API key from the environment.
        self.openai_client = openai.OpenAI(api_key=os.getenv('OPENAI_API_KEY'))
        # Initialize the Twilio client with credentials from environment variables.
        self.twilio_client = Client(os.getenv('TWILIO_ACCOUNT_SID'), os.getenv('TWILIO_AUTH_TOKEN'))
        # Store the Twilio phone number (used as the sender for voice calls).
        self.twilio_phone = os.getenv('TWILIO_PHONE_NUMBER')

    def sense(self, user_input):
        """Sensor: Detect emotion from user input"""
        # Uses the classifier to analyze the input text and return the top emotion and its score.
        classification = self.classifier(user_input)[0]
        return {
            'emotion': classification['label'],
            'confidence': classification['score'],
            'raw_input': user_input
        }

    def process(self, sensor_data):
        """Processor: Analyze emotional state and determine appropriate response"""
        emotion = sensor_data['emotion']
        # Map detected emotions to a mental state and assign an intervention level.
        if emotion in ['sadness', 'fear', 'anger']:
            mental_state = 'potentially depressed'
            intervention_level = 'high'
        elif emotion == 'surprise':
            mental_state = 'experiencing mood changes'
            intervention_level = 'medium'
        else:  # For emotions such as joy or love.
            mental_state = 'not showing signs of depression'
            intervention_level = 'low'

        # Generate a supportive response by calling the OpenAI API.
        response = self._generate_response(sensor_data, mental_state)

        return {
            'mental_state': mental_state,
            'intervention_level': intervention_level,
            'response': response
        }

    def act(self, processed_data):
        """Actuator: Take appropriate action based on intervention level"""
        # Log the interaction for memory (placeholder for future database integration).
        self._update_memory(processed_data)

        # If the intervention is high and a user ID is provided, try to initiate a voice call.
        if processed_data['intervention_level'] == 'high' and self.user_id:
            user_phone = self._get_user_phone(self.user_id)
            if user_phone:
                call_result = self._initiate_call(user_phone, processed_data['mental_state'])
                processed_data['twilio_call_status'] = call_result['status']
                if 'call_sid' in call_result:
                    processed_data['call_sid'] = call_result['call_sid']
            else:
                processed_data['twilio_call_status'] = 'not initiated - missing user phone'

        return {
            'action_taken': processed_data['intervention_level'],
            'response_text': processed_data['response'],
            'twilio_call_status': processed_data.get('twilio_call_status', None)
        }

    def _generate_response(self, sensor_data, mental_state):
        """LLM workflow for generating appropriate responses"""
        # This system message sets the behavior and tone for the OpenAI GPT-3.5 model.
        system_message = (
            "You are a helpful mental health assistant. Provide a supportive response and suggest appropriate resources based on the user's mental state and detected emotion. "
            "If the user is potentially depressed (emotions: sadness, fear, anger) or expressing suicidal thoughts, be extra careful, supportive, and urgent in your response. "
            "Strongly encourage seeking immediate professional help. "
            "If the user is experiencing mood changes (emotion: surprise), offer empathetic support, gentle encouragement, and self-care tips. "
            "If the user is not showing strong signs of depression (emotions: joy, love), provide positive reinforcement and general mental wellness advice. "
            "Include links to at least two reputable articles about mental health and two exercises that can help with the user's current state. "
            "Structure your response with clear sections for 'Response', 'Helpful Articles', and 'Exercises to Try', but use plain text formatting."
        )

        # Sends a chat request to OpenAI with both the system prompt and a user message detailing the context.
        response = self.openai_client.chat.completions.create(
            model="gpt-3.5-turbo",
            messages=[
                {"role": "system", "content": system_message},
                {"role": "user", "content": f"The user said: {sensor_data['raw_input']}. The detected emotion is: {sensor_data['emotion']}. The mental state was determined to be: {mental_state}"}
            ]
        )

        # Returns the generated supportive response.
        return response.choices[0].message.content

    def _initiate_call(self, phone_number, mental_state):
        """Initiate a voice call to the user"""
        try:
            # Creates a new call with Twilio, sending the call to a webhook URL.
            call = self.twilio_client.calls.create(
                to=phone_number,
                from_=self.twilio_phone,
                url=f"{os.getenv('APP_URL', 'http://localhost:5000')}/twiml?state={mental_state}"
            )
            return {'status': 'initiated', 'call_sid': call.sid}
        except Exception as e:
            # In case of failure, returns the error status.
            return {'status': 'failed', 'error': str(e)}

    def _update_memory(self, data):
        """Store interaction in agent memory (currently logs the interaction)"""
        # This function is a placeholder to log or save the user interaction.
        print(f"Agent memory updated: User {self.user_id}, State: {data['mental_state']}")

    def _get_user_phone(self, user_id):
        """Retrieve user phone number from environment or a database"""
        # For demonstration purposes, the phone number is fetched from an environment variable.
        return os.getenv('USER_PHONE_NUMBER')
This is how it works:
Imports and Class Definition:
The file starts by importing necessary modules. The MentalHealthSupportAgent class encapsulates the entire logic (sensing, processing, acting).
__init__ Method:
Initializes the agent with an optional user ID. Sets up:
The emotion classifier (using a pre-trained BERT-based model).
The OpenAI client for generating responses.
The Twilio client for voice call capabilities.
sense Method:
Analyzes user input with the emotion classifier and returns the detected emotion, confidence, and original text.
process Method:
Maps the detected emotion to a mental state (e.g., “potentially depressed”) and determines an intervention level. It then calls _generate_response to obtain a supportive message from OpenAI.
act Method:
Handles follow-up actions. It logs the interaction (via _update_memory) and, if the intervention level is high and a user phone number is available, initiates a voice call using _initiate_call.
_generate_response Method:
Prepares a system message and sends the conversation context to the OpenAI API. It returns the generated supportive response.
_initiate_call Method:
Uses Twilio’s API to start a call. The call's URL is constructed using the APP_URL from environment variables and includes the mental state as a query parameter.
_update_memory and _get_user_phone Methods:
Currently, _update_memory simply logs interactions (a placeholder for future persistence), and _get_user_phone fetches a user phone number from the environment.
Bind everything together
In your project directory, create a file called app.py and import the required modules:
from flask import Flask, request, render_template, jsonify, Response
import openai
import os
from twilio.rest import Client
from transformers import pipeline
from dotenv import load_dotenv
from agent import MentalHealthSupportAgent
import json
app = Flask(__name__)
These imports are crucial for different aspects of your Flask application development. From the Flask framework, you import several essential components:
Flask, which is the core of your application, request for handling HTTP requests.
render_template for rendering HTML templates, jsonify for converting Python objects to JSON format, and Response for creating custom HTTP responses.
openai module to interact with OpenAI's API, enabling us to leverage its natural language processing capabilities. Furthermore, you import the Client class from the twilio.rest module, allowing you to make requests to Twilio's API for managing communication.
pipeline from Hugging Face’s transformers library, used for NLP tasks like emotion detection.
load_dotenv: To load environment variables from a .env file.
json: To parse or generate JSON data.
To start the Flask application named app. Flask takes__name__ as an argument. __name__ represents the current module. This instance of Flask is the core of the web application. It allows defining routes and handling requests.
Analyze User Input
!!!warning
While this application uses AI to detect emotions and mental states, it is important to understand that the AI model is not foolproof. Mental health decisions should always be referred to licensed professionals.
!!!
This function handles the analysis of the text input submitted by the user via the check-in form. It detects emotions, determines mental state, calls OpenAI to provide a response, and initiates a voice call to say the .
Copy and paste the following code to the app.py file.
app = Flask(__name__)
load_dotenv()

@app.route('/')
def index():
    return render_template('checkin.html')

@app.route('/analyze', methods=['POST'])
def analyze():
    try:
        # Get user input and optional user ID from the form.
        user_input = request.form['user_input']
        user_id = request.form.get('user_id', None)

        # Instantiate the Mental Health Support Agent.
        agent = MentalHealthSupportAgent(user_id)

        # Execute the Sense-Process-Act cycle.
        sensor_data = agent.sense(user_input)
        processed_data = agent.process(sensor_data)
        action_result = agent.act(processed_data)

        # Build the result dictionary to return as JSON.
        result = {
            'emotion': sensor_data['emotion'],
            'mental_state': processed_data['mental_state'],
            'ai_response': processed_data['response'],
            'intervention_level': processed_data['intervention_level']
        }
        if 'twilio_call_status' in action_result:
            result['twilio_call_status'] = action_result['twilio_call_status']

        return jsonify(result)
    except Exception as e:
        app.logger.error(f"An error occurred: {e}")
        return jsonify({'error': str(e)}), 500

@app.route('/twiml', methods=['GET'])
def twiml():
    # Retrieve the mental state from the query parameter to customize the message.
    mental_state = request.args.get('state', 'potentially depressed')

    if mental_state == 'potentially depressed':
        message = (
            "Hello, this is a message from the Mental Health Check-In app. "
            "We've noticed that you might be going through a difficult time. "
            "Please remember that help is available. Consider reaching out to a mental health professional or a trusted friend. "
            "You can also call the National Help Lifeline at 1-800-273-8255 for immediate support. "
            "We care about your well-being and encourage you to seek help if needed."
        )
    else:
        message = (
            "Hello, this is a message from the Mental Health Check-In app. "
            "We're checking in to see how you're doing today. Remember that self-care is important. "
            "If you need support, please don't hesitate to reach out to a friend, family member, or mental health professional."
        )

    # Construct the TwiML XML response.
    twiml_response = f'''<?xml version="1.0" encoding="UTF-8"?>
<Response>
    <Say voice="alice">{message}</Say>
</Response>'''

    return Response(twiml_response, mimetype='text/xml')

@app.route('/scheduled_check', methods=['POST'])
def scheduled_check():
    """Endpoint for scheduled proactive check-ins"""
    try:
        user_id = request.json.get('user_id')
        last_input = request.json.get('last_input', "I haven't heard from you in a while.")

        if not user_id:
            return jsonify({'error': 'User ID required'}), 400

        # Initialize the agent and perform a scheduled check.
        agent = MentalHealthSupportAgent(user_id)
        sensor_data = agent.sense(last_input)
        processed_data = agent.process(sensor_data)
        # Force a high intervention level to simulate proactive outreach.
        processed_data['intervention_level'] = 'high'
        action_result = agent.act(processed_data)

        return jsonify({'status': 'proactive check performed', 'action': action_result})
    except Exception as e:
        app.logger.error(f"An error occurred in scheduled check: {e}")
        return jsonify({'error': str(e)}), 500

if __name__ == '__main__':
    app.run(debug=True)
How it works:
Imports and Setup:
The file imports Flask-related modules, loads environment variables (using python-dotenv), and imports the agent class.
Homepage Route (/):
Renders the HTML template (checkin.html) so users can submit their feelings.
Analyze Route (/analyze):
Receives POST requests when a user submits the form.
Retrieves user input and an optional user ID.
Instantiates the MentalHealthSupportAgent and runs the Sense-Process-Act cycle:
Sense: Uses the agent’s sense() method to detect emotion.
Process: Determines mental state and gets a supportive AI-generated response.
Act: If needed (e.g., high intervention), initiates a Twilio call.
Returns the results as a JSON response.
Twilio XML Response Route (/twiml):
Generates a TwiML (XML) response based on the mental state.
The XML instructs Twilio to use the "alice" voice to speak a message during a call.
Scheduled Check Endpoint (/scheduled_check):
Allows proactive check-ins by accepting JSON requests.
Forces a high intervention level for demonstration and calls the agent’s act() method.
Returns a JSON status message.
Application Runner:
Runs the Flask server in debug mode if the file is executed directly.
!!!warning
The voice call triggered by this application provides mental health support but should not be relied upon as the sole source of help. Always encourage users to seek professional mental health services.
!!!
Finally, run the application using app.run(). The script executes directly, allowing the Flask web server to start and serve the application.
Design the User Interface
A simple and straight forward user interface makes it easy for users to input their feelings and submit them for analysis. Ensuring it is intuitive and visually appealing, enhances the overall user experience. Making it enjoyable for users to interact and engage with the application.
In the project directory, create a directory and name it "templates". In the newly created directory, create a -checkin.html- file. Copy the code below and paste it in the file.
<!DOCTYPE html>
<html lang="en">
<head>
    <meta charset="UTF-8">
    <meta name="viewport" content="width=device-width, initial-scale=1.0">
    <title>Mental Health Check-In</title>
    <link rel="stylesheet" href="{{ url_for('static', filename='style.css') }}">
    <style>
        body {
            background-image: url('/static/Moh2.jpg');
            background-size: cover;
            background-repeat: no-repeat;
            background-attachment: fixed;
        }
    </style>
</head>
<body>
    <div class="container">
        <h1>Mental Health Check-In</h1>
        <form id="checkinForm" action="/analyze" method="post">
            <textarea id="userInput" name="user_input" rows="4" cols="50" placeholder="How are you feeling today?"></textarea>
            <!-- Optional: include a hidden user ID field -->
            <input type="hidden" name="user_id" value="user123">
            <button type="submit">Check In</button>
        </form>
    </div>
</body>
</html>
This HTML code defines the structure and content of the Mental Health Check-In webpage.
It includes metadata and links to external resources in the section. Within the <body> section, a container <div> holds the main content of the webpage. The webpage features a visually appealing heading (<h1>) displaying the title of the application.
A user-friendly form allows users to input their feelings and submit them for analysis.
The form includes a spacious <textarea> element for comfortable user input and a clear submit button (<button>).
A clear and accessible interface ensures that users of all backgrounds and abilities can easily navigate the application. This promotes inclusivity by allowing everyone to interact with the application effectively.
Testing your Application
To test your application, navigate to the project directory in your VS Code terminal. Run the Flask application by executing the command python app.py. This will start the web server locally. Open a web browser and navigate to the URL provided by Flask, typically http://localhost:5000. On the webpage, enter your feelings into the provided text area and click the Check In button to submit.
Prompt your application with a random phrase and see how it responds and performs.
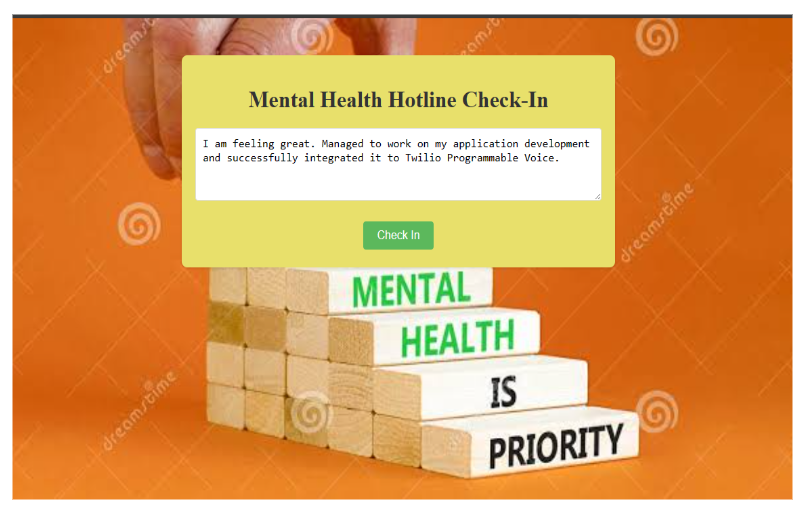
Based on the input, the mental state is determined to not showing signs of depression. OpenAI also provides a response. You notice that no call is initiated.
Now tweak your response. For testing purposes, give it the following phrase. “I'm having a bad day. I don't feel like eating or talking to anyone, I don't want to take a shower or get out of bed. I've been crying non-stop and having suicidal thoughts.” See how it performs.
Based on the phrase, OpenAI provides a comforting response, provides the user with self-guided mental health resources such as articles and exercises. Lastly, the log confirms that the Twilio call has been successfully initiated. This action indicates that the communication system integrated into the application is functioning as intended. And has effectively delivered the user with the message through voice.
Conclusion
In this tutorial, you have gained comprehensive insights into developing a Wellness Check-in App with the integration of OpenAI and Twilio Programmable Voice for Personalized Support. Initially, you delved into the setup and configuration of essential tools such as Flask, OpenAI, and Twilio, laying the groundwork for the application's functionality.
You have equipped yourself with the knowledge and skills necessary to develop a robust and responsive mental health support application. Through this tutorial, you have not only learned the technical aspects of building such an application. You have also gained valuable insights into leveraging technology to address important societal needs and promote mental well-being.
Feel free to explore and customize this application further, or adapt it to suit your use cases.
Link to GitHub repository for complete source code.
Jacob Muganda is a Software, ML/AL developer. He leverages AI solutions in software applications.