
Personalized tech support is crucial for users facing technical issues as they need timely and specific assistance. Traditional support systems often fail to provide this, leading to user frustration. They are also difficult to develop. But in the error of retrieval augmented generation and large language models, creating powerful large language models powered assistants that can provide immediate, relevant, and tailored solutions is easy.
In this article, you will learn how to create a WhatsApp-based tech support system using Strapi for content management, LangChain.js for retrieval-augmented generation (RAG), and gpt-4o for natural language processing. The system will fetch troubleshooting guides from Strapi, use LangChain.js to retrieve relevant information, and generate personalized responses with gpt-4o.
To comfortably follow along with this tutorial, you need to have:
Start by installing Strapi using npx.
npx create-strapi@latest my-strapi-project
The above command will create a new Strapi project residing in the my-project directory. On the terminal, navigate to the project directory path and start the Strapi server using the following command.
npm run develop
Once the server is running, proceed to Strapis admin default URL http://localhost:1337/admin/. Register yourself in order to access the Strapi dashboard.
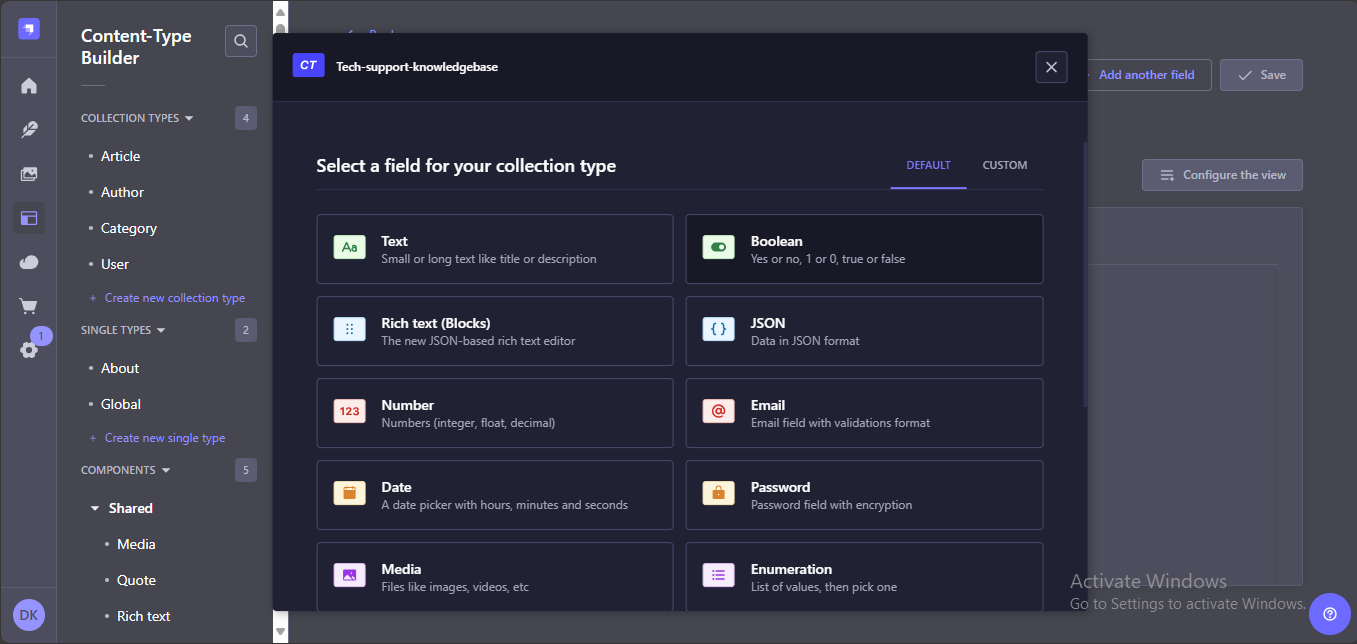
Since Strapi will serve as the knowledge base for your assistant, you need to configure a collection and add data to it. To do this, proceed to Content-Type-Builder and click Create new collection type. This will prompt you to name your collection. Name it tech-support-knowledgebase.

Then click continue and select the fields you need for your collection. In this case, we need one field of type Media in which we will store the documents to be utilized by the assistant.
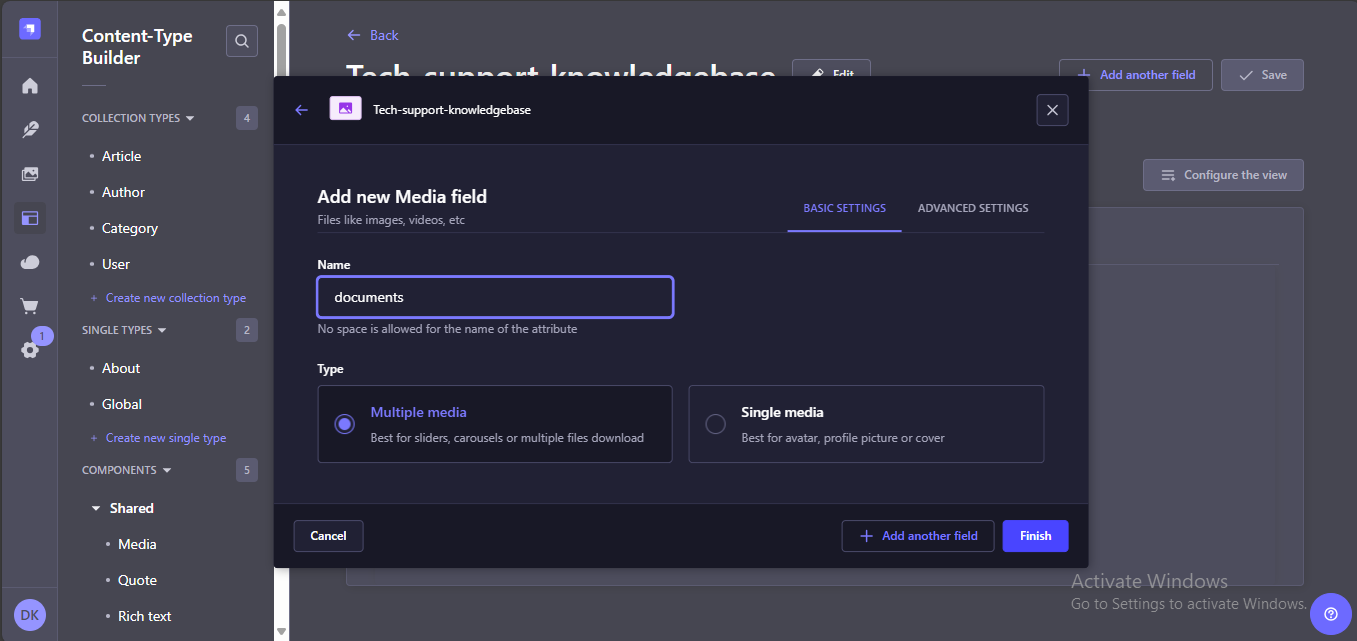
Name the field as documents. Then click Finish. Don't forget to save your collection's configurations.
Wait for the server to restart and then proceed to the Content Manager. Populate the collection with all the tech documents you want your assistant to use when answering questions or troubleshooting tasks. The documents should be in PDF or TXT format as these will be the formats the assistant will support.

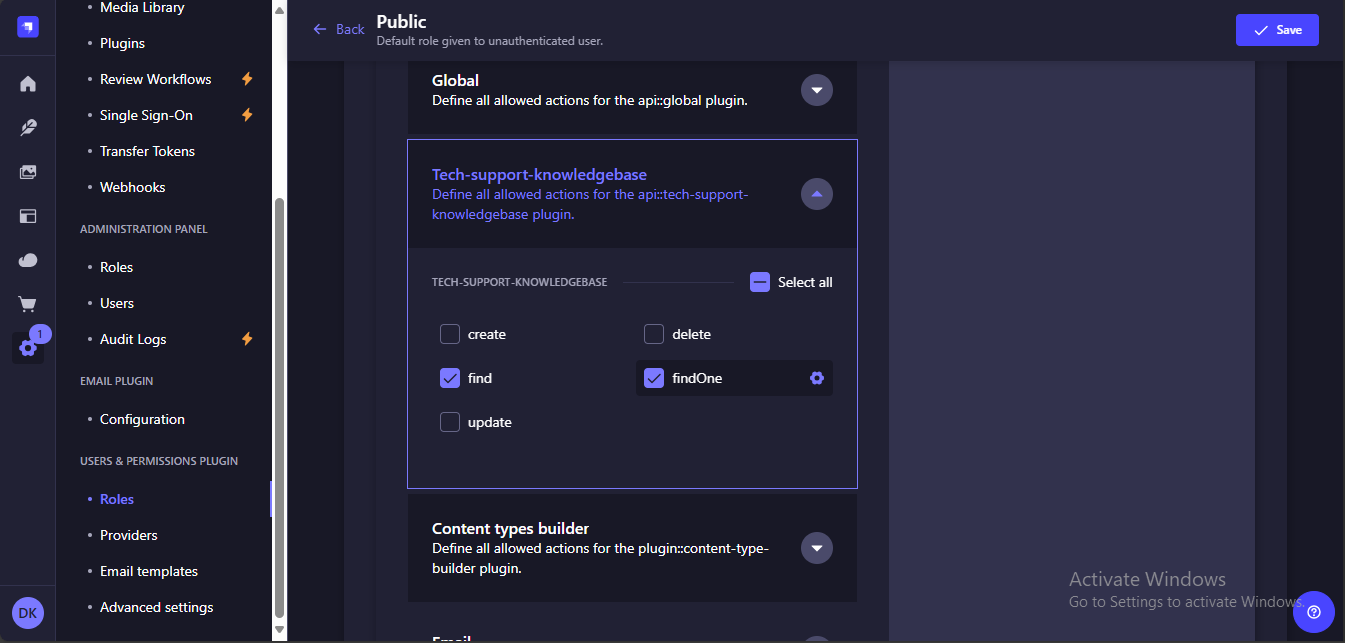
You now have your data stored in Strapi. But for it to be consumed by your app you need to expose it via Strapi's built-in Rest API. To achieve this, proceed to Settings > Users & Permissions Plugin > Roles > Public. Then select Tech-support-knowledgebase and allow the find and findOne actions. Dont forget to click save.
The API endpoint for your collection will be http://localhost:1337/api/tech-support-knowledgebases?populate=documents. Notice the populate parameter, it allows you to populate various field types (e.g. relations, media, components).
Here is a screenshot showing what the API data looks like:
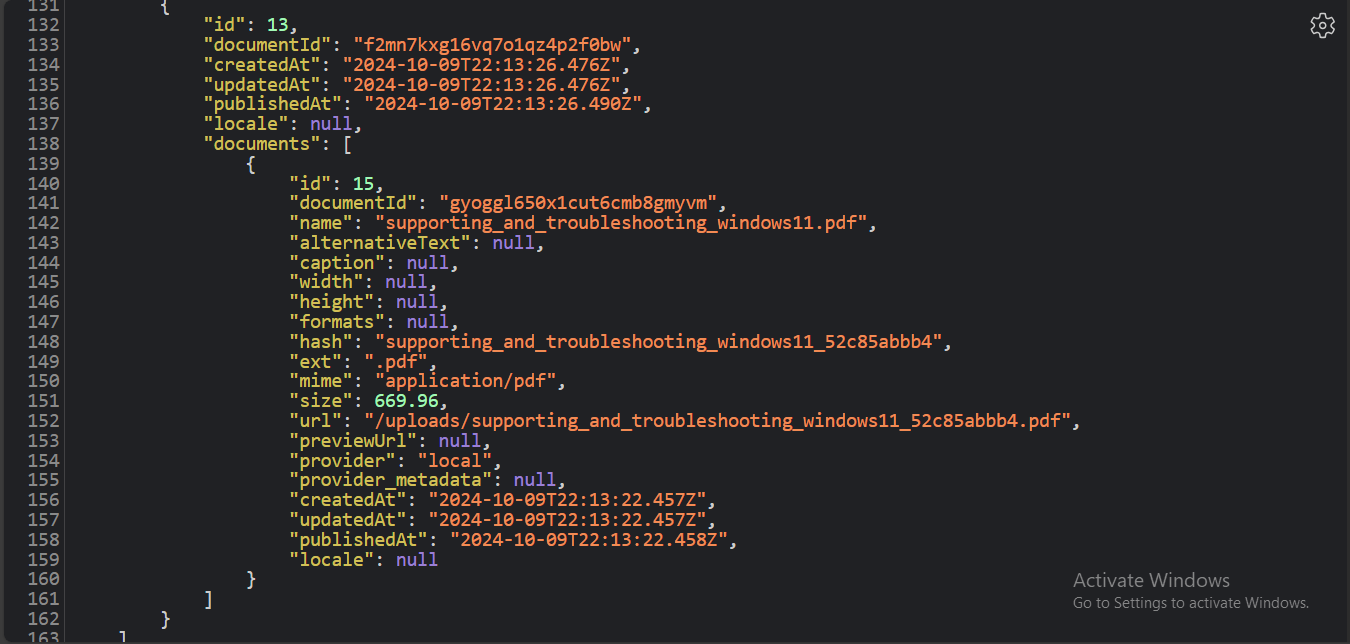
The populate parameter allows you granular control over the data you retrieve from your API, allowing you to get only the data you need.
Since the API endpoint is ready, let's build the tech assistant. You will start by setting up your development environment.
Open an IDE of your choice. Then run the following commands on the terminal to install the required libraries.
npm install axios langchain @langchain/core @langchain/openai @langchain/community pdf-parse dotenv qrcode-terminal
npm install puppeteer github:pedroslopez/whatsapp-web.js
The first command installs the libraries you will need to send http requests to Strapi in order to retrieve the guides. The second command contains the libraries you need to integrate your assistant into WhatsApp. Let's see what each library does:
axios: You will use this library to make HTTP requests, such as fetching document URLs from Strapi and downloading PDF files.
langchain: You will use this library to build a context-aware tech support system that can reason about the provided data.
@langchain/core: You will use this package to create chains. It includes essential components like runnables and prompts.
@langchain/openai: You will use this library to integrate OpenAI models with LangChain.
@langchain/community: You will use this package for community-contributed integrations within LangChain. It includes document loaders such as the PDFLoader.
dotenv: You will use this library to load environment variables from a .env file ensuring secure management of sensitive information like API keys.
puppeteer: You will use this library to control a headless version of Chromium for logging into WhatsApp Web.
whatsapp-web.js: You will use this library to interact with WhatsApp Web.
qrcode-terminal: You will use this library to generate QR codes in the terminal, which is necessary for the initial WhatsApp Web login process.
pdf-parse: You will use this library to parse and extract text from PDF files.
When all the libraries are installed, your environment is ready but you have to obtain the OpenAI API key. You will use this key to authenticate yourself with OpenAI when utilizing @langchain/openai. To obtain it, follow these steps:
Create an OpenAI Account if you don't have one. If you already have an account, simply log in.
After logging in, go to the OpenAI API Keys page.
Click the Create new secret key button to generate a new API key for the project. Make sure to save this key securely, as it will not be displayed again after this point.
Let's start with building the RAG part of the assistant.
This is the core part of the system. It involves fetching data from the Strapi endpoint, processing it, and finally using RAG powered by OpenAI's GPT-4o model to provide responses to user inquiries.
Create a file at the root of your project named rag_code.mjs. The mjs extension means you will be using ECMAScript Modules (ESM) which will allow you to organize code into smaller, reusable components. The code in the following sections will reside in this file.
Then create another file named .env at the root of your project and add your OpenAI API key in this format.
OPENAI_API_KEY= Your OpenAI API Key
Do not share this key on GitHub as anyone with it will be able to make API call to OpenAI on your behalf.
The first step is to import the modules and functions you will use from the libraries you installed earlier.
import fs from 'fs';
import path from 'path';
import axios from 'axios';
import { TextLoader } from 'langchain/document_loaders/fs/text';
import { PDFLoader } from '@langchain/community/document_loaders/fs/pdf';
import { RecursiveCharacterTextSplitter } from 'langchain/text_splitter';
import { OpenAIEmbeddings } from '@langchain/openai';
import { MemoryVectorStore } from 'langchain/vectorstores/memory';
import dotenv from 'dotenv';
import { RunnableSequence } from '@langchain/core/runnables';
import { ChatPromptTemplate } from '@langchain/core/prompts';
import { ChatOpenAI } from '@langchain/openai';
import { StringOutputParser } from '@langchain/core/output_parsers';
import { RunnablePassthrough } from '@langchain/core/runnables';

dotenv.config();
Importing the modules ensures you can call and use the necessary tools needed to create the RAG system. You will understand the use of each import as you follow along.
After the importations, you have to connect your support assistant to your Strapi endpoint and come up with a function that will fetch the documents. We will implement a caching mechanism to avoid downloading the documents everytime a user asks a question as this can delay the assistant's response rate significantly.
Step 1: Creating or Clearing the Cache Folder
Start by ensuring the cache is cleared every time the app starts to avoid using outdated content.
const cacheFolderPath = './cache';

// Function to clear the cache folder
function clearCacheFolder() {
  if (fs.existsSync(cacheFolderPath)) {
    fs.readdirSync(cacheFolderPath).forEach((file) => {
      const filePath = path.join(cacheFolderPath, file);
      fs.unlinkSync(filePath);
    });
  } else {
    fs.mkdirSync(cacheFolderPath);
  }
}

// Ensure cache is cleared every time the app starts
clearCacheFolder();
This function checks whether the cache folder exists and clears it if it does. Otherwise, it creates the cache folder. The folder will be used to store downloaded documents. Clearing it ensures the assistant always starts with a clean state. The function is called only once at the start of the program.
Step 2: Fetching Document URLs from Strapi
Since you have your cache folder ready, the next step is to download the documents in Strapi to it. To achieve this, you need to start by extracting the URL of each document from the Strapi API data.
// Function to fetch document URLs from Strapi
async function fetchDocumentUrlsFromStrapi() {
  const strapiEndpoint = 'http://localhost:1337/api/tech-support-knowledgebases?populate=documents';
  try {
    const response = await axios.get(strapiEndpoint);
    const documentUrls = response.data.data.flatMap(item => {
      // Check if documents exist
      if (item.documents && Array.isArray(item.documents)) {
        return item.documents.map(doc => doc.url);
      }
      return []; // Return an empty array if no documents are found
    });
    console.log('Fetched document URLs:', documentUrls); // For debugging
    return documentUrls;
  } catch (error) {
    console.error('Error fetching document URLs from Strapi:', error);
    throw error;
  }
}
You will append these URLs to the base URL of your Strapi instance. This is because the url you get from the Strapi API is the relative path.
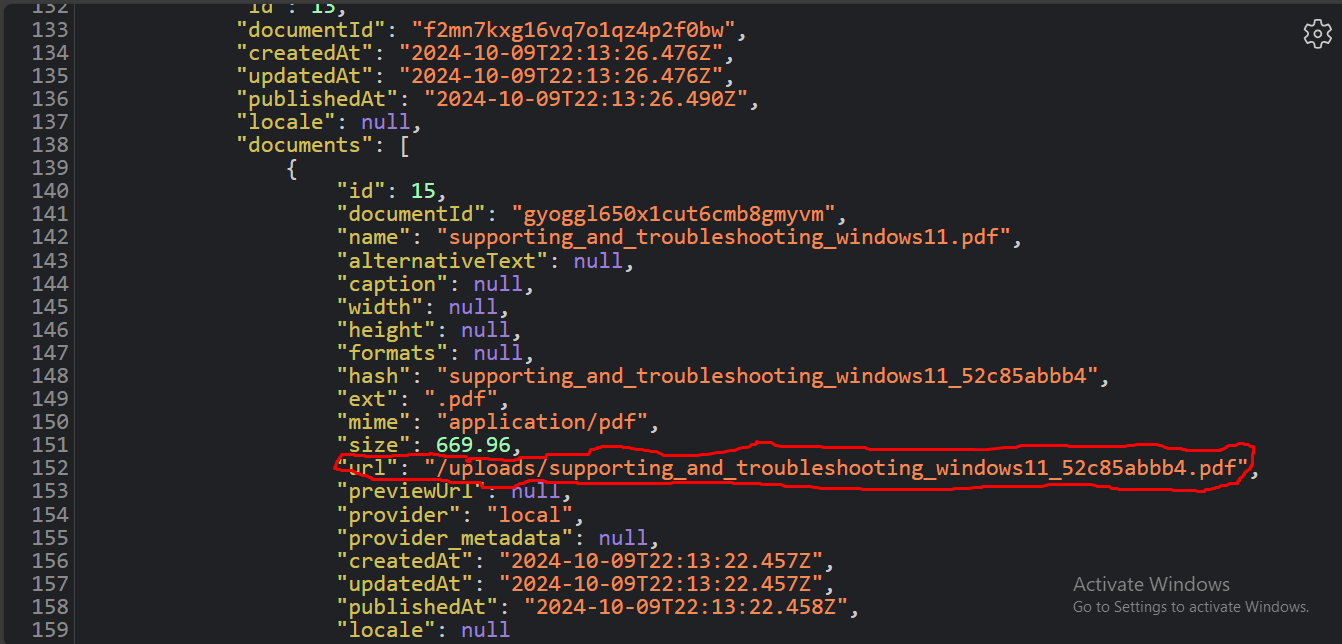
But to download a document you need to pass the full URL. For example, in the case of the relative path in the screenshot above, the full URL should be http://localhost:1337/uploads/supporting_and_troubleshooting_windows11_52c85abbb4.pdf
Let's see how to actually download the documents from Strapi.
Step 3: Downloading Documents with Caching
Define a function to download Documents from Strapi, using caching to avoid redundant downloads:
// Function to download Docs from Strapi with caching
async function downloadDocsWithCache(url) {
  const filename = path.basename(url);
  const cacheFilePath = path.join(cacheFolderPath, filename);

  // Check if the file already exists in the cache
  if (fs.existsSync(cacheFilePath)) {
    console.log(`Using cached file: ${cacheFilePath}`);
    return cacheFilePath;
  }

  console.log(`Downloading file: ${url}`);
  const fullUrl = url.startsWith('/') ? `http://localhost:1337${url}` : url;
  try {
    const response = await axios({
      url: fullUrl,
      method: 'GET',
      responseType: 'stream',
    });

    const writer = fs.createWriteStream(cacheFilePath);
    response.data.pipe(writer);

    return new Promise((resolve, reject) => {
      writer.on('finish', () => {
        console.log(`File downloaded and cached: ${cacheFilePath}`);
        resolve(cacheFilePath);
      });
      writer.on('error', (err) => {
        console.error(`Error writing file: ${err}`);
        reject(err);
      });
    });
  } catch (error) {
    console.error(`Error downloading file from ${fullUrl}:`, error);
    throw error;
  }
}
The function determines the document's filenames from the URLs fetched from the Strapi endpoint. It then uses the filenames to check whether the file already exists in the cache. If it does, it uses the cached file. If not, it downloads the file by using axios to fetch the document as a stream which is efficient for handling large files. It then pipes this stream to a file writer, which writes the file to the cache directory. This avoids file duplication.
By now you have implemented the logic to fetch and cache documents from Strapi. This ensures centralized data management using Strapi while also reducing the load time of your system through caching for subsequent queries. After downloading the documents, the next step is to load and process them.
This stage involves loading and splitting the documents in the cache folder into chunks for further processing. Chunks are smaller manageable segments of a text. This step is crucial as it optimizes the handling of potentially large documents and prepares them for retrieval operations.
async function loadAndSplitChunks({ folderPath, chunkSize, chunkOverlap }) {
  const documents = [];
  const files = fs.readdirSync(folderPath);

  for (const file of files) {
    const filePath = path.join(folderPath, file);
    let rawContent;
    if (filePath.endsWith('.pdf')) {
      const loader = new PDFLoader(filePath);
      rawContent = await loader.load();
    } else if (filePath.endsWith('.txt')) {
      const loader = new TextLoader(filePath);
      rawContent = await loader.load();
    } else {
      console.log(`Skipping file: ${filePath} (Not a PDF or TXT)`);
      continue;
    }

    const splitter = new RecursiveCharacterTextSplitter({ chunkSize, chunkOverlap });
    const splitDoc = await splitter.splitDocuments(rawContent);
    documents.push(...splitDoc);
  }

  console.log('Documents loaded and split:', documents);
  return documents;
}
The above function iterates over the files in the cache folder looking for pdf and txt. It then uses the TextLoader class to load the text files and the PDFloader class to load the PDF files. If any other file is found, it is skipped.
Once the documents are loaded The function splits them into chunks using the RecursiveCharacterTextSplitter. After obtaining the chunks, you need a way to store them and perform operations on them. This is where vector stores come in.
A vector store is a specialized database optimized for storing and managing vector representations. In this case, we will use an in-memory vector store which uses your computer's memory to store the documents' chunks and their embeddings.
async function initializeVectorstoreWithDocuments(documents) {
  const embeddings = new OpenAIEmbeddings({
    openAIApiKey: process.env.OPENAI_API_KEY,
  });

  const vectorstore = new MemoryVectorStore(embeddings);
  await vectorstore.addDocuments(documents);
  console.log('Documents added to vector store.');
  return vectorstore;
}
The above function first initializes an OpenAIEmbeddings instance which is used to compute embeddings for documents. It then creates a MemoryVectorStore with these embeddings, which allows storing and retrieving vectors in memory and adds the documents.
After adding the documents to the vector store, you need a way to retrieve the relevant documents based on a user query.
This workflow will start by handling a user query by making it more clear, and then retrieve the relevant documents to the query and pass the query plus the retrieved documents as content to GPT4o. GPT4o will then generate a response which you will send back to the user.
The above is achieved through chains. A chain is a sequence of steps that work together to achieve a specific task.
This sequence enhance the clarity and specificity of user queries before they are processed for document retrieval.
function createRephraseQuestionChain() {
  const REPHRASE_QUESTION_SYSTEM_TEMPLATE = `
  meet the following objective to the best of your ability:
  `;

  const rephraseQuestionChainPrompt = ChatPromptTemplate.fromMessages([
    ['system', REPHRASE_QUESTION_SYSTEM_TEMPLATE],
    ['human', 'Rephrase the following question or instruction to be standalone:\n{question}'],
  ]);

  const rephraseQuestionChain = RunnableSequence.from([
    rephraseQuestionChainPrompt,
    new ChatOpenAI({
      openAIApiKey: process.env.OPENAI_API_KEY,
      maxTokens: 2048,
      model: "gpt-4o",
    }),
    new StringOutputParser(),
  ]);
  return rephraseQuestionChain;
}
The function above sets up a chat prompt template that tells the system to rephrase the user's input. It creates a RunnableSequence with the prompt, a chat operation using OpenAI's model, and a string output parser to format the response from the large language model. Making the input a standalone question makes it well-defined and structured, which helps in achieving more relevant document retrieval results.
This chain is the one responsible for retrieving the relevant documents to a user query from the vector store.
function createDocumentRetrievalChain(retriever) {
  const convertDocsToString = (documents) => {
    return documents.map((document) => `<doc>\n${document.pageContent}\n</doc>`).join('\n');
  };

  const documentRetrievalChain = RunnableSequence.from([
    (input) => input.question,
    retriever,
    convertDocsToString,
  ]);

  return documentRetrievalChain;
}
The function takes the user question, which is by now standalone, and retrieves the relevant documents to the query. It then formats the retrieved related documents into strings with newlines. This creates a single string containing all relevant document contents.
After retrieving the documents, you have the context to the user question. You now need to pass the question and the context to GPT4o together with some instructions on what you want to achieve.
This is the final chain in our conversational workflow. But before we create it, we need to come up with the instructions that will direct GP4o on how we want the user question answered. You can change this prompt to your liking.
const ANSWER_CHAIN_SYSTEM_TEMPLATE = `You are a customer service assistant. The messages you reply
 with are served through WhatsApp, so keep replies short and convenient. You are helpful and
 professional. Interpret and answer the user's question using only the provided sources.

<context>
{context}
</context>
The user's question is: {question}`;

const answerGenerationChainPrompt = ChatPromptTemplate.fromMessages([
  ['system', ANSWER_CHAIN_SYSTEM_TEMPLATE],
  ['human', `Now, answer this question:\n{question}`],
]);
Now you have all the components required to create the final conversational retrieval chain. Let's see how you can achieve this.
async function createConversationalRetrievalChain(retriever) {
  const rephraseQuestionChain = await createRephraseQuestionChain();

  const conversationalRetrievalChain = RunnableSequence.from([
    RunnablePassthrough.assign({
      question: rephraseQuestionChain,
    }),
    RunnablePassthrough.assign({
      context: createDocumentRetrievalChain(retriever),
    }),
    answerGenerationChainPrompt,
    new ChatOpenAI({
      openAIApiKey: process.env.OPENAI_API_KEY,
      maxTokens: 2048,
      model: "gpt-4o",

    }),
  ]);

  return conversationalRetrievalChain;
}
The above function takes a user query and calls the rephrase chain and document retrieval chain to format the query and retrieve the relevant documents respectively. It then sends the user question and the retrieved documents as context to GPT40 together with the instructions of what is to be done. The LLM then returns the answer to the user's question using the given context.
You now have all the functions needed to answer a user's question using the relevant guides and GPT4o. The only remaining part of implementing the RAG system is providing the logic of how the program will flow.
This function will be responsible for handling the RAG system logic. It will handle an incoming chat question, manage document handling, and execute the retrieval-answer chain.
export async function chatWithDocs(question) {
  console.log('Fetching document URLs from Strapi...');
  const documentUrls = await fetchDocumentUrlsFromStrapi();

  for (const url of documentUrls) {
    await downloadDocsWithCache(url, cacheFolderPath);
  }

  console.log('Loading and splitting documents...');
  const documents = await loadAndSplitChunks({
    folderPath: cacheFolderPath,
    chunkSize: 1536,
    chunkOverlap: 128,
  });

  console.log('Initializing vector store...');
  const vectorstore = await initializeVectorstoreWithDocuments(documents);
  const retriever = vectorstore.asRetriever();

  console.log('Creating retrieval chain.....');
const finalRetrievalChain = await createConversationalRetrievalChain(retriever);
console.log('Invoking retrieval chain...');
const result = await finalRetrievalChain.invoke({
question: question,
});
console.log('Result:', result);
return result.content; // Ensure to return the content for proper string handling
}
The function fetches document URLs from Strapi. It then downloads and caches these documents locally for efficient access. Next, it loads and splits them into manageable text chunks and initializes a vector store. It then sets up a conversational retrieval chain that rephrases user questions, retrieves relevant document sections, and generates an answer. Finally, it invokes the retrieval chain with the user's query.
You have completed the RAG part, the final step in building the WhatsAPP-based tech support system is integrating the RAG part into WhatsAPP.
There are many ways you can integrate your system into WhatsApp. You can use the official WhatsApp business API, use paid services like Twilio WhatsApp API, or use opensource integrations like whatsapp-web.js. In this article, you will utilize whatsapp-web.js for the integration.
Proceed to the root of your project and create a file named whatsapp_integration.mjs. Then paste the following code.
// Import the necessary modules
import puppeteer from 'puppeteer';
import { Client } from 'whatsapp-web.js';
import { config as dotenvConfig } from 'dotenv';
import qrcode from 'qrcode-terminal';
import { chatWithDocs } from './rag_code.mjs'; // Ensure the path is correct

// Load environment variables from .env file
dotenvConfig();

// Initialize WhatsApp client with Puppeteer configuration
const client = new Client({
  puppeteer: {
    // Specify the executable path for Puppeteer; adjust according to your setup
    executablePath: puppeteer.executablePath(),
    // Additional Puppeteer arguments to ensure it runs smoothly in various environments
    args: ['--no-sandbox', '--disable-setuid-sandbox'],
  },
  // Specify the cache settings for WhatsApp Web version; this can improve load times
  webVersionCache: {
    type: "remote",
    remotePath: "https://raw.githubusercontent.com/wppconnect-team/wa-version/main/html/2.2412.54.html",
  },
});

// Event listener for QR code generation, needed for authentication
client.on('qr', (qr) => {
  // Display QR code in the terminal
  qrcode.generate(qr, { small: true });
});

// Event listener for when the client is ready
client.on('ready', () => {
  console.log('Client is ready!');
});

// Event listener for incoming messages
client.on('message', async (msg) => {
  console.log(`Message received from ${msg.from}: ${msg.body}`);
  const chat = await msg.getChat();

  try {
    // Log the processing action
    console.log('Processing the message...');

    // Send a typing indicator to show the bot is processing
    await chat.sendStateTyping();

    // Process the message with a custom function (make sure to define this function)
    const result = await chatWithDocs(msg.body);
    console.log('Result:', result);

    // Extract the content from the result object to send as a reply
    const replyContent = result;
    console.log(`Sending reply: ${replyContent}`);

    // Clear the typing indicator
    await chat.clearState();

    // Send the reply to the user
    await msg.reply(replyContent);
    console.log('Reply sent.');
  } catch (error) {
    // Log and handle errors
    console.error('Error processing the message:', error);

    // Clear typing indicator if an error occurs
    await chat.clearState();

    // Send an error message to the user
    await msg.reply('Sorry, an error occurred while processing your request.');
  }
});

// Initialize the WhatsApp client
client.initialize();
The code receives a user query. It then uses the chatWithDocs function from the RAG code to generate a response using the documents in Strapi. It then sends the answer back to the user using WhatsApp.
You now have the full system. Let's see the results.
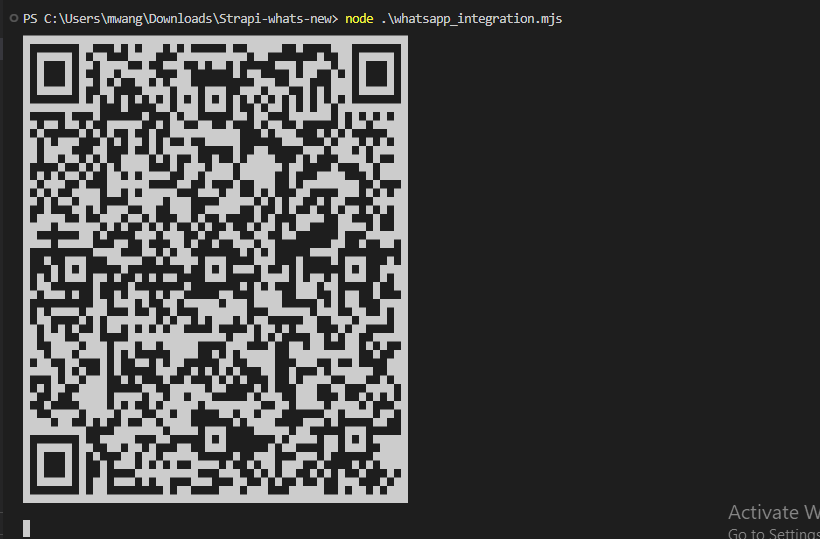
Proceed to the terminal and run the whatsapp_integration.mjs code using node:
node .\whatsapp_integration.mjs
When you run the code, a QR code will be displayed on the terminal.
Proceed to WhatsApp and use your phone to scan it. This will authenticate the connection between the WhatsApp client on your device and your system, which is running through the Puppeteer-driven instance of WhatsApp Web. Make sure not to use your main number, as any message received after this will invoke a response from the system.
Send your queries to the connected WhatsApp account, and the system will respond with the relevant answers. Here is a sample result:
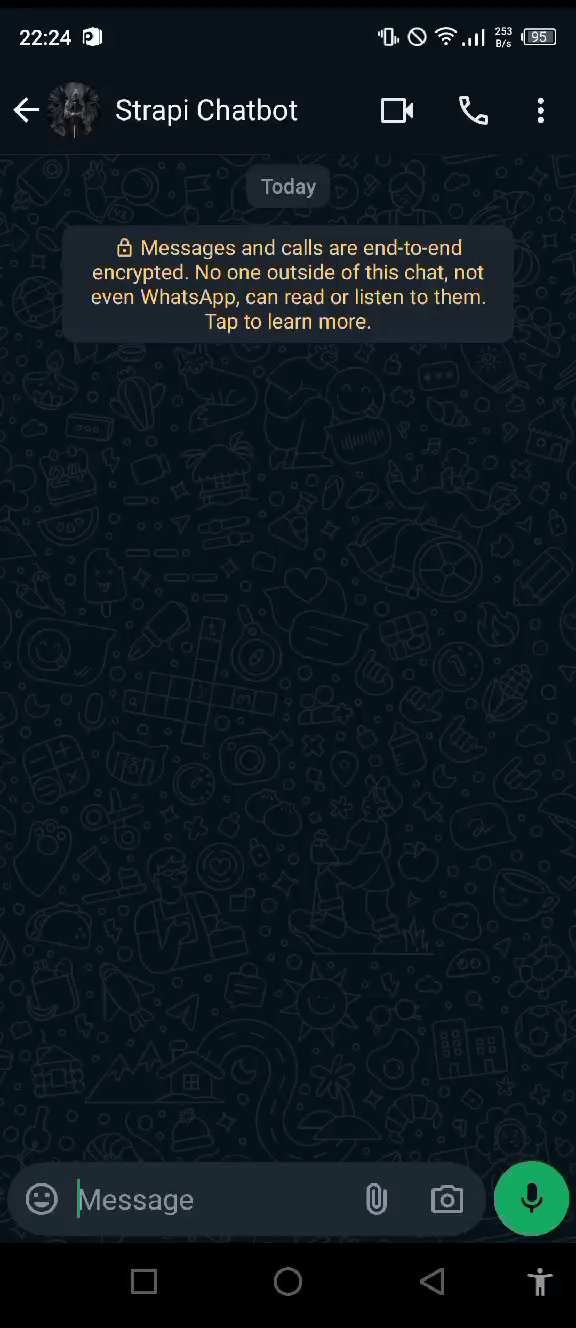
You can see the system responds with the correct answers to the queries. The system is limited to the information stored in Strapi. If you ask any question outside that, it will notify you it does not have that information.
In this tutorial, you have learned how to utilize Strapi, LangChain, GPT4o, and WhatsApp to create a Tech Support system. When you combine AI with Strapi, you can build infinite solutions. Go ahead and apply the knowledge you learned to create more solutions.