OpenCV Projects Examples
Explore simple yet powerful computer vision (CV) projects: AR, FER, Hand Gesture Recognition, Lane Detection for Driving, Object Tracking.
 |  |  |
|---|---|---|
 |  |  |
| -------------------------- | --------------------------- | --------------------------- |
You can skip the CV techniques in the
Simple Project Ideas section and go directly to the OpenCV Projects section.
Access GitHub for more details and deep CV algorithms: Haar Cascade, Laplacian, SIFT.
Simple Project Ideas
Edge Detection
It’s particularly useful for tasks like object detection, where need to distinguish different objects based on their edges.
Key learning points:
- Edge Detection Algorithms: The Canny Edge Detector is one of the most popular algorithms. It uses gradients in the image to detect edges.
- Gradients: The algorithm looks at how the intensity of pixels changes and uses this information to find edges.
- Thresholding: Edge detection often involves setting thresholds to determine which gradients should be considered as edges.
edges = cv2.Canny(img, threshold1=100, threshold2=200)
show(edges)
Straight Lines Detection
Probabilistic Hough Line Transform detects line segments in an image
import numpy as np

# Define HoughLinesP parameters
rho = 1                # The distance resolution of the accumulator in pixels.
theta = np.pi / 180    # The angle resolution of the accumulator in radians
threshold = 50         # Minimum number of intersections in the Hough space to detect a line.
                       # Higher values mean fewer, but more prominent, lines will be detected.
min_line_length = 100  # Minimum line length in pixels
max_line_gap = 10      # Maximum allowed gap between points on the same line

# Detect line segments in the image
lines = cv2.HoughLinesP(edges, rho, theta, threshold, minLineLength=min_line_length, maxLineGap=max_line_gap)

def draw_lines(img, lines):
    if lines is None:
        return
    for line in lines:
        for x1, y1, x2, y2 in line:
            cv2.line(img=img, pt1=(x1,y1), pt2=(x2,y2), color=(0,255,0), thickness=5)

draw_lines(img, lines)
show(img)
Morphological Operations
- Erosion: removes pixels at the boundaries of objects.
- Dilation: adds pixels to the boundaries.
They’re often used together for noise reduction.
kernel = np.ones((5, 5), np.uint8)
erosion = cv2.erode(img, kernel, iterations=1)
show(erosion)
dilation = cv2.dilate(img, kernel, iterations=1)
show(dilation)
 |  |
|---|
- Opening: is erosion followed by dilation, useful for removing small objects.
- Closing: is dilation followed by erosion, helpful in closing small holes within objects.
opening = cv2.morphologyEx(img, cv2.MORPH_OPEN, kernel)
show(opening)
closing = cv2.morphologyEx(img, cv2.MORPH_CLOSE, kernel)
show(closing)
 |  |
|---|
Corner Detection
Corner detection is to find points in an image where the intensity changes sharply, indicating a corner or intersection.
- Harris Corner Detector: This method identifies corners based on local changes in intensity.
corners = cv2.cornerHarris(img, blockSize=2, ksize=3, k=0.04)

# Dilate corner image to enhance corner points
corners = cv2.dilate(corners, None)

print(corners)
- Shi-Tomasi Corner Detector: An improvement over the Harris detector, it is widely used in tracking algorithms.
corners = cv2.goodFeaturesToTrack(img, maxCorners=25, qualityLevel=0.001, minDistance=10)
corners = np.int0(corners)

# Draw corners on the image
for corner in corners:
    x, y = corner.ravel()
    cv2.circle(img, center=(x, y), radius=5, color=255, thickness=-1)

show(img)

Contour Detection
Contours are curves that join all the continuous points along a boundary with the same color or intensity. They are essential for identifying shapes in an image.
path = './sample_data/box_toy.jpg'
img = cv2.imread(path, cv2.IMREAD_COLOR)
gray_image = cv2.cvtColor(img, cv2.COLOR_BGR2GRAY)

# Binarize the image
## THRESH_BINARY_INV: Inverse of THRESH_BINARY. Pixel is set to maxval if it’s below thresh; otherwise, it’s set to 0.
## cv2.THRESH_OTSU: automatically determines an optimal threshold
## by analyzing the histogram of pixel intensities to separate foreground from background
_, thresh = cv2.threshold(src=gray_image, thresh=127, maxval=255, type=cv2.THRESH_BINARY_INV+cv2.THRESH_OTSU)

# Find contours in a binary image.
## cv2.RETR_TREE: Retrieves all contours and reconstructs a full hierarchy of nested contours.
## cv2.CHAIN_APPROX_SIMPLE: Stores only the endpoints of the contours (saves memory).
contours, _ = cv2.findContours(image=thresh.copy(), mode=cv2.RETR_TREE, method=cv2.CHAIN_APPROX_SIMPLE)
## contours: Each contour in contours is represented as a NumPy array of (x, y) coordinates.
print('contour shape: ', contours[0].shape)

# Draw the contour
## function cv2.contourArea calculates the area of a contour
max_contour = max(contours, key=cv2.contourArea)
img = cv2.drawContours(image=img, contours=[max_contour], contourIdx=-1, color=(0, 255, 0), thickness=2)

show(img)
Convex Hull Detection
Convex Hull is the smallest convex shape that can enclose all the points in a set. It helps to identify the shape of the object.
# Convex Hull
## returnPoints=True returns the points that form the convex hull.
## returnPoints=False returns the indices of the max_contour points that form the convex hull
hull = cv2.convexHull(max_contour, returnPoints=True)

# Draw the convex hull
img = cv2.drawContours(image=img, contours=[hull], contourIdx=-1, color=(0, 0, 255), thickness=2)
show(img)
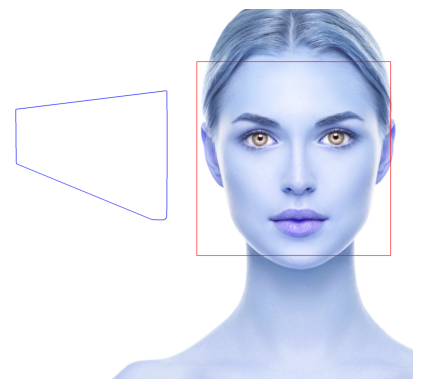
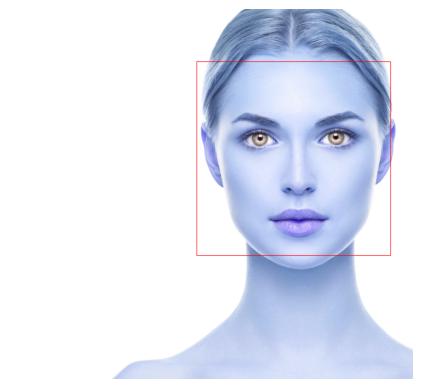
Face Detection
- Haar Features: Haar Cascades use features that look at the contrast between adjacent pixel groups to detect objects.
import requests

# Read img from website
url = 'https://www.lumierebeautyclinic.com.au/wp-content/uploads/2023/05/how-to-make-yourself-pretty-Lumiere-Beauty-Clinic-scaled.jpg'
response = requests.get(url)
img_data = np.asanyarray(bytearray(response.content), dtype='uint8')
img_data
img = cv2.imdecode(img_data, cv2.IMREAD_COLOR)
gray_image = cv2.cvtColor(img, cv2.COLOR_BGR2GRAY)
# show(gray_image)
# Detect faces using the pre-trained Haar Cascade classifier for face detection
face_cascade = cv2.CascadeClassifier(cv2.data.haarcascades + 'haarcascade_frontalface_default.xml')
faces = face_cascade.detectMultiScale(gray_image, scaleFactor=1.1, minNeighbors=5)

# Draw rectangles around the detected faces
for (x, y, w, h) in faces:
    cv2.rectangle(img, (x, y), (x+w, y+h), (255, 0, 0), 2)

show(img)
Camera Pose Estimation
camera pose estimation determines the position and orientation of an object in 3D space relative to the camera; by solving the Perspective-n-Point (PnP) problem, where it estimates the transformation (rotation and translation) required to map 3D points in the world to 2D points in an image.
Python Function Signature
retval, rvec, tvec = cv2.solvePnP(objectPoints, imagePoints, cameraMatrix, distCoeffs, rvec, tvec, useExtrinsicGuess, flags)
Parameters
-
objectPoints: An array of 3D points in the world coordinate space. It should be of shape
(N, 3), whereis the number of points. -
imagePoints: An array of 2D points in the image plane that correspond to the 3D points. It should be of shape
(N, 2). -
cameraMatrix: The intrinsic camera matrix, which contains information about the focal length and optical center of the camera. It’s typically obtained from camera calibration and has the form:
where
and are the focal lengths in the x and y directions, and and are the coordinates of the optical center. -
distCoeffs: The distortion coefficients of the camera, usually obtained from camera calibration. It’s an array of shape
(4, 1)or(5, 1), depending on whether you're correcting for radial and/or tangential distortion. -
rvec (optional): An initial estimate for the rotation vector. It’s used if you want to provide an initial guess (especially useful if you're refining a previous solution).
-
tvec (optional): An initial estimate for the translation vector.
-
useExtrinsicGuess (optional): A boolean flag to indicate if the initial
rvecandtvecshould be used as a starting point for the iterative algorithm. -
flags (optional): Specifies the PnP solving algorithm. Options include:
cv2.SOLVEPNP_ITERATIVE(default): A standard iterative algorithm.cv2.SOLVEPNP_P3P: Requires exactly four points and is faster but less accurate.cv2.SOLVEPNP_AP3P: Another variant of P3P with different constraints.cv2.SOLVEPNP_EPNP: Efficient PnP that works with larger sets of points but is less accurate.cv2.SOLVEPNP_DLSorcv2.SOLVEPNP_UPNP: Advanced methods for specific cases.
Returns
- retval: A boolean indicating whether the solution was found.
- rvec: The rotation vector, representing the orientation of the object relative to the camera. This vector can be converted to a rotation matrix with
cv2.Rodrigues. - tvec: The translation vector, representing the position of the object relative to the camera in 3D space.
import cv2
import numpy as np

# Define 3D object points in the world (for example, the corners of a square on the ground)
object_points = np.array([
    [0, 0, 0],
    [1, 0, 0],
    [1, 1, 0],
    [0, 1, 0]
], dtype=np.float32)

# Corresponding 2D image points in pixels
image_points = np.array([
    [322, 230],
    [400, 230],
    [400, 310],
    [322, 310]
], dtype=np.float32)

# Camera intrinsic parameters (example values)
camera_matrix = np.array([
    [800, 0, 320],
    [0, 800, 240],
    [0, 0, 1]
], dtype=np.float32)

# Assuming no distortion
dist_coeffs = np.zeros((4, 1), dtype=np.float32)

# Solve for rotation and translation vectors
retval, rvec, tvec = cv2.solvePnP(object_points, image_points, camera_matrix, dist_coeffs)

# Convert the rotation vector to a rotation matrix (optional)
rotation_matrix, _ = cv2.Rodrigues(rvec)

# Project 3D points to 2D image plane
image_points, jacobian = cv2.projectPoints(object_points, rvec, tvec, camera_matrix, dist_coeffs)
## The Jacobian matrix describes the partial derivatives of the projected points with respect to each parameter.
## It’s typically used for optimization.

print("Rotation Matrix:\n", rotation_matrix)
print("Translation Vector:\n", tvec)
print("Projected 2D points:\n", image_points)
Rotation Matrix:
 [[ 0.98751468 -0.00154922 -0.15751936]
 [ 0.00572493  0.99964401  0.02605895]
 [ 0.15742292 -0.02663538  0.98717201]]
Translation Vector:
 [[ 0.02472907]
 [-0.12735441]
 [ 9.96113758]]
Projected 2D points:
 [[[321.98605 229.7719 ]]

 [[400.03064 230.38365]]

 [[400.11908 309.60135]]

 [[321.8666  310.24326]]]
Standardize The Low Quality Image
Generate low quality image
Rotate, blur, bring to gray scale, change the brightness and contrast of an image randomly.
import cv2
import numpy as np
import random

def show_color(image):
    cv2.imshow('', cv2.resize(image, None, fx=0.5, fy=0.5, interpolation=cv2.INTER_AREA))
    cv2.waitKey(0)
    cv2.destroyAllWindows()

image = cv2.imread('./example_data/box_toy.jpg')
# 1. Random Rotation
angle = random.randint(-90, 90)
(h, w) = image.shape[:2]
center = (w // 2, h // 2)
transformation_matrix = cv2.getRotationMatrix2D(center, angle, scale=0.8)
print(transformation_matrix)
rotated_image = cv2.warpAffine(image, transformation_matrix, (w, h))

show_color(rotated_image)
[[  0.7517541   -0.27361611 252.66469441]
 [  0.27361611   0.7517541   21.71795954]]
Transformation Matrix (M):
The transformation matrix M is a 2×3 matrix in the form:
(a, b, c, d)control rotation, scaling, and shearing.(tx, ty)control translation (shifting).
# 2. Random Blur
if random.random() > 0.5:  # Apply blur with 50% probability
    ksize = random.choice([3, 5, 7])  # Kernel size: 3x3, 5x5, or 7x7
    blurred_image = cv2.GaussianBlur(rotated_image, (ksize, ksize), 0)
else:
    blurred_image = rotated_image

show_color(blurred_image)
# 3. Random Grayscale Conversion
if random.random() > 0.5:  # Convert to grayscale with 50% probability
    grayscale_image = cv2.cvtColor(blurred_image, cv2.COLOR_BGR2GRAY)
    grayscale_image = cv2.cvtColor(grayscale_image, cv2.COLOR_GRAY2BGR)  # Convert back to 3 channels
else:
    grayscale_image = blurred_image

show_color(grayscale_image)
# 4. Random Brightness Adjustment
brightness_factor = random.uniform(0.5, 1.5)  # Scale brightness
brightness_adjusted = np.clip(grayscale_image * brightness_factor, 0, 255).astype(np.uint8)

show_color(brightness_adjusted)
# 5. Random Contrast Adjustment
contrast_factor = random.uniform(0.5, 1.5)  # Scale contrast
mean = np.mean(brightness_adjusted, axis=(0, 1))
contrast_adjusted = np.clip((brightness_adjusted - mean) * contrast_factor + mean, 0, 255).astype(np.uint8)

show_color(contrast_adjusted)
cv2.imwrite("./example_data/transformed_image.jpg", contrast_adjusted)
Quality Recovery
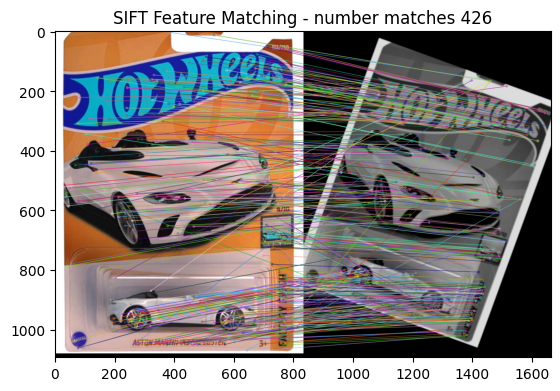
SIFT for Rotation and Scaling
import matplotlib.pyplot as plt
import os

def load_image(path):
    return cv2.imread(path, cv2.IMREAD_COLOR)

def detect_and_compute_keypoints(image):
    gray = cv2.cvtColor(image, cv2.COLOR_BGR2GRAY)
    sift = cv2.SIFT_create()
    keypoints, descriptors = sift.detectAndCompute(gray, None)
    return keypoints, descriptors

def match_keypoints(descriptors1, descriptors2):
    bf = cv2.BFMatcher()
    matches = bf.knnMatch(descriptors1, descriptors2, k=2)
    # Apply ratio test
    good_matches = []
    for m, n in matches:
        if m.distance < 0.75 * n.distance:
            good_matches.append(m)
    return good_matches

# Metrics and plots
def plot_matches(img1, img2, kp1, kp2, matches, path_save_plot):
    matched_image = cv2.drawMatches(img1, kp1, img2, kp2, matches, None, flags=cv2.DrawMatchesFlags_NOT_DRAW_SINGLE_POINTS)
    plt.imshow(matched_image)
    plt.title("SIFT Feature Matching - number matches " + str(len(matches)))
    plt.savefig(path_save_plot)

def get_matched_points(keypoints1, keypoints2, matches):
    points1 = np.zeros((len(matches), 2), dtype=np.float32)
    points2 = np.zeros((len(matches), 2), dtype=np.float32)

    for i, match in enumerate(matches):
        points1[i, :] = keypoints1[match.queryIdx].pt
        points2[i, :] = keypoints2[match.trainIdx].pt

    return points1, points2

def compute_homography(points1, points2):
    h, mask = cv2.findHomography(points2, points1, cv2.RANSAC)
    return h

def warp_image(image, h, shape):
    height, width = shape[:2]
    warped_image = cv2.warpPerspective(image, h, (width, height))
    return warped_image
path_standard_image = './example_data/box_toy.jpg'
dir_aligned_images = './example_data/'
path_modified_image = './example_data/transformed_image.jpg'

file_mod_image = path_modified_image.split("/")[-1]
name_mod_image = file_mod_image.split(".")[0]
path_save_plot = os.path.join(dir_aligned_images, name_mod_image + "_matches.png")
path_save_aligned_image = os.path.join(dir_aligned_images, name_mod_image + "_SIFT.png")

# Load images
image1 = load_image(path_standard_image)
image2 = load_image(path_modified_image)

# Find keypoints and descriptors
keypoints1, descriptors1 = detect_and_compute_keypoints(image1)
keypoints2, descriptors2 = detect_and_compute_keypoints(image2)

# Matching keypoints
matches = match_keypoints(descriptors1, descriptors2)

print(f"Number of keypoints in the original image: {len(keypoints1)}")
print(f"Number of keypoints in the rotated image: {len(keypoints2)}")
print(f"Number of good matches: {len(matches)}")

# Plot matching
plot_matches(image1, image2, keypoints1, keypoints2, matches, path_save_plot)

# Extract correspondences
points1, points2 = get_matched_points(keypoints1, keypoints2, matches)

# Calculate homography
h = compute_homography(points1, points2)

# Rotation and transformation of the second image
aligned_image2 = warp_image(image2, h, image1.shape)

# Save the second image
cv2.imwrite(path_save_aligned_image, aligned_image2)
Number of keypoints in the original image: 1625
Number of keypoints in the rotated image: 748
Number of good matches: 426

True
Laplacian for Blur Removal
import os
# if the amount of blur is over the threshold, remove the blur.
threshold = 100

def variance_of_laplacian(image):
	# compute the Laplacian of the image and then return the focus
	# measure, which is simply the variance of the Laplacian
	gray = cv2.cvtColor(image, cv2.COLOR_BGR2GRAY)
	return cv2.Laplacian(gray, cv2.CV_64F).var()

def unblur(image):
	# Create the sharpening kernel
	kernel = np.array([[0, -1, 0], [-1, 5, -1], [0, -1, 0]])
	# Sharpen the image
	unblur_image = cv2.filter2D(image, ddepth=-1, kernel=kernel)
	return unblur_image
path_blur_image = './example_data/transformed_image_SIFT.png'
dir_unblurred_image = './example_data/'
file_image = path_blur_image.split("/")[-1]

# load the image
image = cv2.imread(path_blur_image)

# loop until focus measure is bigger then the threshold
iter = 0
while variance_of_laplacian(image) <= threshold:
    # unblur the image
    image = unblur(image)
    iter += 1

# Save the image
print("iter: {} - focus measure: {}".format(iter, variance_of_laplacian(image)))
path_unblurred_image = os.path.join(dir_unblurred_image, 'transformed_image_unblurred.png')
cv2.imwrite(path_unblurred_image, image)
Contrast and Brightness Adjustment
def calculate_brightness_and_contrast(image):
    # Convert image to grayscale
    gray = cv2.cvtColor(image, cv2.COLOR_BGR2GRAY)
    # Calculate brightness (mean)
    brightness = np.mean(gray)
    # Calculate contrast (standard deviation)
    contrast = np.std(gray)
    return brightness, contrast

def adjust_brightness_and_contrast(image, target_brightness, target_contrast):
    gray = cv2.cvtColor(image, cv2.COLOR_BGR2GRAY)
    # Calculate current brightness and contrast
    current_brightness, current_contrast = calculate_brightness_and_contrast(image)

    # Calculate scaling factor and offset
    if current_contrast != 0:
        scaling_factor = target_contrast / current_contrast
    else:
        scaling_factor = 1

    offset = target_brightness - scaling_factor * current_brightness

    # Adjust brightness and contrast
    adjusted_image = cv2.convertScaleAbs(image, alpha=scaling_factor, beta=offset)

    return adjusted_image
path_test_image = './example_data/transformed_image_unblurred.png'
path_standard_image = './example_data/box_toy.jpg'
dir_clean_image = './example_data/'
file_image = 'transformed_image_bright.png'

# Load the images
standard_image = cv2.imread(path_standard_image)
image_to_adjust = cv2.imread(path_test_image)

# Calculate brightness and contrast of the standard image
standard_brightness, standard_contrast = calculate_brightness_and_contrast(standard_image)

# Adjust the second image
adjusted_image = adjust_brightness_and_contrast(image_to_adjust, standard_brightness, standard_contrast)

# Save the adjusted image
cv2.imwrite(os.path.join(dir_clean_image, file_image), adjusted_image)
OpenCV Projects
Object Tracking
1. Tracking the selected object

- CamShift and Meanshift: base on object's color and shape.
- Meanshift helps in finding the centroid of a mass in an image.
- CamShift (Continuously Adaptive Meanshift) adapts the search window size and rotation as the object moves.
- Kalman Filter: is used to predict the position of an object in subsequent frames based on its velocity and direction.
# Load a video
path = './balls-moving.mp4'
cap = cv2.VideoCapture(path)

# Get the width and height of the frame
width = int(cap.get(cv2.CAP_PROP_FRAME_WIDTH))
height = int(cap.get(cv2.CAP_PROP_FRAME_HEIGHT))

# Read the first frame of the video
ret, frame = cap.read()

# Set up the initial location of the window
## Select the ROI (Region of Interest) for the object you want to track
frame = cv2.resize(frame, (int(width * 0.5), int(height * 0.5))) # resize to avoid a zoomed in video
roi = cv2.selectROI("Select ROI", frame, fromCenter=False, showCrosshair=True)
x, y, w, h = roi

# x, y, w, h = 0, 100, 100, 100  # Hardcoded initial window
track_window = (x, y, w, h)

# Set up the Region of Interest (ROI) for tracking
roi = frame[y:y+h, x:x+w]
hsv_roi = cv2.cvtColor(roi, cv2.COLOR_BGR2HSV)
# show(hsv_roi)

# cv2.inRange() creates a binary mask where
# pixels within the specified color range are set to 255 (white),
# and pixels outside the range are set to 0 (black).
mask = cv2.inRange(hsv_roi, lowerb=np.array((0, 60, 32)), upperb=np.array((180, 255, 255)))
# print(mask)

roi_hist = cv2.calcHist(images=[hsv_roi], channels=[0], mask=mask, histSize=[180], ranges=[0, 180])
clipped_roi_hist = cv2.normalize(src=roi_hist, dst=None, alpha=0, beta=255, norm_type=cv2.NORM_MINMAX)

# Set up the termination criteria: either 10 iterations or move by at least 1 pt
term_crit = (cv2.TERM_CRITERIA_EPS | cv2.TERM_CRITERIA_COUNT, 10, 1)

while True:
    ret, frame = cap.read()
    if ret:
        # resize to avoid a zoomed in video
        frame = cv2.resize(frame, (int(width * 0.5), int(height * 0.5)))
        hsv = cv2.cvtColor(frame, cv2.COLOR_BGR2HSV)

        # create a probability map (dst) based on the color distribution from roi_hist.
        dst = cv2.calcBackProject(images=[hsv], channels=[0], hist=roi_hist, ranges=[0, 180], scale=1)

        # apply CamShift to get new location
        ret, track_window = cv2.CamShift(probImage=dst, window=track_window, criteria=term_crit)

        # converts the result to a set of points to draw a rotated rectangle on the video
        pts = cv2.boxPoints(ret) # Get the four corner points of the rotated rectangle
        pts = np.intp(pts) # Convert to integer
        img2 = cv2.polylines(img=frame, pts=[pts], isClosed=True, color=255, thickness=2)
        # img2 = cv2.resize(img2, (int(width * 0.5), int(height * 0.5))) # resize to avoid a zoomed in video
        cv2.imshow('Object Tracking', img2)

        if cv2.waitKey(30) & 0xFF == 27: break
    else: break

cap.release()
cv2.destroyAllWindows()
2. Tracking all objects

cap = cv2.VideoCapture(path)  # Replace "video.mp4" with 0 for webcam

# Get the width and height of the frame
width = int(cap.get(cv2.CAP_PROP_FRAME_WIDTH))
height = int(cap.get(cv2.CAP_PROP_FRAME_HEIGHT))

# Create background subtractor
fgbg = cv2.createBackgroundSubtractorMOG2(history=500, varThreshold=25, detectShadows=True)

while cap.isOpened():
    ret, frame = cap.read()
    if not ret:
        break

    frame = cv2.resize(frame, (int(width * 0.5), int(height * 0.5))) # resize to avoid a zoomed in video

    # Apply background subtraction
    fgmask = fgbg.apply(frame)

    # Remove noise and small objects from the mask
    kernel = cv2.getStructuringElement(cv2.MORPH_ELLIPSE, (5, 5))
    fgmask = cv2.morphologyEx(fgmask, cv2.MORPH_OPEN, kernel)

    # Find contours of the moving objects
    contours, _ = cv2.findContours(fgmask, cv2.RETR_EXTERNAL, cv2.CHAIN_APPROX_SIMPLE)

    for cnt in contours:
        # Filter out small objects based on contour area
        if cv2.contourArea(cnt) > 500:
            # Draw bounding box around the moving object
            x, y, w, h = cv2.boundingRect(cnt)
            cv2.rectangle(frame, (x, y), (x + w, y + h), (0, 255, 0), 2)
            # cv2.putText(frame, "Moving Object", (x, y - 10), cv2.FONT_HERSHEY_SIMPLEX, 0.5, (0, 255, 0), 2)

        # Display the original frame with the bounding box
        cv2.imshow("Object Tracking", frame)

    # Exit if 'q' is pressed
    if cv2.waitKey(30) & 0xFF == ord('q'):
        break

# Release resources
cap.release()
cv2.destroyAllWindows()
Hand Gesture Recognition

- Machine Learning Integration: classifies the gestures based on the contours and hulls detected.
# Load the video feed from the webcam
cap = cv2.VideoCapture(0)

while True:
    ret, frame = cap.read()
    frame = cv2.flip(frame, 1)
    if not ret:
        break

    # Convert the frame to grayscale and
    gray = cv2.cvtColor(frame, cv2.COLOR_BGR2GRAY)

    # apply Gaussian filter to blur the image by reducing noise and detail.
    kernel_size = (35,35) # the area over which the Gaussian average is calculated; a larger kernel size leads to a greater blur.
    blurred = cv2.GaussianBlur(src=gray, ksize=kernel_size, sigmaX=0)
    # cv2.imshow('test blurred cam', blurred)

    # Threshold the image
    _, thresh = cv2.threshold(src=blurred, thresh=127, maxval=255, type=cv2.THRESH_BINARY_INV+cv2.THRESH_OTSU)

    # Find contours
    contours, _ = cv2.findContours(image=thresh.copy(), mode=cv2.RETR_TREE, method=cv2.CHAIN_APPROX_SIMPLE)
    if len(contours) > 0:
        # Find the largest contour
        max_contour = max(contours, key=cv2.contourArea)

        # Draw the contour
        cv2.drawContours(image=frame, contours=[max_contour], contourIdx=-1, color=(0, 255, 0), thickness=2)

        # Convex Hull
        hull = cv2.convexHull(max_contour)

        # Draw the convex hull
        cv2.drawContours(image=frame, contours=[hull], contourIdx=-1, color=(0, 0, 255), thickness=2)

    cv2.imshow('Hand Gesture Recognition', frame)

    if cv2.waitKey(1) & 0xFF == ord('q'): break

cap.release()
cv2.destroyAllWindows()
Lane Detection for Self-Driving Cars

- Hough Transform: is used to detect straight lines in an image.
- Masking: is essential to focus on the region of interest (e.g., the road) while ignoring irrelevant parts of the image.
- Perspective Transformations: Adjusting the perspective of the image helps in correctly identifying lanes, especially on curved roads.
import cv2
import numpy as np

def RoI(img, vertices): # color the RoI
    mask = np.zeros_like(img)
    cv2.fillPoly(img=mask, pts=vertices, color=255)
    masked = cv2.bitwise_and(img, mask)
    return masked

def draw_lines(img, lines):
    if lines is None:
        return
    for line in lines:
        for x1, y1, x2, y2 in line:
            cv2.line(img=img, pt1=(x1,y1), pt2=(x2,y2), color=(0,255,0), thickness=5)

onl_path = 'https://mazwai.com/videvo_files/video/free/2014-11/small_watermarked/matt_devir--one_minute_drive_preview.webm'
offl_path = './driving.mp4'
cap = cv2.VideoCapture(offl_path)

# Get the width and height of the frame
width = int(cap.get(cv2.CAP_PROP_FRAME_WIDTH))
height = int(cap.get(cv2.CAP_PROP_FRAME_HEIGHT))

while cap.isOpened():
    ret, frame = cap.read()
    # frame = cv2.resize(frame, (int(width * 0.5), int(height * 0.5))) # resize to avoid a zoomed in video

    if not ret:
        break

    gray = cv2.cvtColor(frame, cv2.COLOR_BGR2GRAY)
    blur = cv2.GaussianBlur(gray, (5, 5), 0)
    edges = cv2.Canny(blur, 50, 150)

    # Define the region of interest
    height = frame.shape[0]
    width = frame.shape[1]
    vertices = np.array([[(100, height), (width//2 - 50, height//2 + 50),
                          (width//2 + 50, height//2 + 50), (width-100, height)]],
                        dtype=np.int32)
    roi = RoI(edges, vertices)

    # Hough Transform to detect lines
    lines = cv2.HoughLinesP(roi, 1, np.pi/180, 100, minLineLength=40, maxLineGap=5)
    line_img = np.zeros_like(frame)
    draw_lines(line_img, lines)

    # Combine the original frame with the line image
    combo = cv2.addWeighted(frame, 0.8, line_img, 1, 0)

    cv2.imshow('Lane Detection', combo)
    if cv2.waitKey(1) & 0xFF == ord('q'):
        break

cap.release()
cv2.destroyAllWindows()
Augmented Reality (AR)

AR is a cutting-edge technology that overlays virtual objects onto the real world. Using OpenCV to track a real-world object and places 3D models on top of it.
- Homography: is a transformation that maps the points in one plane to another. It’s crucial for accurately placing virtual objects in the correct position relative to the real world.
- Perspective Transformations: adjust the image perspective, helping align virtual objects with real-world objects.
- 3D Object Rendering: render 3D objects and overlay them onto a live camera feed, creating an AR effect.
import cv2
import numpy as np
import requests

# Load the marker image and start the camera
path = 'https://i.sstatic.net/kdqSZ.jpg'
response = requests.get(path)
img_data = np.asanyarray(bytearray(response.content), dtype='uint8')
marker = cv2.imdecode(img_data, cv2.IMREAD_GRAYSCALE)
show(marker)
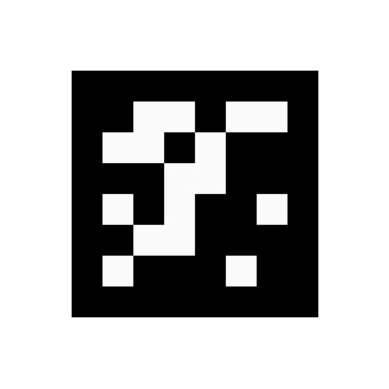
- Marker images (or AR markers) serve as reference points that the AR system can recognize and track to anchor digital content in the physical world. These images typically look like QR codes or high-contrast patterns, and the AR app detects and identifies them through the camera.
- SIFT (Scale-Invariant Feature Transform) object detects and computes distinctive, scale-invariant features in an image. SIFT is robust to changes in scale, rotation, and even some degree of perspective distortion.
- Keypoint Detection: The SIFT algorithm identifies "keypoints" in an image, which are points of interest that stand out in terms of contrast, edges, or other unique features.
- Descriptor Computation: For each keypoint, SIFT computes a descriptor — a vector that characterizes the keypoint’s appearance in a way that is stable under different scales and rotations. This descriptor enables matching of the same point across different images.
- These keypoints and descriptors can be used to match similar features across images.
cap = cv2.VideoCapture(0)

# Define 3D points for a simple cube
cube_points = np.float32([[0, 0, 0], [0, 3, 0], [3, 3, 0], [3, 0, 0], [0, 0, -3], [0, 3, -3], [3, 3, -3], [3, 0, -3]])

# Define a dummy camera matrix and no distortion for testing
camera_matrix = np.array([[800, 0, 320], [0, 800, 240], [0, 0, 1]], dtype="double")
dist_coeffs = np.zeros((4, 1))  # Assuming no distortion

while True:
    ret, frame = cap.read()
    frame = cv2.flip(frame, 1)
    if not ret:
        break

    gray_frame = cv2.cvtColor(frame, cv2.COLOR_BGR2GRAY)
    sift = cv2.SIFT_create()
    kp1, des1 = sift.detectAndCompute(marker, None)
    kp2, des2 = sift.detectAndCompute(gray_frame, None)

    bf = cv2.BFMatcher(cv2.NORM_L2, crossCheck=True)
    matches = bf.match(des1, des2)
    matches = sorted(matches, key=lambda x: x.distance)

    # Proceed only if enough matches are found
    if len(matches) > 10:
        src_pts = np.float32([kp1[m.queryIdx].pt for m in matches]).reshape(-1, 1, 2)
        dst_pts = np.float32([kp2[m.trainIdx].pt for m in matches]).reshape(-1, 1, 2)
        matrix, mask = cv2.findHomography(src_pts, dst_pts, cv2.RANSAC, 5.0)

        # Draw a box around the detected marker
        h, w = marker.shape
        pts = np.float32([[0, 0], [0, h], [w, h], [w, 0]]).reshape(-1, 1, 2)
        dst = cv2.perspectiveTransform(pts, matrix)
        frame = cv2.polylines(frame, [np.int32(dst)], True, 255, 3)
        ## cv2.perspectiveTransform() applies a perspective transformation to a set of 2D points.
        ## This transformation is typically defined by a 3x3 homography matrix,
        ## allowing you to map points from one plane to another under a perspective transformation.

        # 3D-2D points mapping for solvePnP
        image_points = np.array(dst).reshape(-1, 2)
        object_points = cube_points[:4]  # Ensure only 4 points for solvePnP

        # SolvePnP to find rotation and translation vectors
        retval, rvecs, tvecs = cv2.solvePnP(object_points, image_points, camera_matrix, dist_coeffs)

        # Define cube edges for 3D projection and overlay
        axis = np.float32([[3, 3, 0], [6, 3, 0], [6, 6, 0], [3, 6, 0], [3, 3, -3], [6, 3, -3], [6, 6, -3], [3, 6, -3]])
        imgpts, _ = cv2.projectPoints(axis, rvecs, tvecs, camera_matrix, dist_coeffs)
        imgpts = np.int32(imgpts).reshape(-1, 2)

        # Draw the cube using line segments
        for i, j in zip([0, 1, 2, 3, 4, 5, 6, 7], [1, 2, 3, 0, 5, 6, 7, 4]):
            frame = cv2.line(frame, tuple(imgpts[i]), tuple(imgpts[j]), (0, 0, 255), 3)
        for i, j in zip([0, 4, 1, 5, 2, 6, 3, 7], [4, 0, 5, 1, 6, 2, 7, 3]):
            frame = cv2.line(frame, tuple(imgpts[i]), tuple(imgpts[j]), (0, 255, 0), 3)

    cv2.imshow('Augmented Reality', frame)

    if cv2.waitKey(1) & 0xFF == ord('q'):
        break

cap.release()
cv2.destroyAllWindows()
Real Time Emotion Recognition

- uses Haar Cascade classifier for face detection.
- builds a CNN model for facial expression recognition (FER).
Check this link for more details.