Enhancing MRI Analysis with Multimodal AI and Computer Vision.
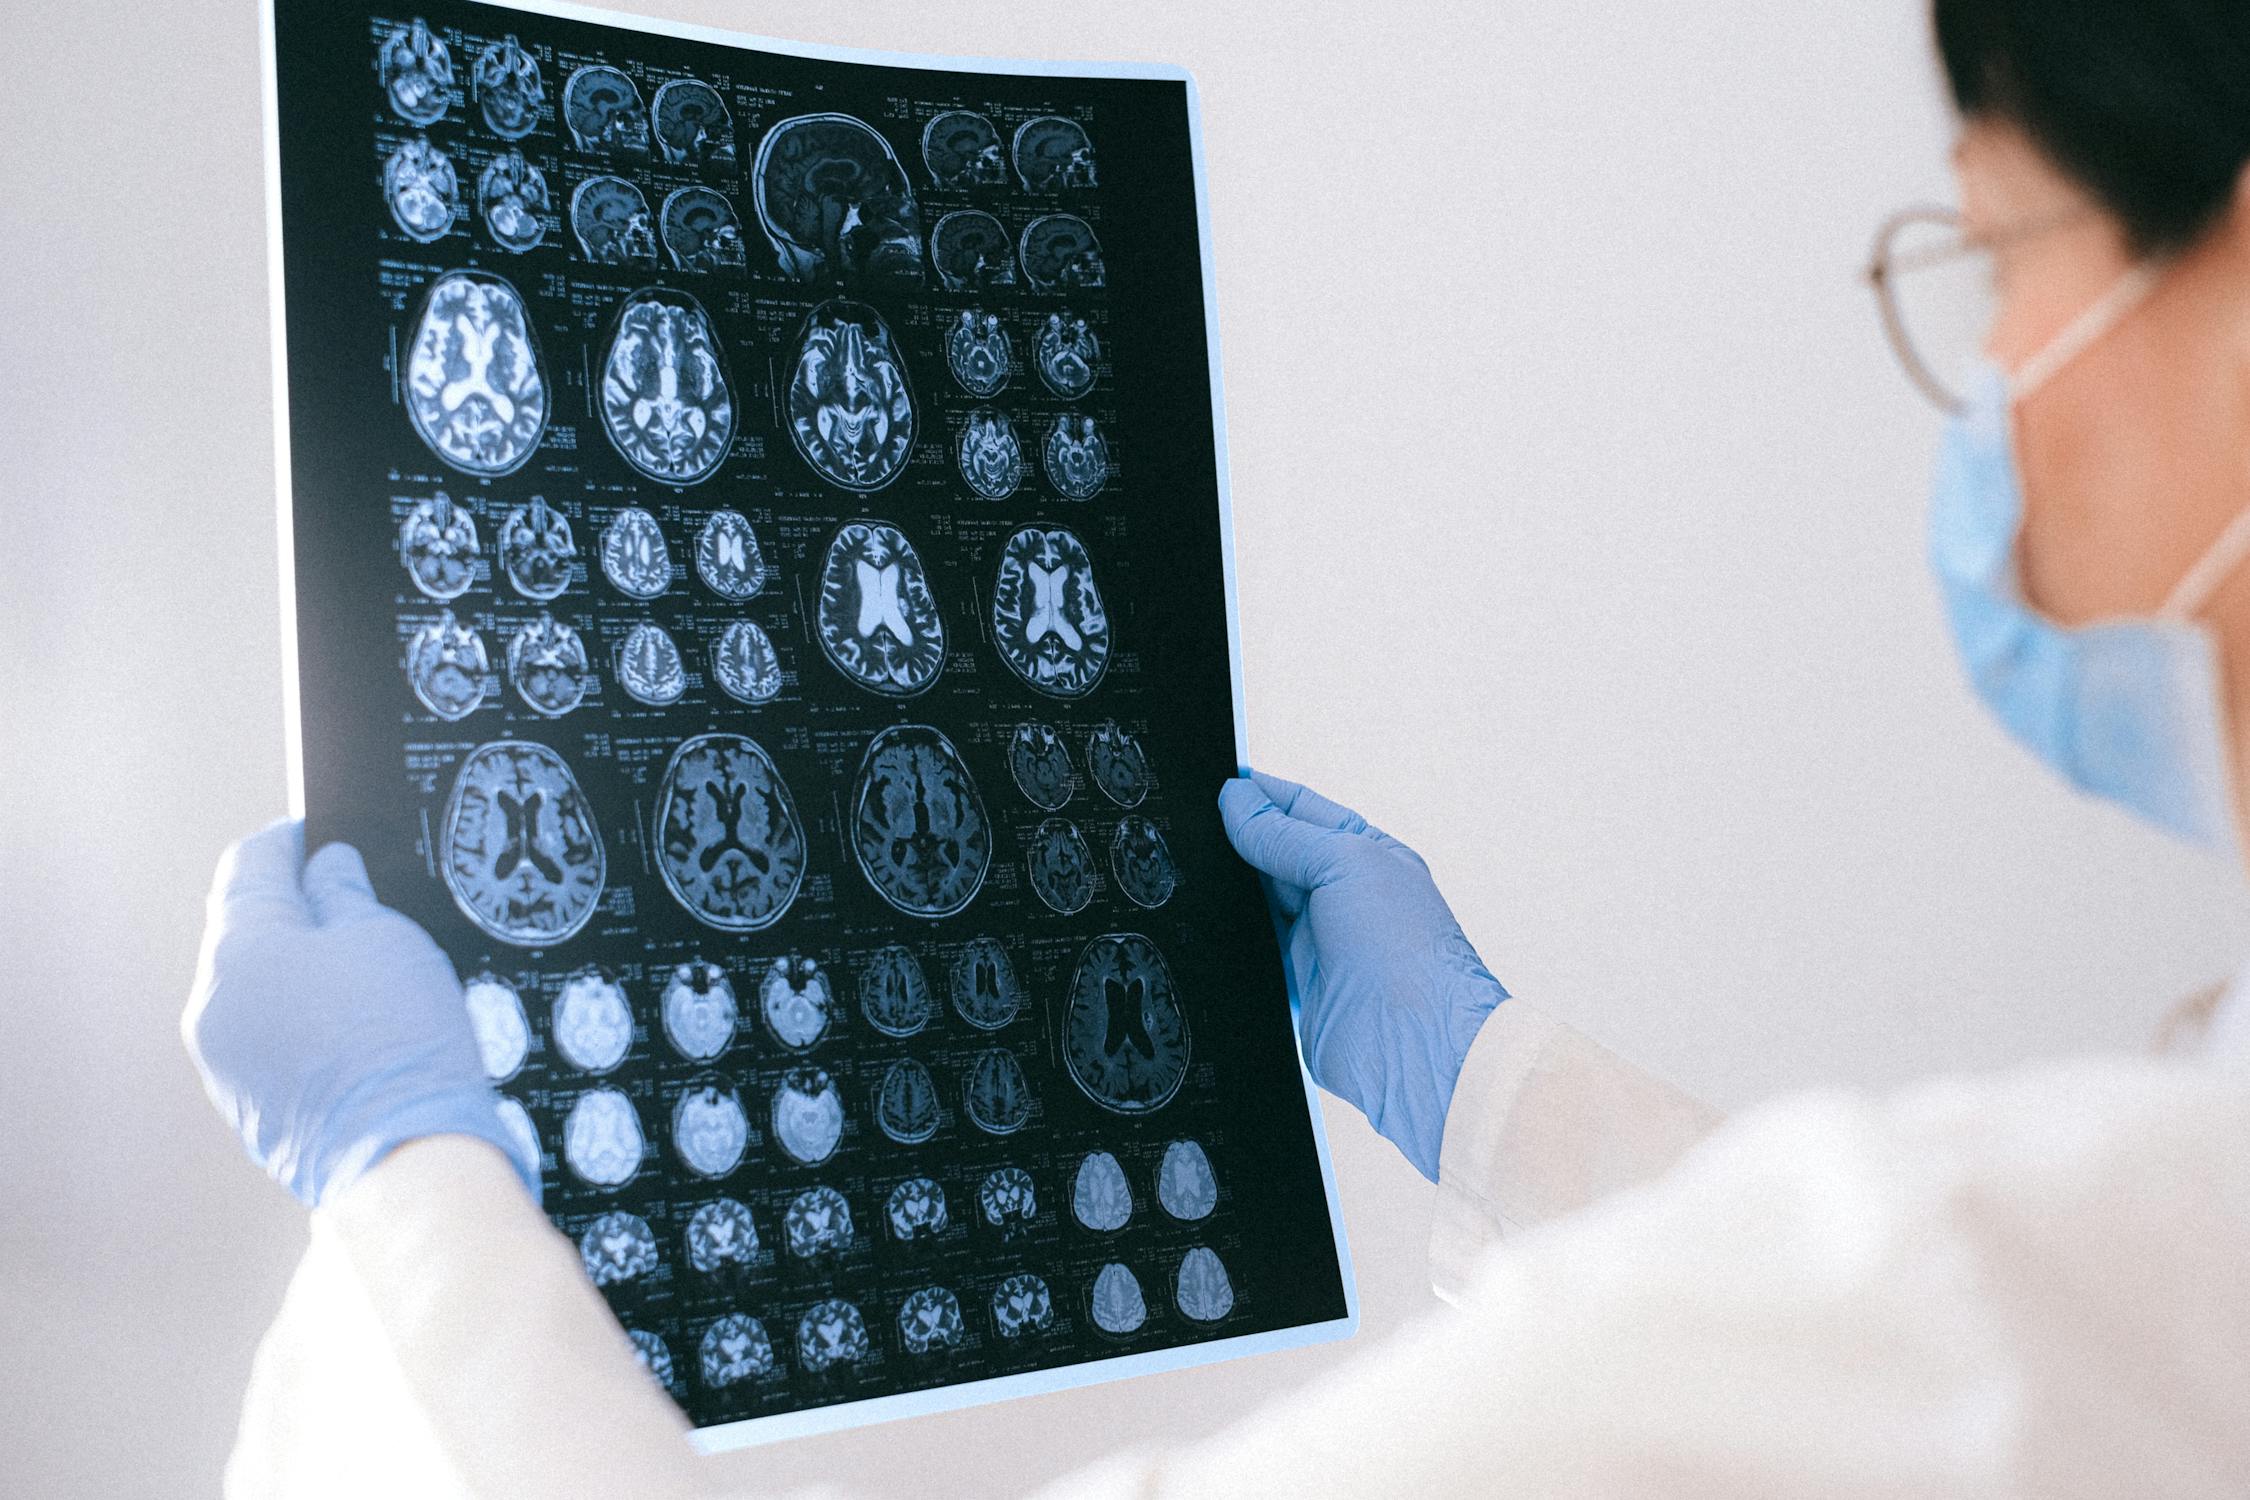
Photo by Anna Shvets
Abstract
This project presents an innovative approach to multimodal AI and Computer Vision pipeline to enhance medical imaging analysis, specifically targeting the early detection of brain tumors through MRI scans. By integrating convolutional neural networks (CNNs), advanced computer vision techniques, and vision-language models, our system achieves high classification accuracy and provides detailed diagnostic reports. The implementation demonstrates significant improvements in diagnostic speed and accuracy, with potential implications for clinical practice.
1. Project Scope and Objectives
The objective of this project is to develop a Computer Vision and Multimodal AI solution that improves the accuracy and efficiency of brain tumor diagnosis from MRI scans. This include:
- To develop a robust image detection model that accurately classifies different types of brain tumors.
- To generate comprehensive diagnostic reports that assist clinicians in decision making.
- To evaluate the model's performance and demonstrate its effectiveness.
- To deploy and run model on cloud or locally on device.
2. Technical Methodology and Implementation Details
Setup
#Uncomment to install the packages below
# %pip install ultralytics
# %pip install supervision
# %pip install roboflow
Import libraries
from ultralytics import YOLO
from roboflow import Roboflow
import supervision as sv
import cv2
import base64
from io import BytesIO
from PIL import Image as PILImage
2.1 Data Collection and Preparation
The dataset consists of annotated MRI scans sourced from multiple medical institutions.
Key preprocessing steps include:
- Normalization: Adjusting image intensities to standardize input for model training.
- Artifact Correction: Mitigating noise and distortions common in MRI imaging.
- Data Augmentation: Applying transformations like rotations, flipping, and contrast adjustments to enhance model generalization.
- Annotation: Annotating images with tumor-specific attributes such as type, size, and location.
Roboflow API Key
Roboflow is a comprehensive platform for building, training, and deploying computer vision models, which we will use to streamline our dataset management, annotation, and model deployment processes, ensuring efficiency and scalability in our project.
To load models with inference, you'll need a Roboflow API Key. Find instructions for retrieving your API key here.
rf = Roboflow(api_key=api_key)
project = rf.workspace("openvision-pkoxi").project("live-brain-surgery")
version = project.version(1)
dataset = version.download("yolov8")
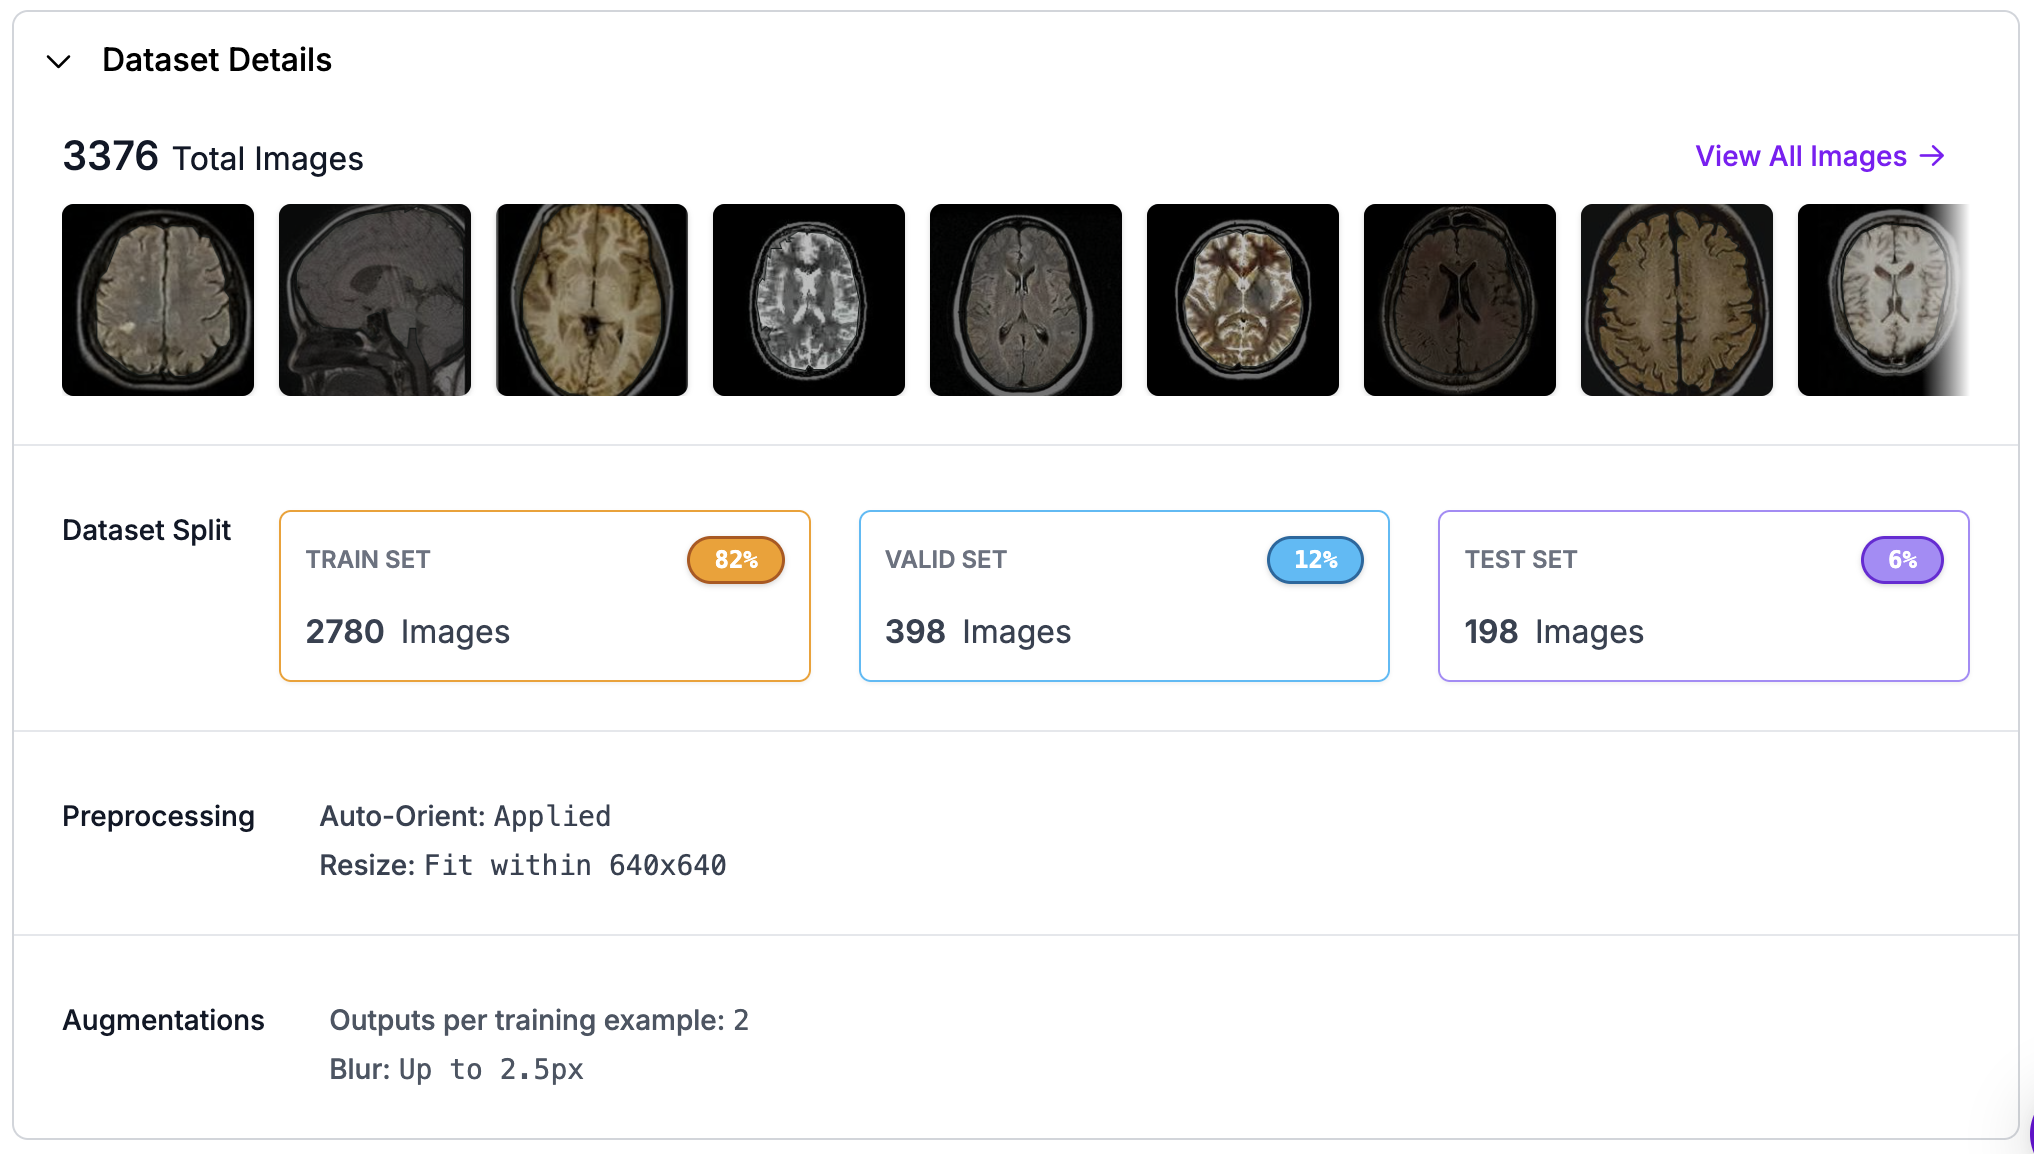
Fig 1: Picure of dataset from Roboflow.
2.2 Model Architecture
We used a hybrid architecture combining CNNs for image classification and segmentation with vision language models for report generation.
The architecture includes:
- YOLOv8 for Object Detection: Utilized for tumor detection and segmentation.
- Visual Language Model Workflow: Converts image data into natural language descriptions for diagnostic reporting.
The YOLOv8 architecture, developed by the Ultralytics team, is the latest iteration of the "You Only Look Once" (YOLO) family, renowned for its efficiency in real-time object detection. It is designed to identify and locate multiple objects within images rapidly and accurately. By reframing object detection as a single regression problem, YOLOv8 improves upon traditional methods that were often slow and computationally intensive.
The architecture consists of three main components:
- Backbone: Utilizes a custom CSPDarknet53, which enhances feature extraction through Cross-Stage Partial connections to improve information flow and accuracy.
- Neck: Incorporates a novel C2f module that merges feature maps from different layers to capture multi-scale information effectively.
- Head: Features multiple detection modules that predict bounding boxes, object scores, and class probabilities, improving detection accuracy, particularly for smaller objects.
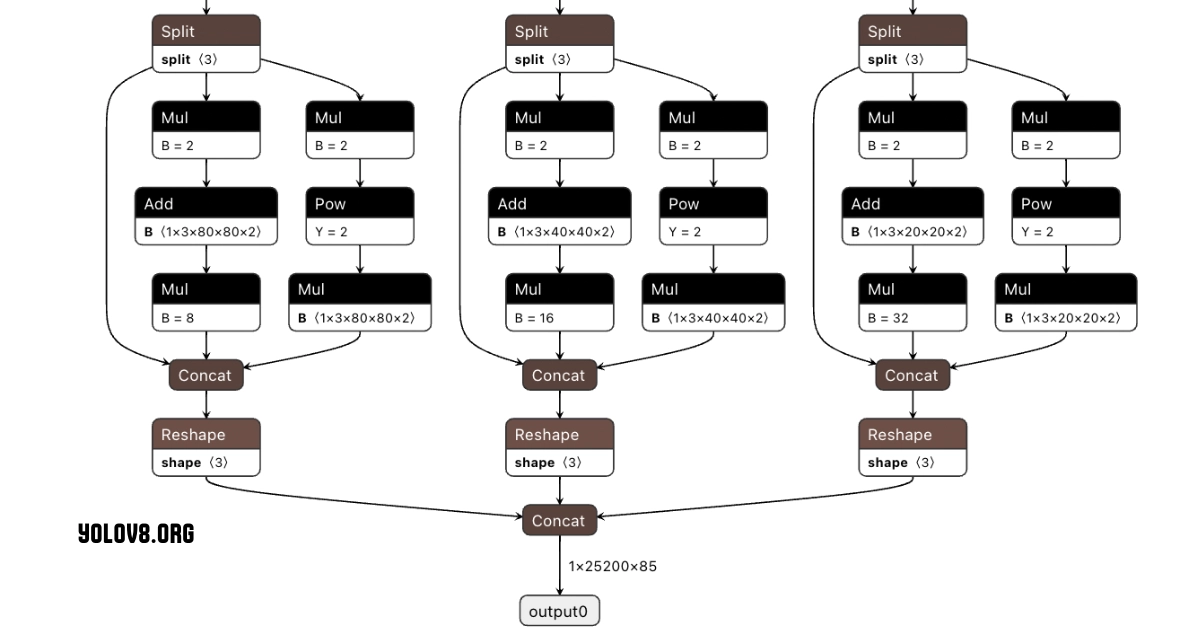
Fig 2: Yolo architecture by yolov8.org
Our visual language model workflow is a structured sequence of steps designed to process and analyze visual data, such as images or videos, using Yolov8 model and AI vision. The goal is to extract meaningful information from visual inputs and often convert this information into a form that can be understood or utilized by other medical professionals. Here’s a breakdown of what this workflow typically involves:
- Input: Submit an image or video.
- Object Detection Model: Detects objects in the image using a pre-trained model.
- Bounding Box Visualization: Draws bounding boxes around detected objects.
- Label Visualization: Adds labels to the bounding boxes.
- Detection Offset: Adjusts the bounding boxes.
- Dynamic Crop: Crops the detected image based on detected objects for analysis.
- OpenAI: Uses OpenAI vision for further analysis.
- Response: Outputs the results, including visualized images and text.
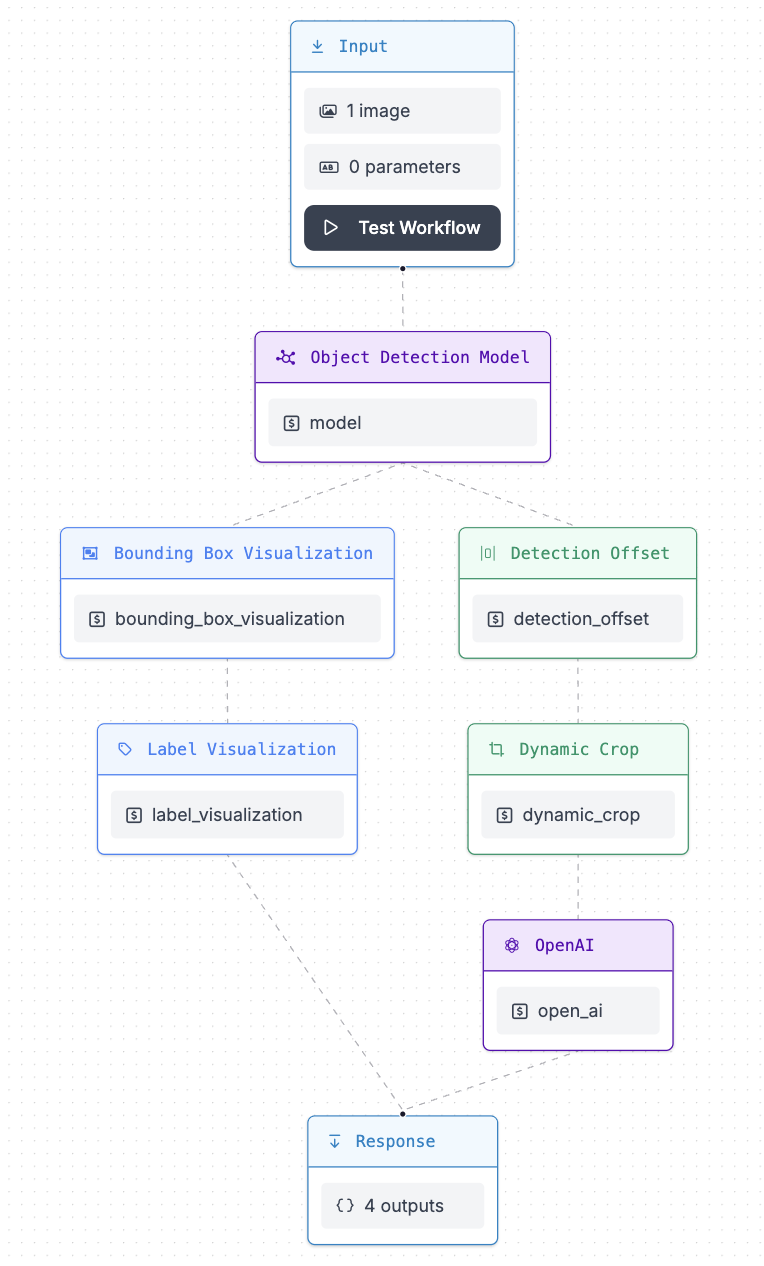
Fig 3: Picture of detection workflow
2.3 Implementation
# Load pre-trained YOLOv8 model
model = YOLO("yolov8x.pt")
# Display model information (optional)
model.info()
2.3.1 Model Training
Training a deep learning model requires supplying it with data and fine-tuning its parameters to improve prediction accuracy. According to the documentation for Ultralytics YOLOv8, the model's training mode is specifically designed for the effective and efficient training of object detection models, maximizing the use of modern hardware capabilities (Ultralytics, n.d.).
The command below initiates training of a YOLOv8 model, where "data" refers to the path of the dataset configuration file, "epochs" indicates the number of complete passes through the training dataset, and "device" specifies the hardware used for training, in this case, utilizing Metal Performance Shaders (MPS) for GPU acceleration
# Train the model with MPS
results = model.train(data="Live-Brain-Surgery-1/data.yaml", epochs=50, device="mps")
Alternatively, training can be done using roboflow.
Roboflow offers a streamlined, low-code approach to training YOLO models by enabling users to upload and annotate images, generate dataset versions, export data in the necessary format, and utilize command-line tools for model training, significantly simplifying the machine learning workflow (Skalski, 2023; Gallagher, 2024).
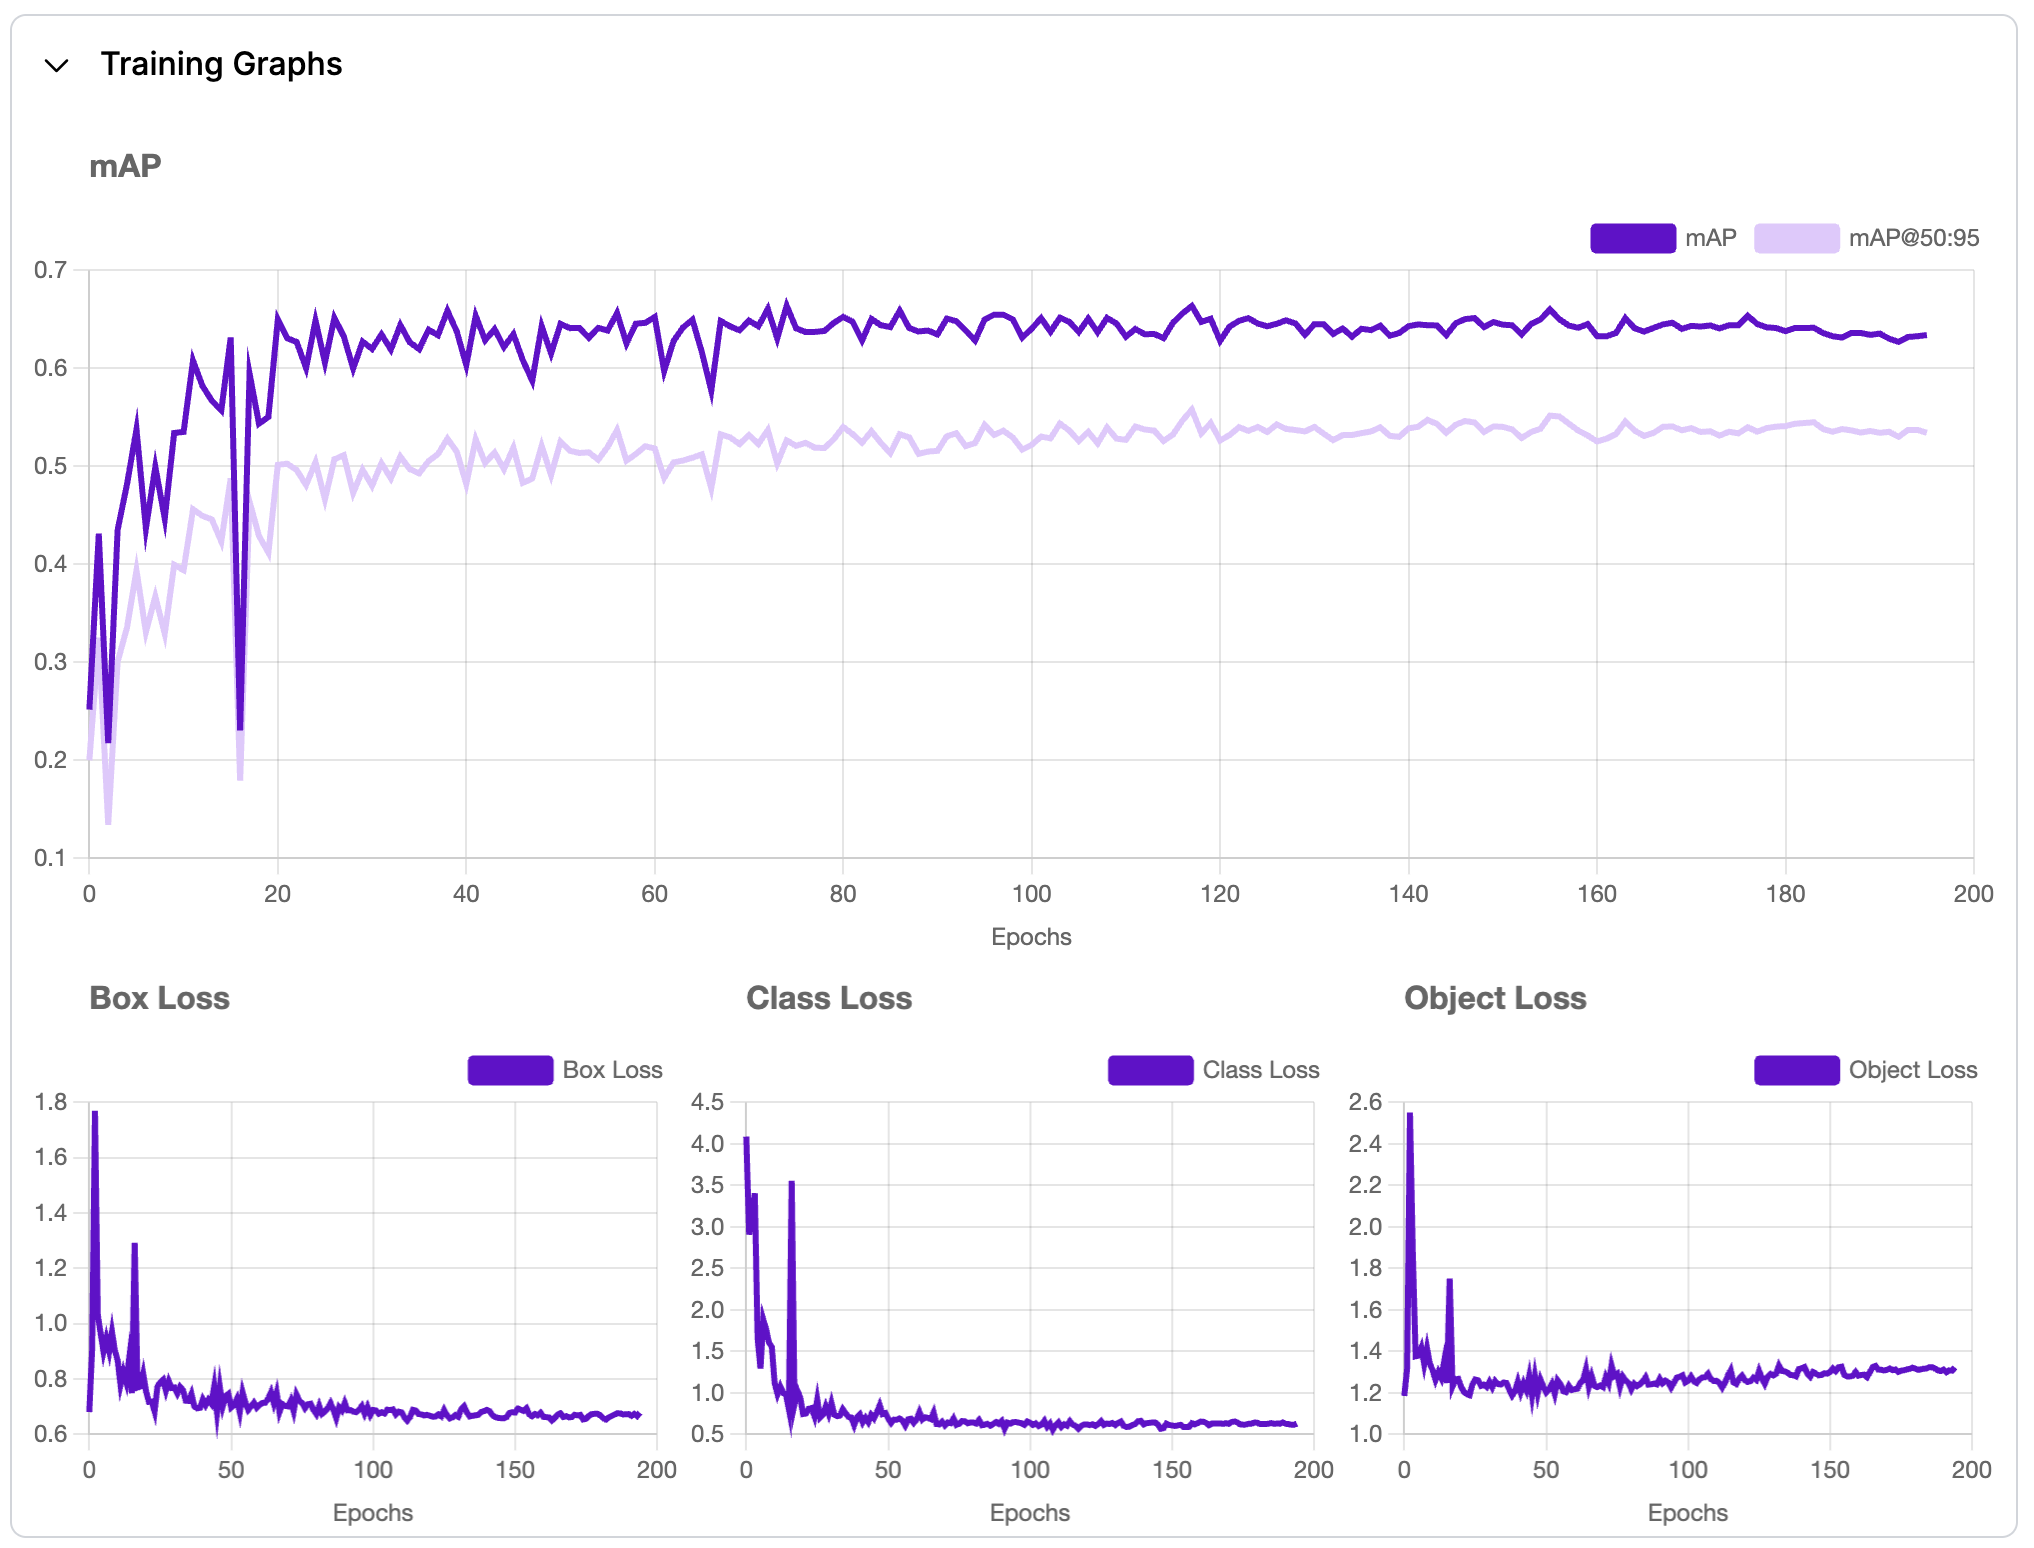
Fig 4: Image of model training graph.
2.3.2 Model Validation
Validation is an important step in the machine learning pipeline, as it provides a means to evaluate the performance and reliability of trained models.
# Load a model
model = YOLO("path/to/best.pt")  # load our trained model

# Validate the model
metrics = model.val()
metrics.box.maps
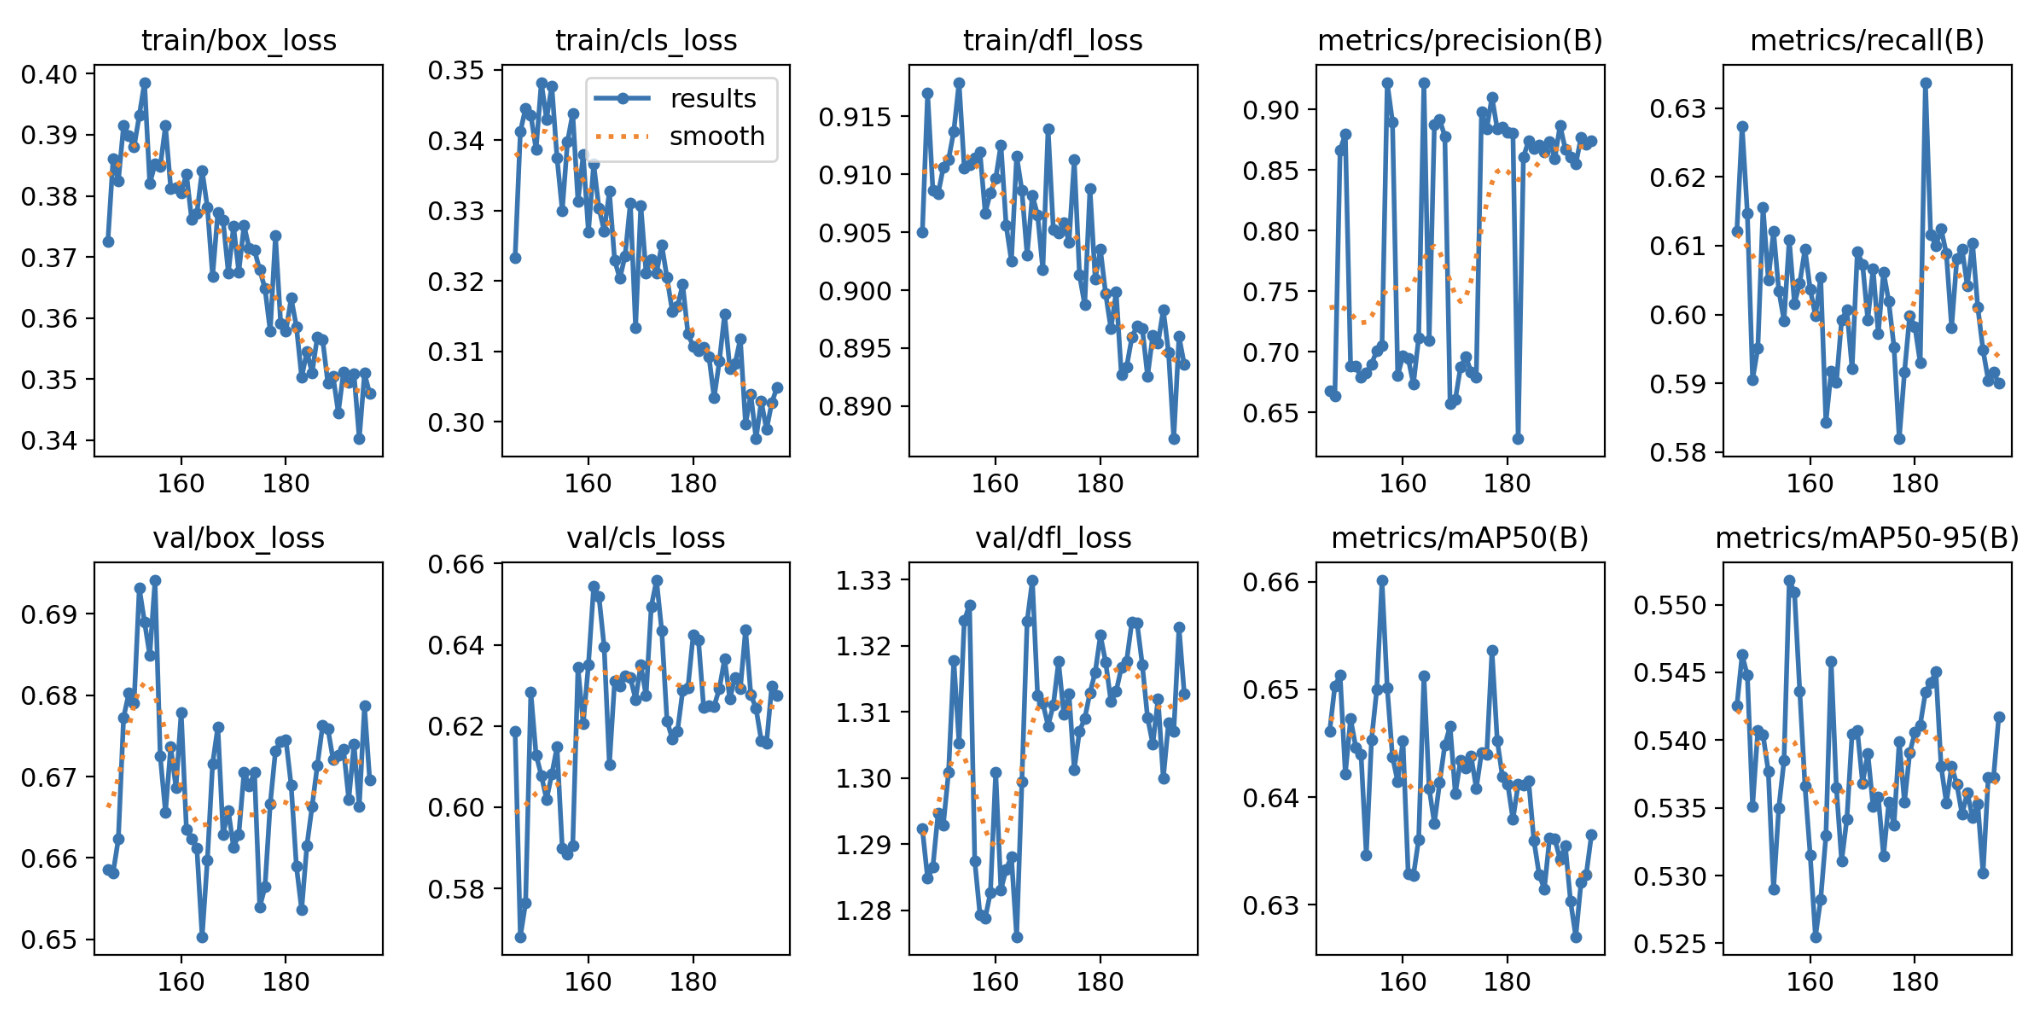
Fig 5: Image of model validation metrics.
3. Evaluation Metrics and Results
3.1 Performance Metrics

Fig 6: Image of model performance metrics.
The model's performance was evaluated using the following metrics:
-
mAP (mean Average Precision): 63.4%
This metric measures the model's ability to make accurate predictions across all classes. It combines precision and recall to evaluate the overall accuracy of predictions at different confidence levels. A higher mAP indicates better performance. -
Precision: 89.3%
This quantifies how many of the model's positive predictions are correct. High precision means the model makes fewer false positive predictions. -
Recall: 60.2%
This measures how many of the actual positive instances are correctly predicted by the model. High recall means the model detects most of the true instances, even at the cost of more false positives.
3.2 Results Summary
The model achieves a high precision of 89.3%, but the recall of 60.2% indicates it misses some detections, leading to a mAP of 63.4%. To improve performance, I plan to augment the dataset with more diverse dataset, address potential class imbalances, and fine tune key hyperparameters like the confidence threshold and learning rate. Additionally, experimenting with multi-scale training, higher resolution images, and techniques like focal loss could help balance precision and recall for better overall results.
4. Model Testing and Deployment
In machine learning and computer vision, deployment and testing are crucial steps in the lifecycle of machine learning (ML) models, ensuring that they perform well in real-world applications. The process of making sense out of visual data is called 'inference' or 'prediction'.
We will utilize Inference to facilitate the deployment of our model. This simplifies the process by providing a user-friendly interface and robust infrastructure, allowing for efficient execution of the model across various platforms ensuring that our model is readily accessible and operational in real world applications.
# %pip install inference
# %pip install inference-cli && inference server start
from inference_sdk import InferenceHTTPClient

client = InferenceHTTPClient(
    api_url="http://localhost:9001", # use local inference server
    api_key=api_key
)

result = client.run_workflow(
    workspace_name="openvision-pkoxi",
    workflow_id="brain-surgery-workflow",
    images={
        "image":"test-img.jpg"
    }
)
Image Analysis Stage
We employ a deep learning-based approach to analyze MRI scans
# Decode the base64 string
label_visualization = result[0]['label_visualization']
dynamic_crop = result[0]['dynamic_crop'][0]
# show predicton image and label
image_bytes1 = base64.b64decode(label_visualization)

# Create an image from the bytes
image1 = PILImage.open(BytesIO(image_bytes1))

# Display the image
display(image1)
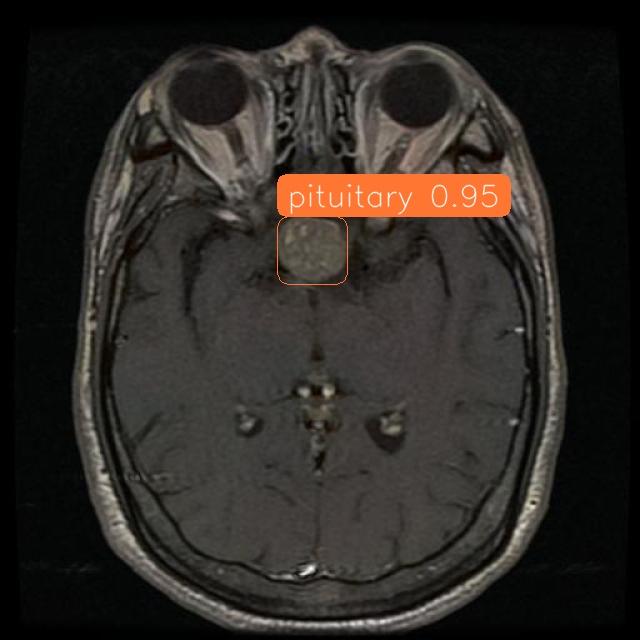
# show detected image
image_bytes2 = base64.b64decode(dynamic_crop)

# Create an image from the bytes
image2 = PILImage.open(BytesIO(image_bytes2))

# Display the image
display(image2)

Vision Language Integration Results
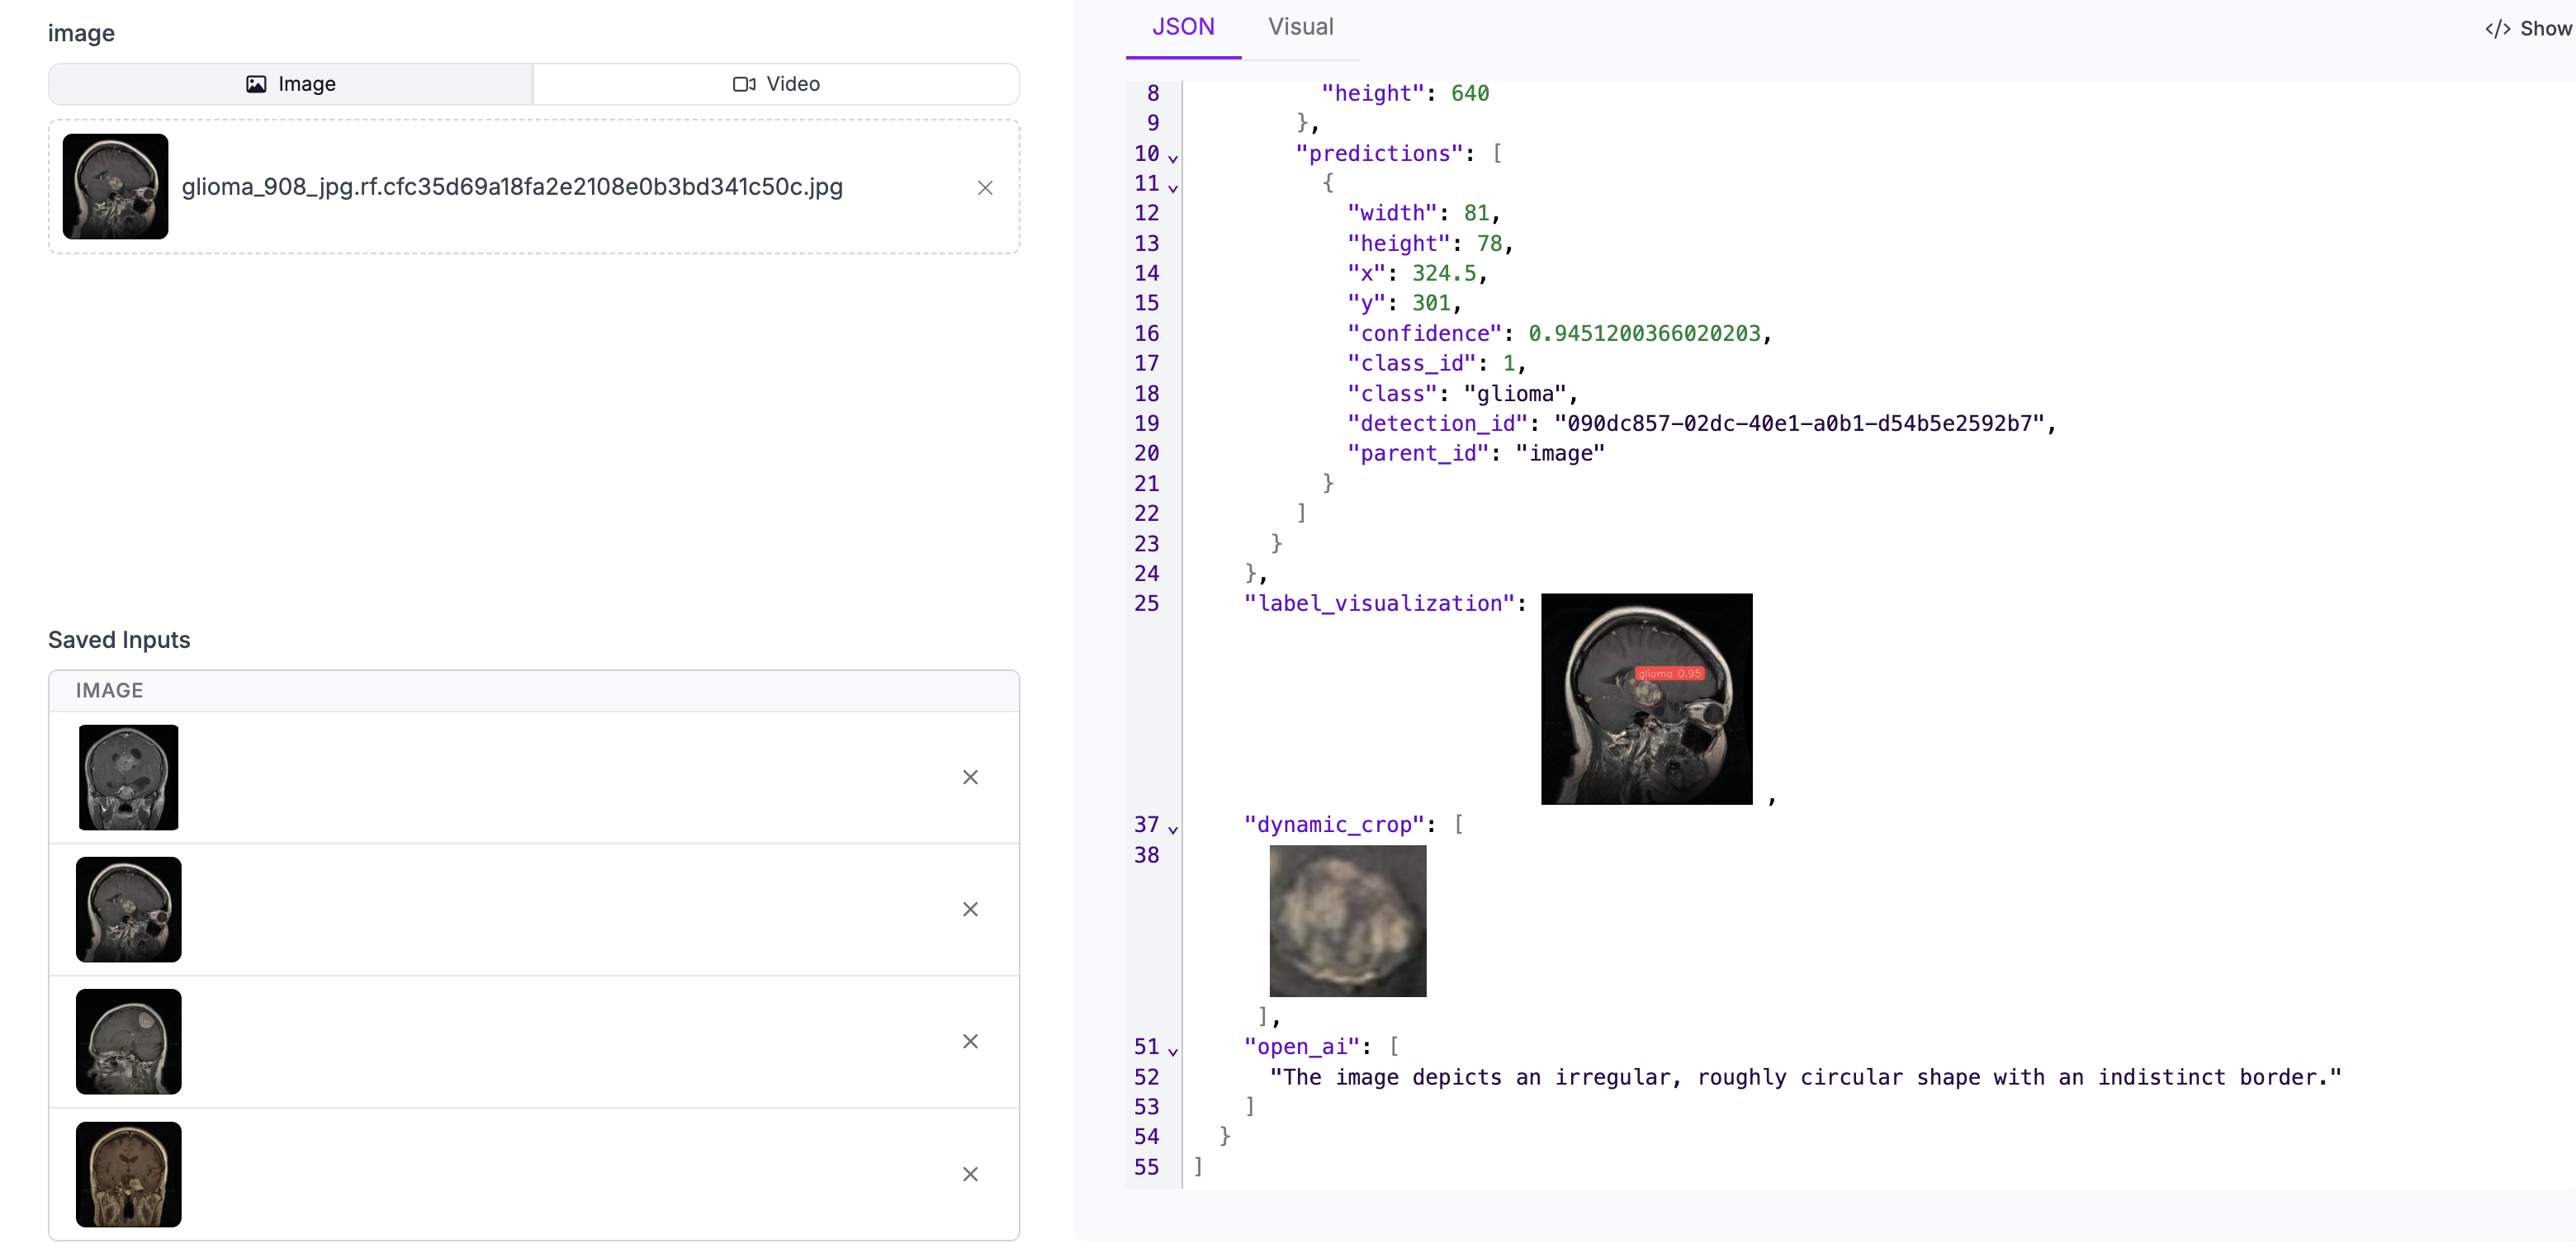
Fig 7: Image showing workflow results.
def convert_pixels_to_mm(bounding_box, conversion_factor):
    """
    Convert pixel dimensions to millimeters.

    Parameters:
    bounding_box (dict): A dictionary containing the bounding box coordinates with keys 'width', 'height', 'x', and 'y'.
    conversion_factor (float): The pixel-to-millimeter conversion factor (mm/pixel).

    Returns:
    dict: A dictionary containing the width, height, and area in millimeters.
    """
    # Extract the dimensions from the bounding box
    width_px = bounding_box['width']
    height_px = bounding_box['height']

    # Convert width and height from pixels to millimeters
    width_mm = width_px * conversion_factor
    height_mm = height_px * conversion_factor

    # Calculate the area in square millimeters
    area_mm2 = width_mm * height_mm

    # Return the dimensions and area in millimeters
    return area_mm2
prediction = result[0]['model_predictions']['predictions']['predictions'][0]
confidence = result[0]['model_predictions']['predictions']['predictions'][0]['confidence']
open_ai = result[0]['open_ai']
width_px = prediction['width']
height_px = prediction['height']
x_px = prediction['x']
y_px = prediction['y']
detection_id = prediction['detection_id']
predition_class = prediction['class']
size = convert_pixels_to_mm(prediction,0.1)

print("Below are the scan results:")
print("_ _"*30)

print(f"ID:           {detection_id}")
print(f"Prediction:   {predition_class.upper()}")
print(f"Confidence:   {confidence} ~ {int(confidence * 100)}%")
print(f"Size:         {size}mm²")
print(f"Morphology:")
for res in open_ai:
    print(f"- {res}")

print("_ _"*30)
Below are the scan results:
_ __ __ __ __ __ __ __ __ __ __ __ __ __ __ __ __ __ __ __ __ __ __ __ __ __ __ __ __ __ _
ID:           fdb02240-c9ed-41f8-abc4-ae68524bdf06
Prediction:   PITUITARY
Confidence:   0.949749231338501 ~ 94%
Size:         47mm²
Morphology:
- The image displays an irregular, roughly circular shape with a blurred appearance.
_ __ __ __ __ __ __ __ __ __ __ __ __ __ __ __ __ __ __ __ __ __ __ __ __ __ __ __ __ __ _
Live Demo:
Test Workflow
This demo uses the inference sdk.
You can also test the deployed workflow locally:
# Import the InferencePipeline object
from inference import InferencePipeline
import cv2

def video_sink(result, video_frame):
    if result.get("output_image"): # Display an image from the workflow response
        cv2.imshow("Workflow Image", result["output_image"].numpy_image)
        cv2.waitKey(1)
    print(result) # do something with the predictions of each frame


# initialize a pipeline object
pipeline = InferencePipeline.init_with_workflow(
    api_key=api_key,
    workspace_name="openvision-pkoxi",
    workflow_id="brain-surgery-workflow",
    video_reference='test-img.png', # Path to video, device id (int, usually 0 for built in webcams), or RTSP stream url
    max_fps=30,
    on_prediction=video_sink
)
pipeline.start() #start the pipeline
pipeline.join() #wait for the pipeline thread to finish
5. Impact Analysis and Future Directions
This project has the potential to transform clinical workflows by providing rapid and accurate diagnostic support for brain tumors.
Future work will focus on:
- Expanding the dataset to include diverse imaging modalities (e.g., PET scans).
- Implementing federated learning to enhance model accuracy and privacy.
- Conducting real-world clinical trials to validate the model's effectiveness in practice.

Photo by Isabella Mendes.
6. Conclusion
This project demonstrates the transformative potential of multimodal AI and Computer Vision in medical imaging analysis. By leveraging advanced computer vision techniques and visual language model processing, we have developed a robust solution that addresses key challenges in brain tumor diagnosis.
We believe that our solution has the potential to revolutionize brain cancer diagnosis and treatment, enabling clinicians to make more informed decisions and improve patient outcomes.
References
-
Jocher, G., Chaurasia, A., & Qiu, J. (2023). Ultralytics YOLOv8 (Version 8.0.0) [Software]. https://github.com/ultralytics/ultralytics (AGPL-3.0 License)
-
Roboflow. (2023). Supervision. https://github.com/roboflow/supervision (MIT License)
-
Brain tumor detection. (2024, July). Tumor Detection Dataset [Open Source Dataset]. Roboflow Universe. https://universe.roboflow.com/brain-tumor-detection-wsera/tumor-detection-ko5jp (Visited on 2024-12-03)
-
Ultralytics. (n.d.). YOLOv8 architecture. Retrieved December 3, 2024, from https://yolov8.org/yolov8-architecture/
-
Skalski, P. (2023). How to Train YOLOv8 Object Detection on a Custom Dataset. Roboflow Blog. https://blog.roboflow.com/how-to-train-yolov8-on-a-custom-dataset/
-
Gallagher, J. (2024). How to Train a YOLOv11 Object Detection Model on a Custom Dataset. Roboflow Blog. https://blog.roboflow.com/yolov11-how-to-train-custom-data/